Headsets, VR and Training
Information on how to undertake training in a Next World headset or using Next World software.
- Accessing Virtual Reality training modules
- How to administer your trainees on device
- How to share/screencast your VR view to a screen
- How to troubleshoot connection problems
- How to find insights from the training undertaken on your headset
- Reinstall Next World Home
- Headset tracking doesn't move along with you
- How to setup your controllers
- How to Access Other VR Applications
- Screencasting to an Android Device Completely Offline
- Screencasting to an Apple Device Completely Offline
- Screencasting to a Windows Device Completely Offline
- How Do I Find My Pico Device's MAC Address
- How Do I Find My Meta Device's MAC Address
Accessing Virtual Reality training modules
This article will explain how to access your desired training module once you are in the headset.
If the headset has not been setup yet, take a look at this article on setting up a headset.
Make sure you ready for training
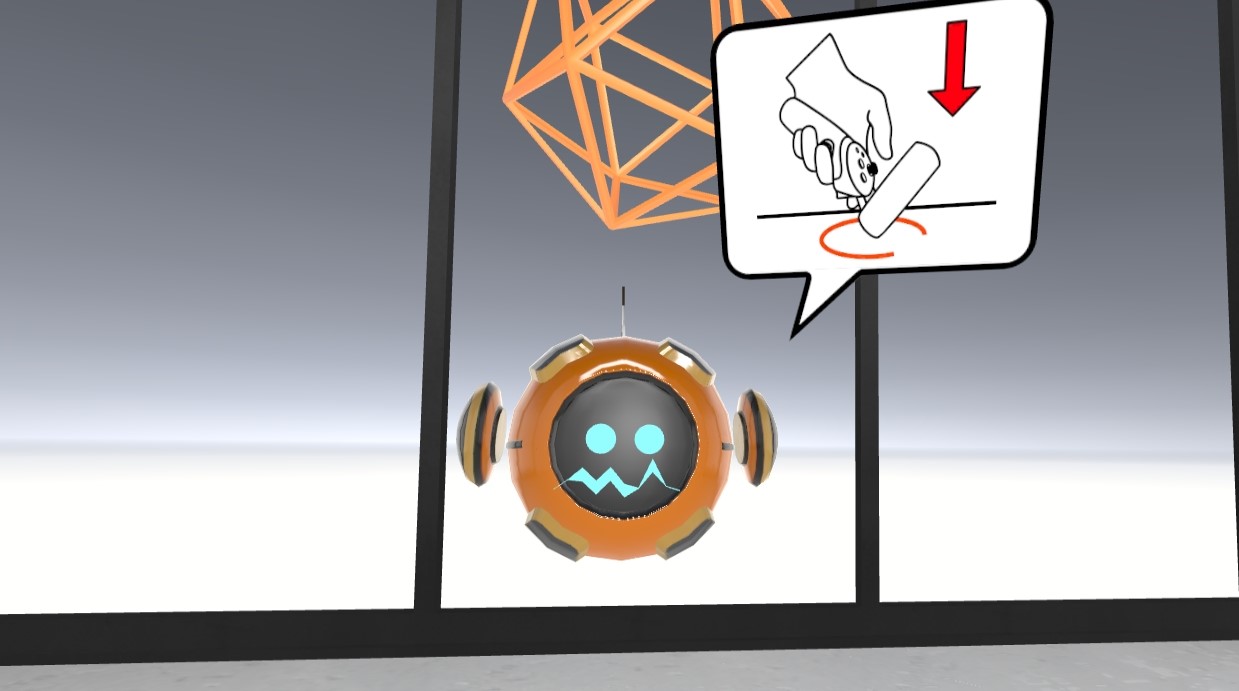
Putting on a headset and powering it on, will take you immediately to Next World Home. Here you will be greeted by E.L.I.O.T!

E.L.I.O.T will check to see that your controllers are activated, in the correct hands, and are functioning correctly. If anything is wrong, E.L.I.O.T will assist you in fixing the issue.
if you are currently seated, E.L.I.O.T may also ask you to check where the floor is. You'll be instructed to hold your controller to the ground to get an accurate reading.
Login with your access code
Once E.L.I.O.T is happy with your setup, you'll be asked to enter your login code. This is the unique 4-character code that represents you for your training. You will have received a code when scheduled for training. If you do not know your code, please talk to your trainer.
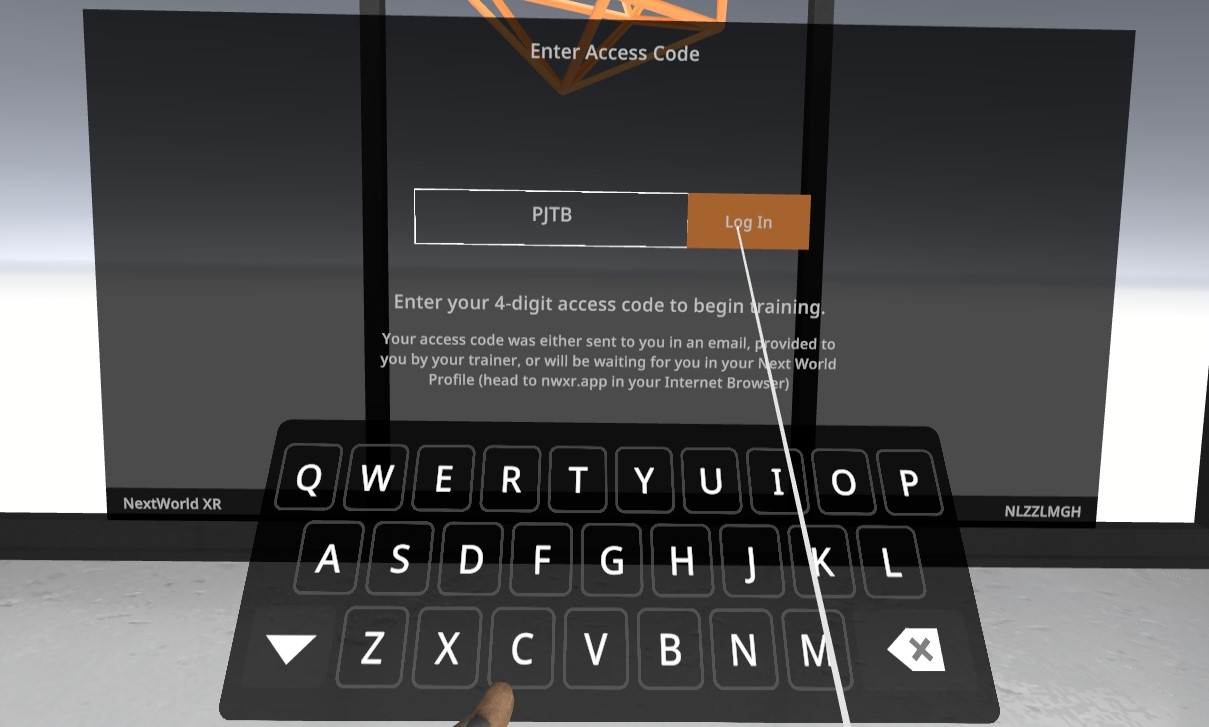 Enter your code, then click 'Log in'.
Pick the correct experience
You'll be faced with a selection of all the experiences available to you. Use the scroll bar or the joystick on the controller to look through the list, and when you find the experience you are looking for, click on it.
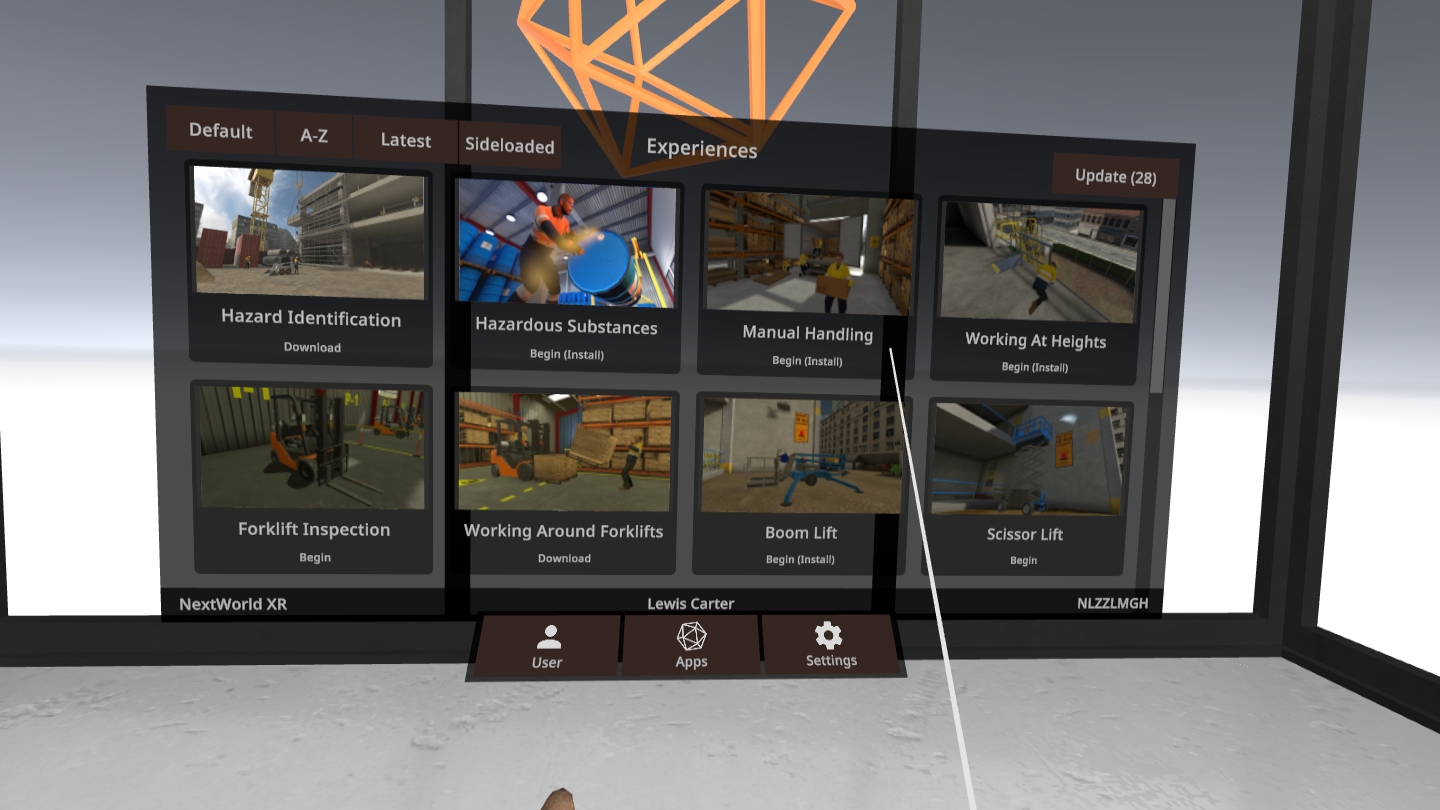 This will launch the experience. Enjoy the training!
How to administer your trainees on device
Sometimes you have trainees who don't know their access code. This article will explain how to allow those trainees to still access the training experiences with insights.
Use the headset as normal
Have the trainee follow the steps described in this article when first wearing the headset.
Enter the Trainer's code
When they have reached the access code page, have them enter your own training code. This access code signifies that you - as a trainer - are logging in.
Select the correct person from the list of Trainees
There will be a list of all your trainees to select from. Use the joystick or scrollbar to scroll through the list and find the correct person and select it.
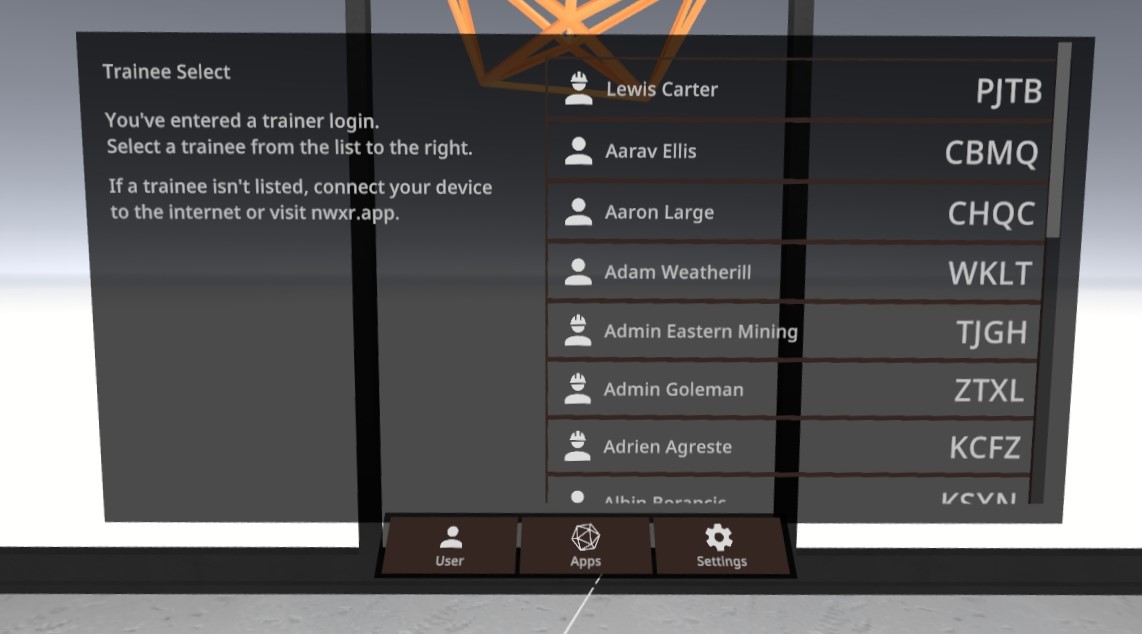 When they find their own name, make sure they take note of their code, then select their name to move on.
How to share/screencast your VR view to a screen
Screencasting allows a trainer to view what's going on in a VR headset while a trainee is using it.
Accessing screencasting
After turning on the headset and setting the player boundary, press the Pico button on your hand controller to bring up the Pico menu. From there, select the screencasting icon, which will display several options depending on whether you have internet access or not. Let's explore each of these options.
Casting to a phone or tablet
The first option is Cast to TV, which can be used with any device that has access to the Android Play Store. To use this option, download the Cast for Pico app from the Play Store on your phone, tablet, or TV, and then connect to the device from your headset by selecting "Connect" after opening the app. This option requires both the headset and the device you are casting to be connected to the same internet network.
Casting to an Internet Browser
The next option is Cast to Browser, which allows you to cast to any device that can open a Chromium-based browser, such as Chrome, Edge, or Brave. However, this option will not work for Safari or Firefox. After selecting this option, copy the IP address displayed on the screen into your internet browser. Again, both the headset and the device you are casting to must be connected to the same internet network.
Casting using Miracast
The final option we will cover is Miracasting, which is an option that does not require an internet connection. Select the icon at the top-right of the screen to see a list of available devices to cast to, such as any Smart TV with Miracasting functionality, or any Windows PC or laptop with the Connect app. If you are trying to Miracast to a Windows PC or laptop, you will first need to check if the Connect app is enabled, and if not, enable it. To connect to a device from your headset, simply select the device from the screen and it will begin casting.
How to troubleshoot connection problems
Having issues with your device not connecting? This article goes through some steps to help diagnose and solve the issue.
Troubleshooting Connections
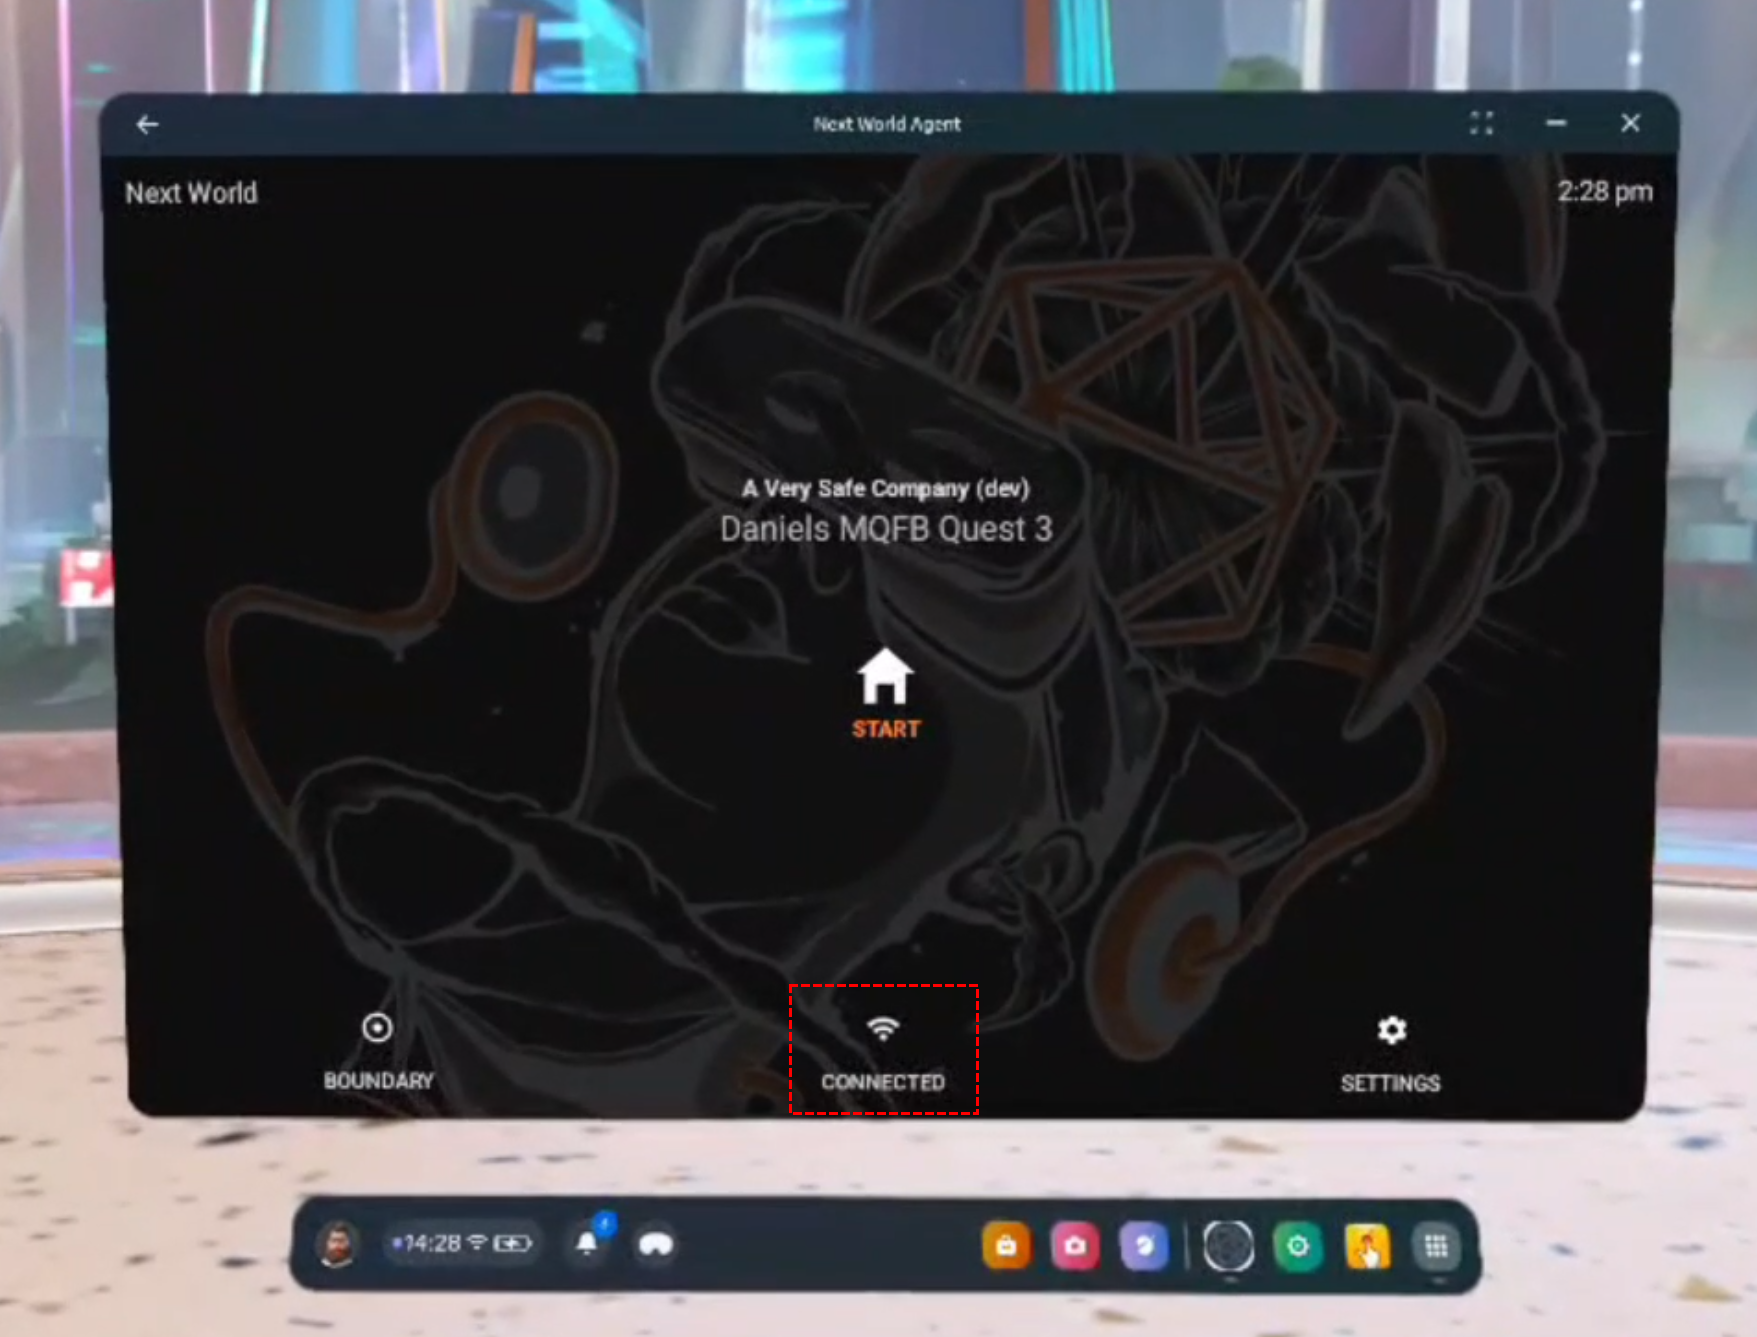
From Agent, you should be able to see the connection status and the time. The connection status should show Connected and the time set to your current time.
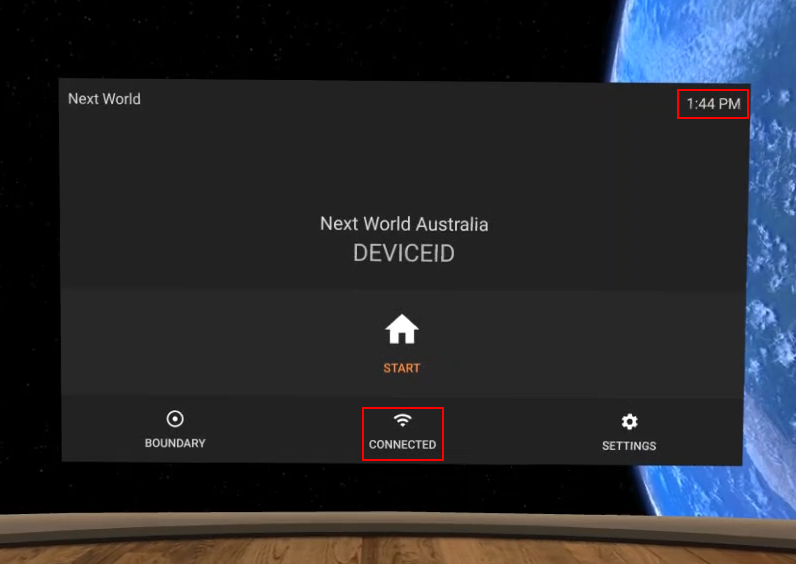
If your device isn't connected or your time is incorrect, click the Wi-Fi (middle) button and you'll be taken to the Pico's settings where you can set the Wi-Fi Network and time. Both will need to be correct to connect successfully.
Locating Version Information
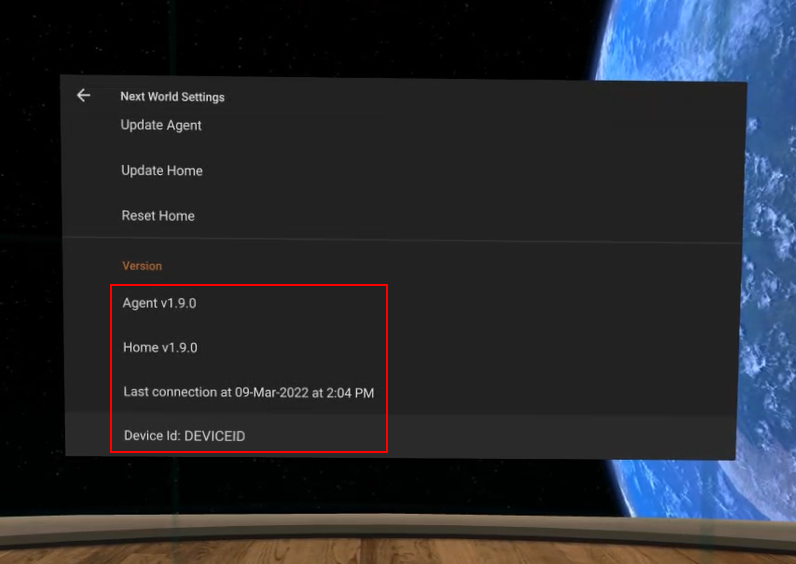
In order to check your software versions and/or last connection time: press the Settings button as shown below.

Scroll down to Version. You can see the last connection time here as well as the Agent and Home versions installed. This will also show you if updates are available for them.
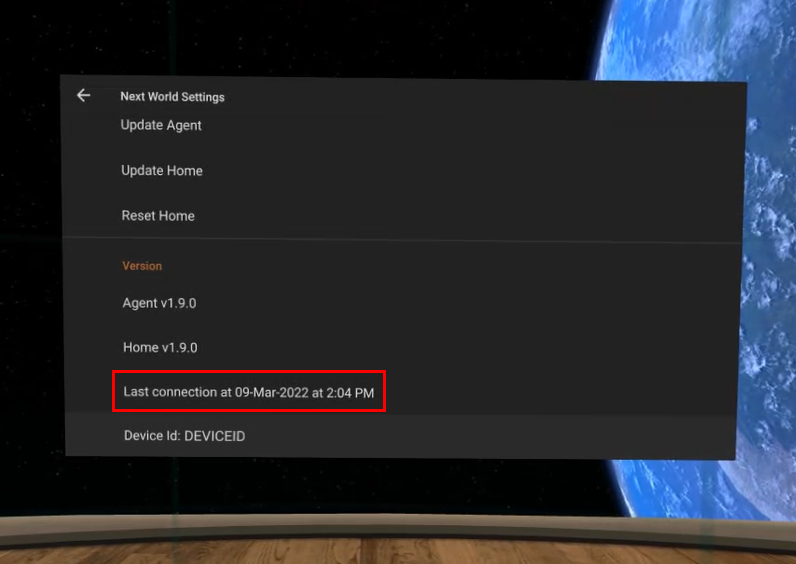
If you have been instructed to send this information to Next World Support, then you can send all the information in a single click! All you have to do is click where you see Last connection. You only need to click it once.
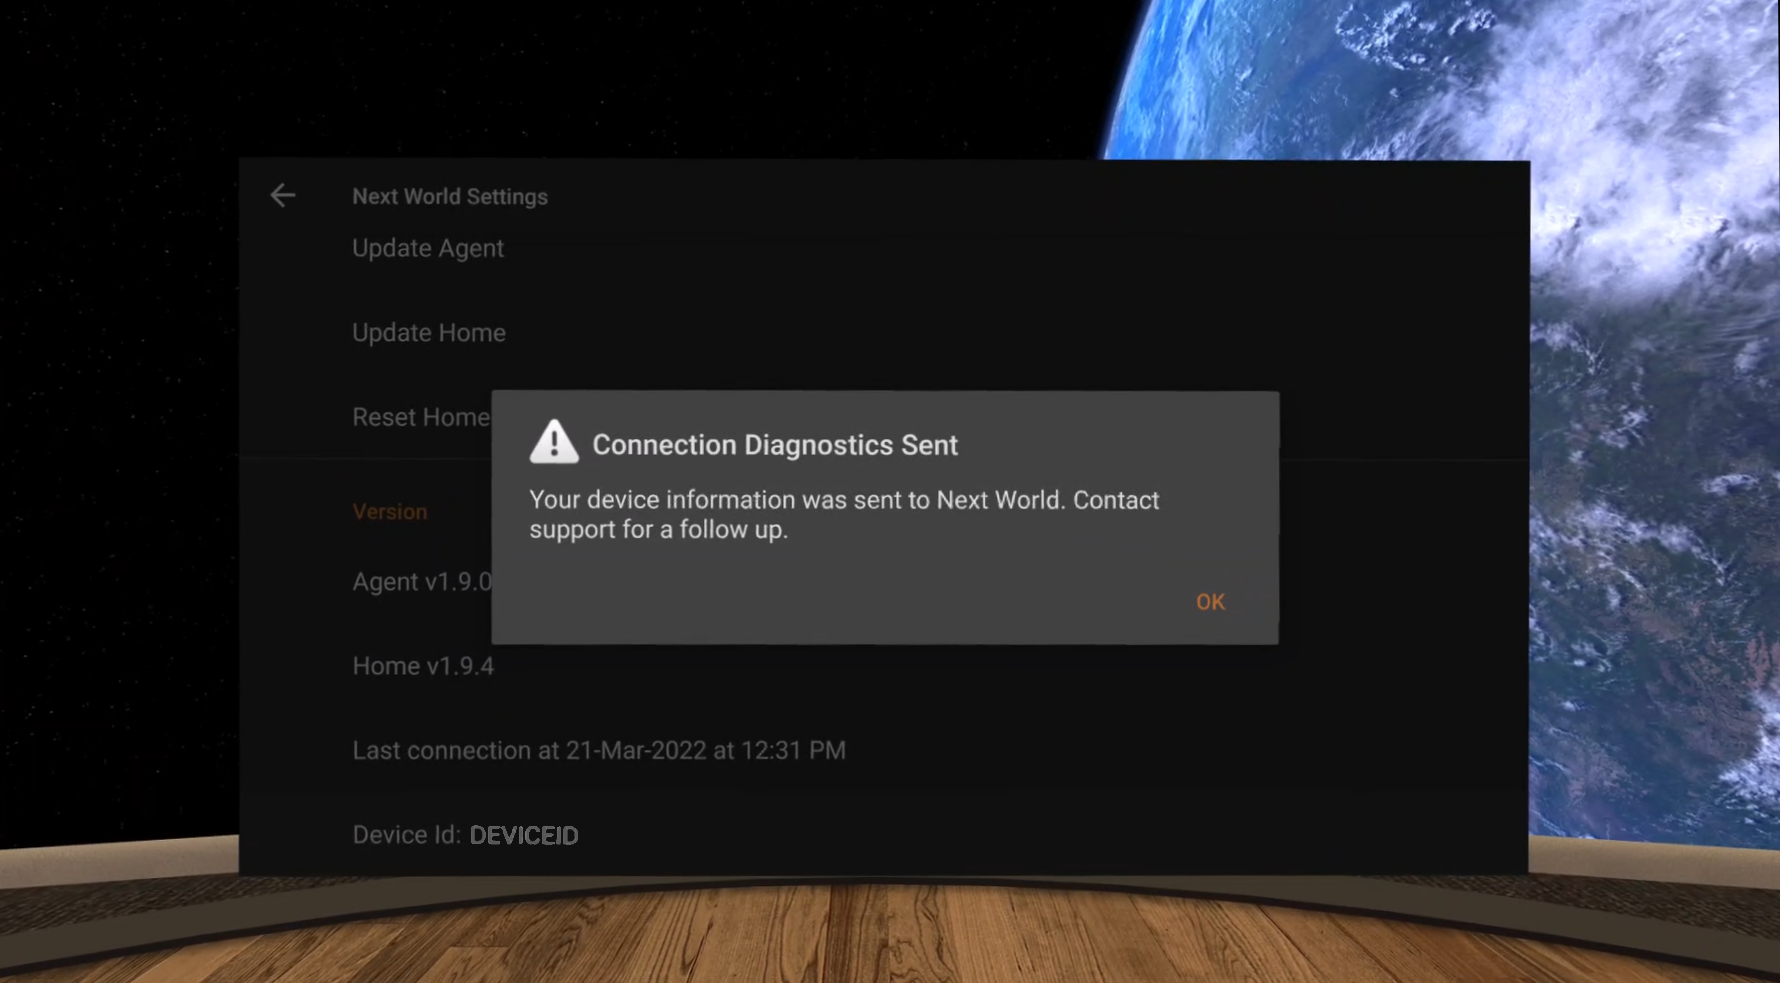
The below message will show up, which is verification that the information has been sent through to Next World Support. Contact us to get help with your connection issues.
How to find insights from the training undertaken on your headset
If you or your trainees have undertaken training on a headset, you'll likely want to view insights and course reporting from within the Next World Platform Portal.
Head to the Next World Platform Portal
To access the Portal, point your browser to http://nwxr.app, for information read the following article.
From here, you'll want to look at the Training Insights page, available in the menu to the left.
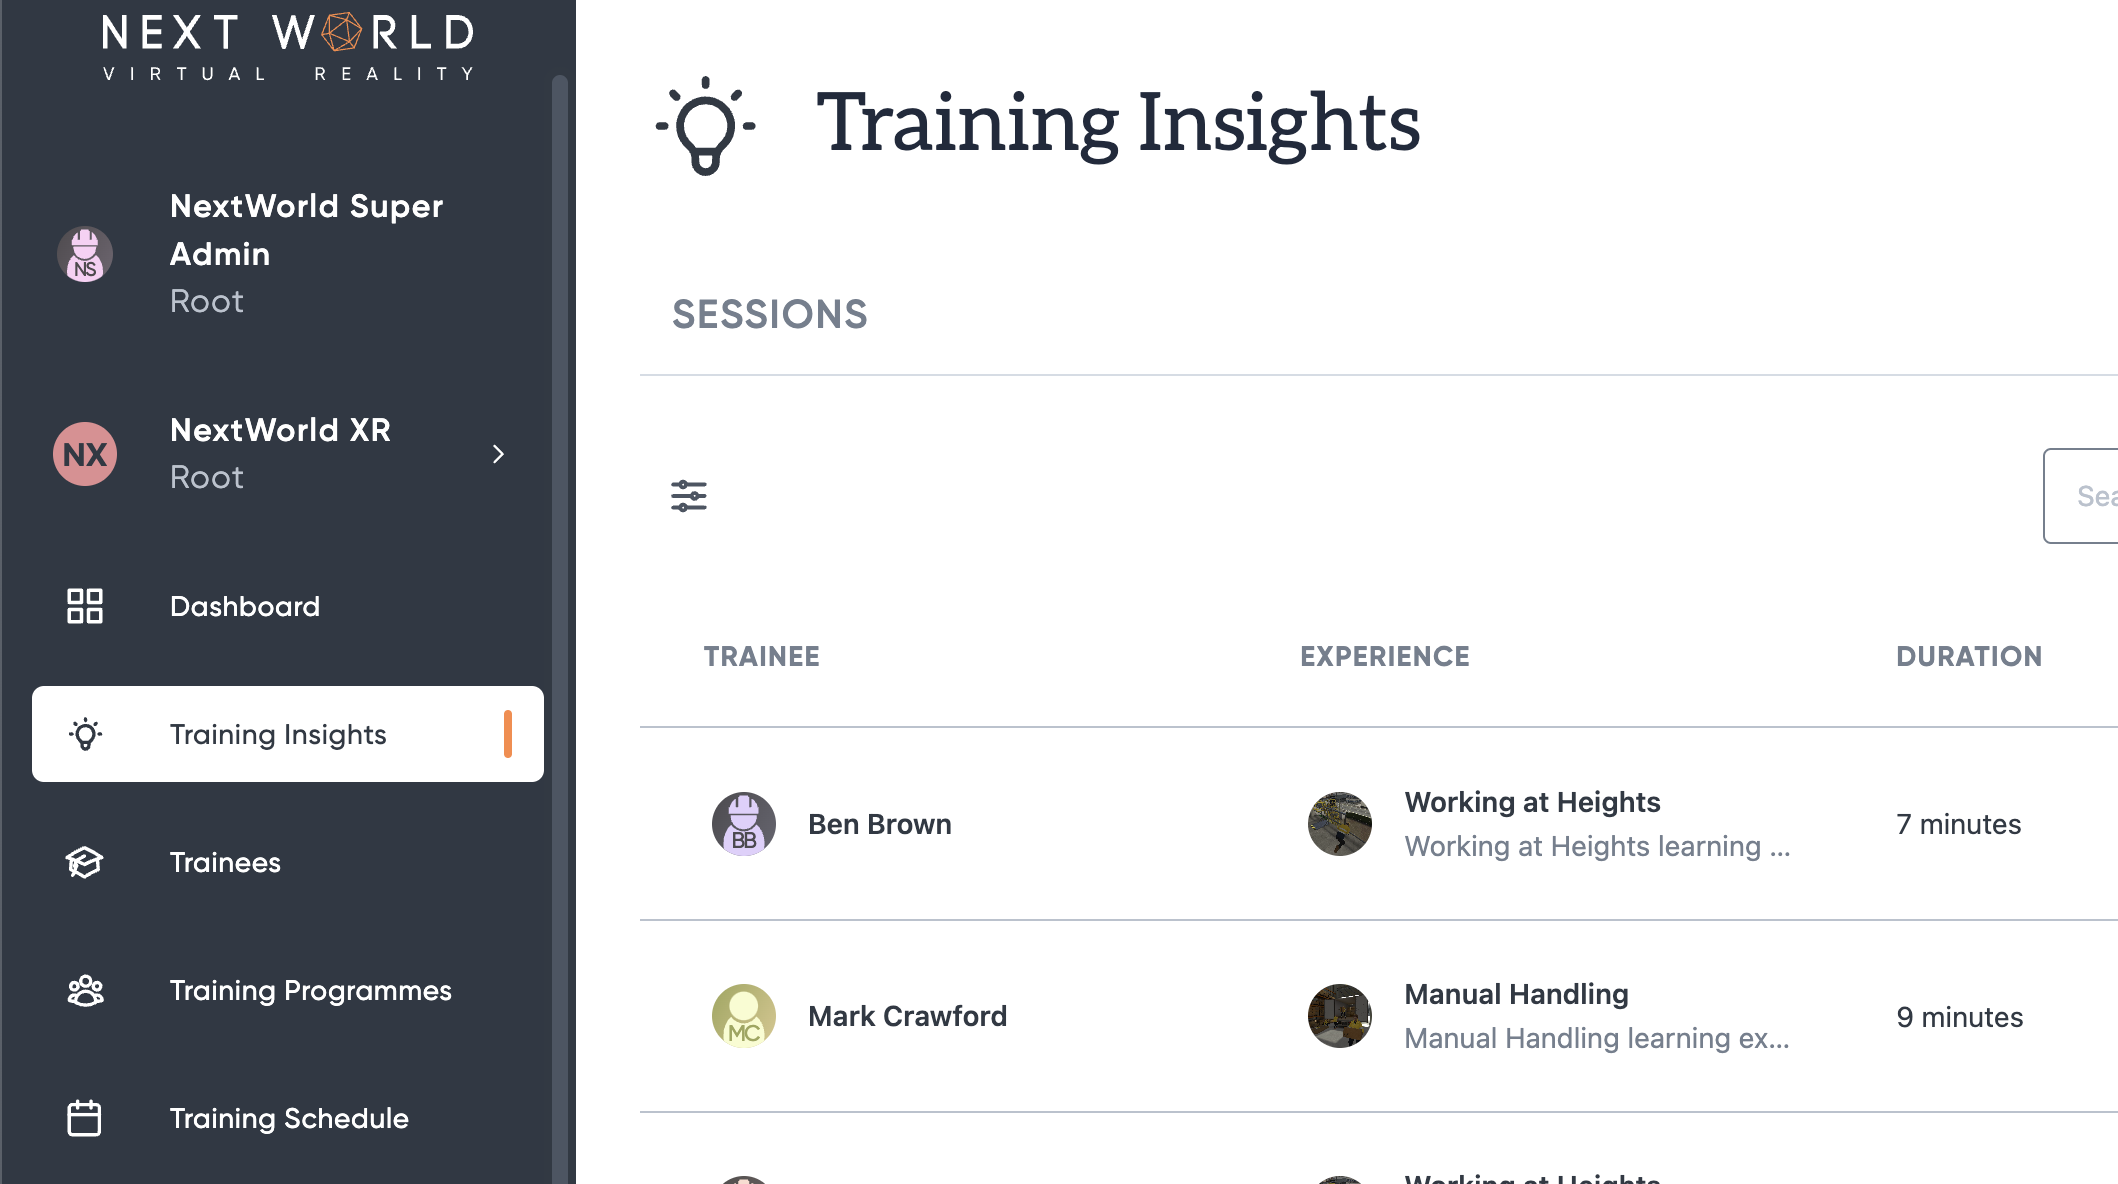
Here there's a list of recent sessions from all of the devices across your division.
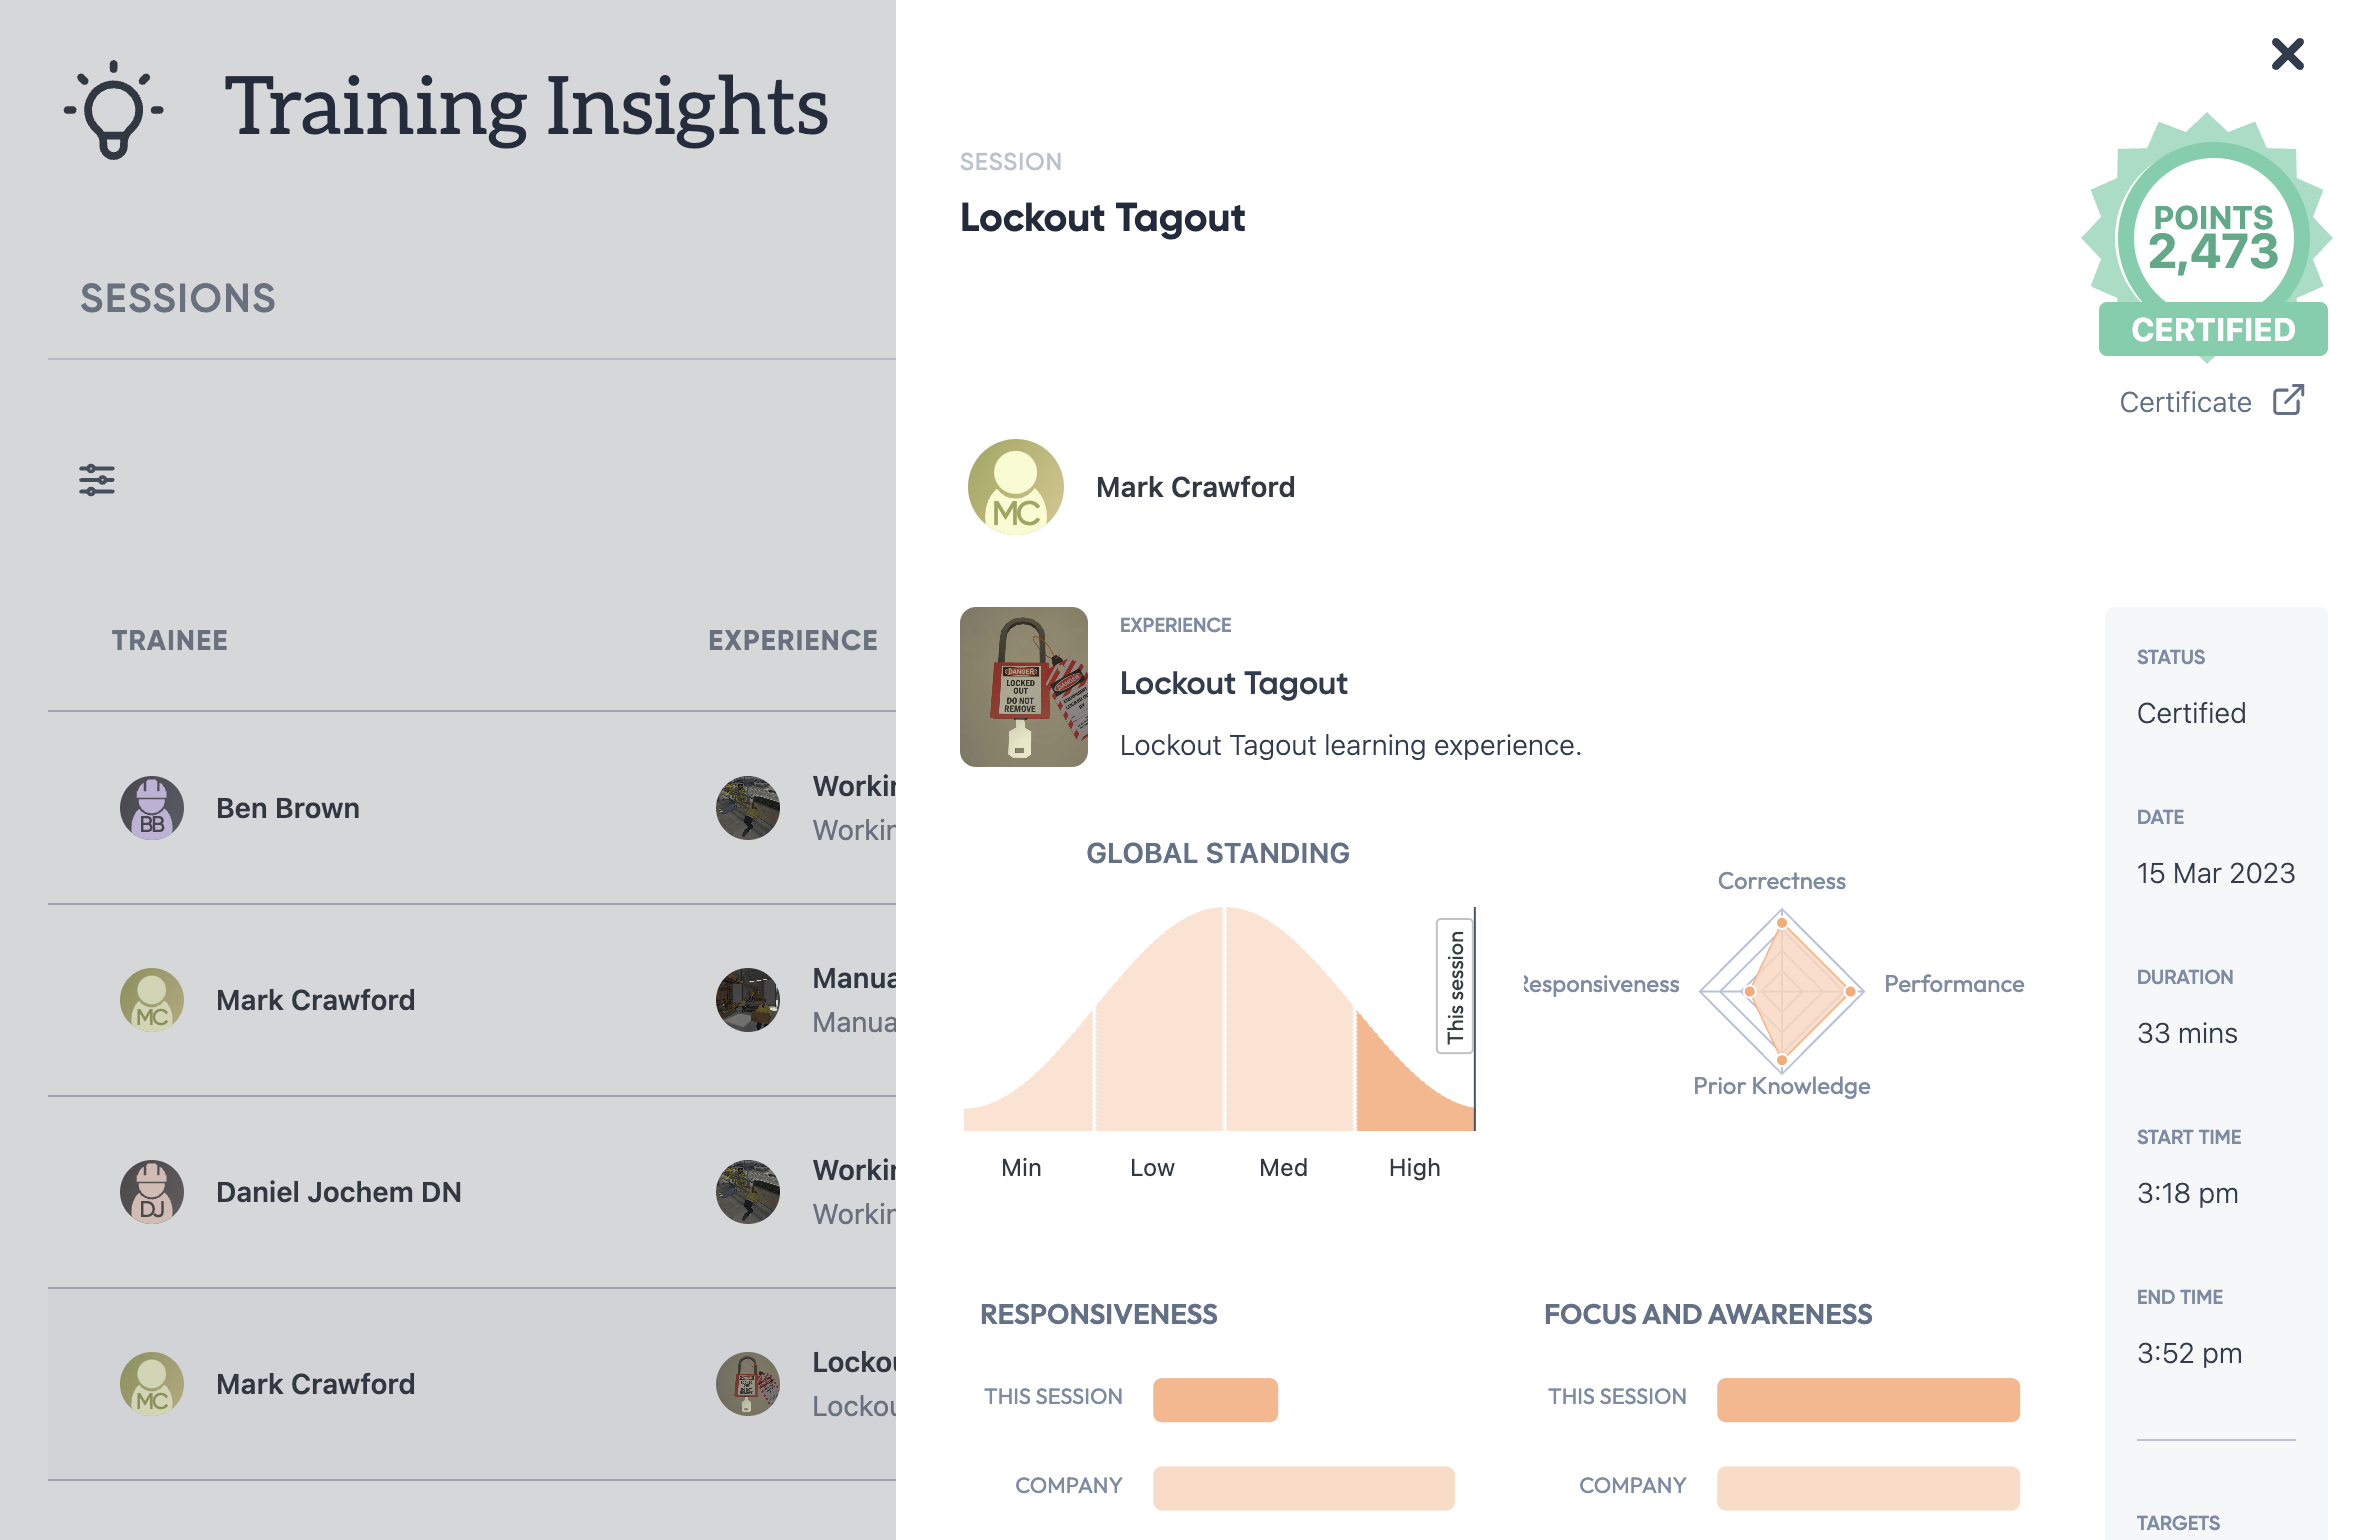
Click a session in order to view training data.
If you can't find your session
If you can't find your session, check subdivisions using the filters on the sessions table.
Reinstall Next World Home
Sometimes there may be issues that occur such as a corrupted download of an experience, in which case Next World Home needs to be reset. This article walks you through how to uninstall and reinstall Home.
Note: While you will not lose user or headset data, you will be required to re-download all of the experiences if you follow these steps.
Go to the Agent
If you are logged into Next World Home, access the Home settings by clicking on the Settings button.
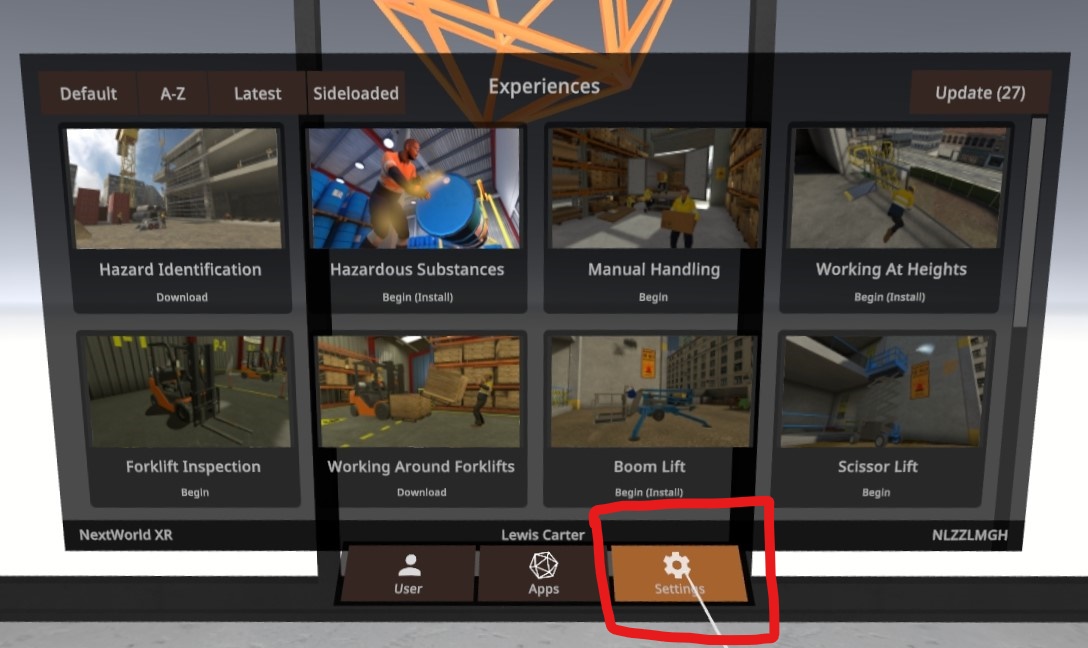
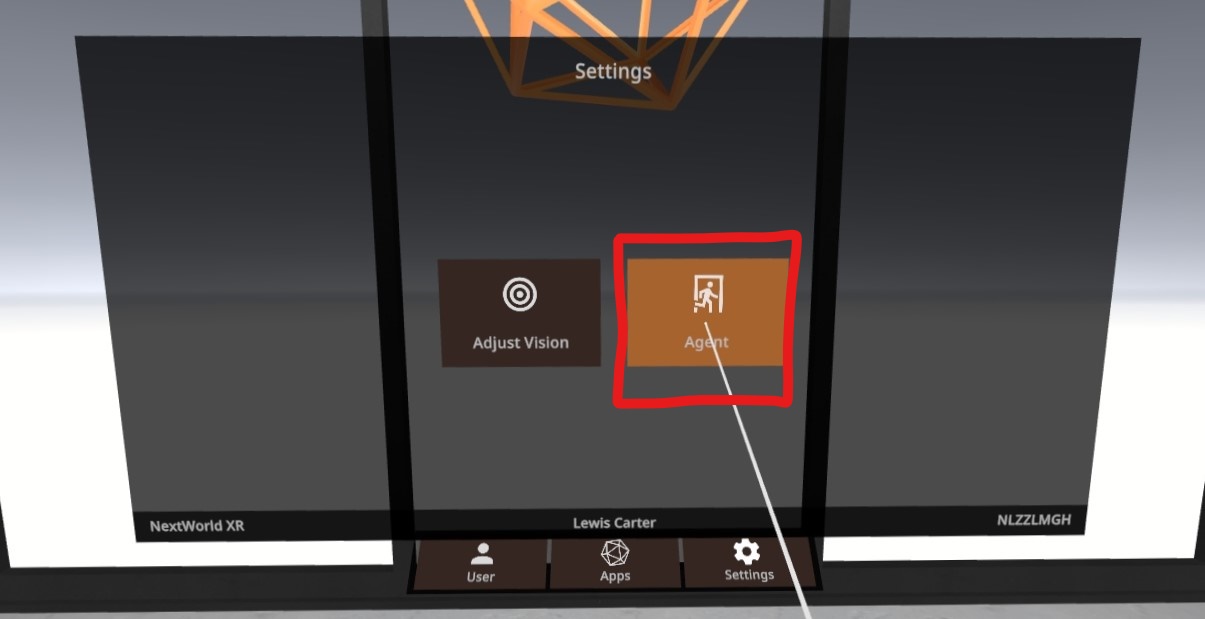
From this screen, select Agent.
Reset/Uninstall Home
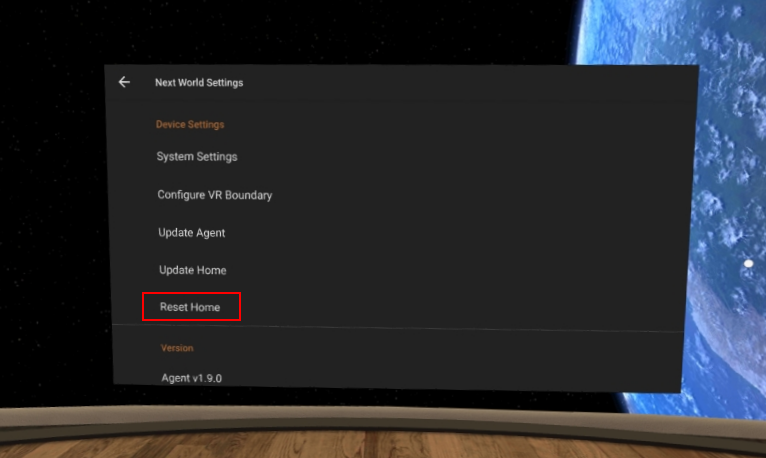
From Next World Agent, press the Settings button in the bottom-right corner.

This will take you to the Agent Settings screen. Find Reset Home, and select it.
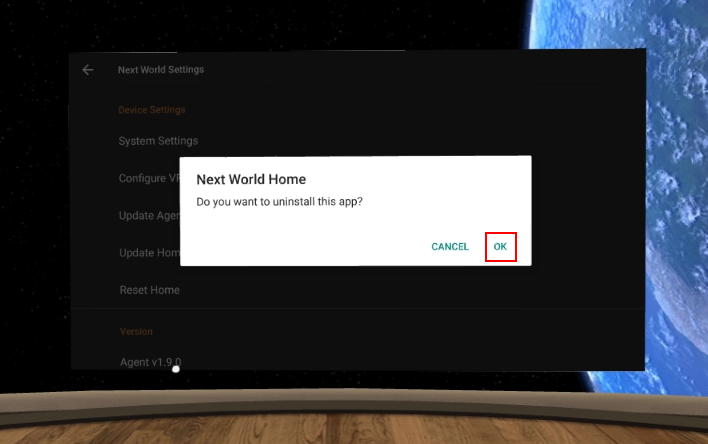
You will be asked to confirm you want to uninstall this app. Select Ok.
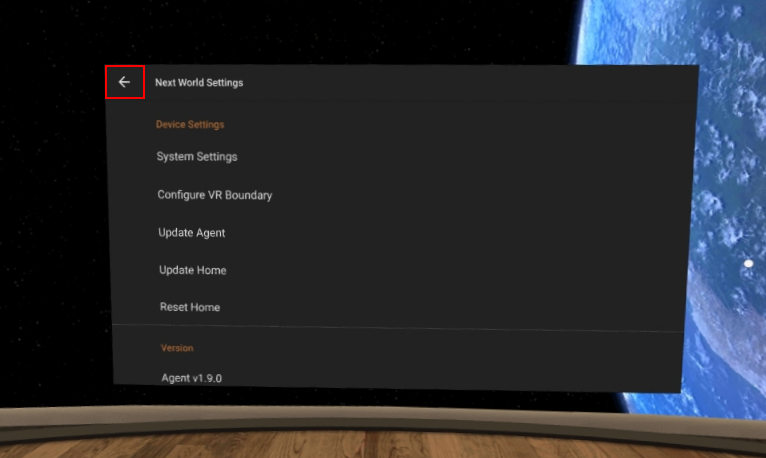
Return to the Next World Agent's main screen by clicking on the back button in the top-left.
Install Home
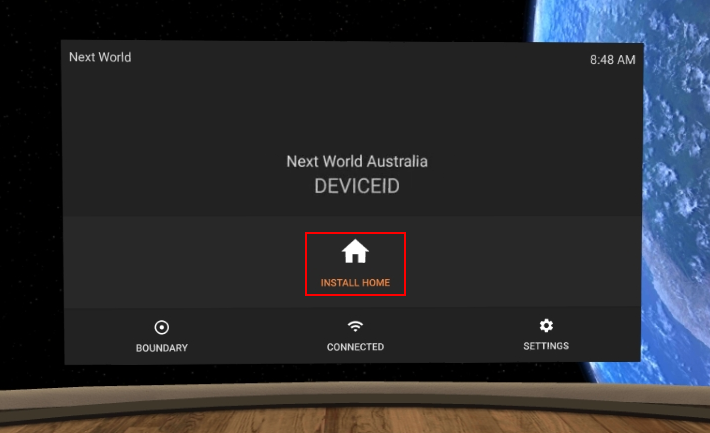
You will now be able to install Home again. Click on the Install Home button and follow the prompts on screen.
Headset tracking doesn't move along with you
All Next World experiences give you a full movement experience, where you can not just use your hands in virtual reality but lean forward, backwards, stand-up, and reach down to fully experience the training. Occasionally, an update may disable this functionality. Here is how to turn it back on to get the most out of your training.
Pico Headsets
Click on the Settings button in Next World Agent within the Pico headset.

Click on System Settings.
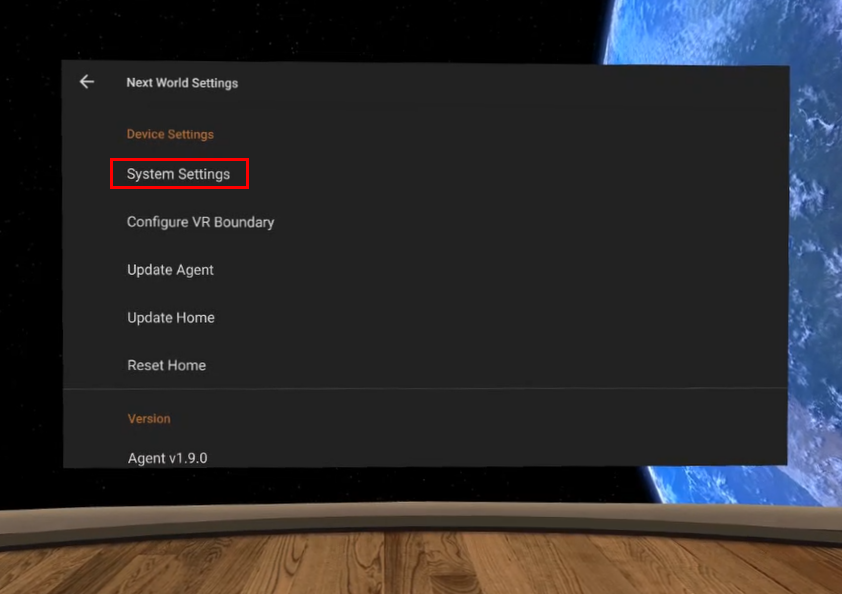
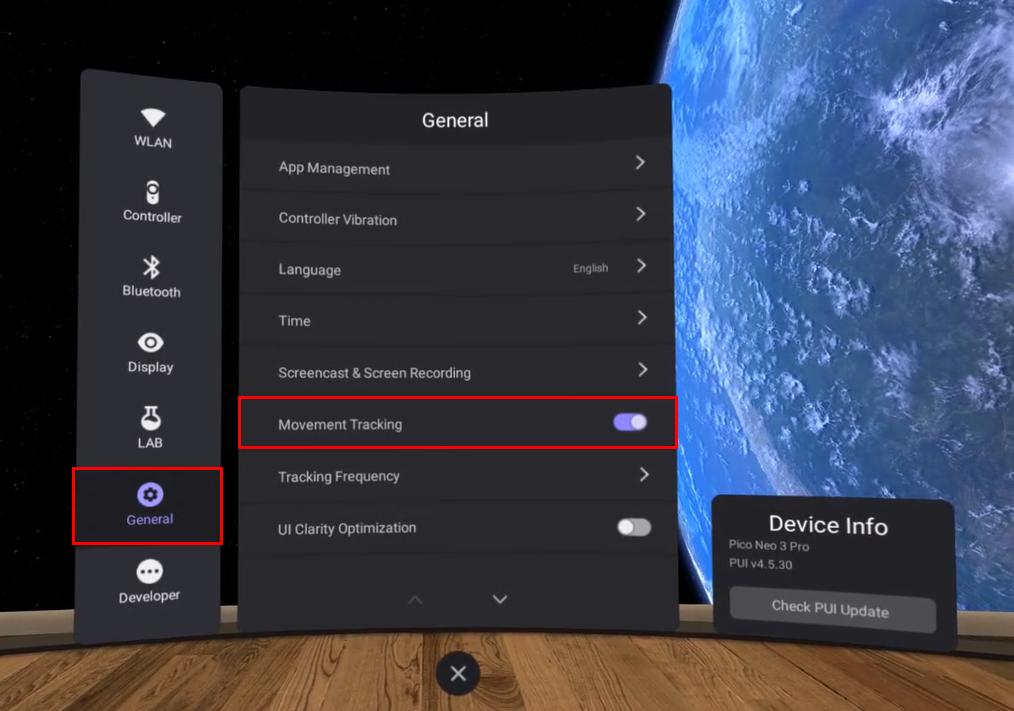
Go to General and make sure Movement Tracking is turned on.
If this does not solve your tracking issue, please contact Next World Support.
How to setup your controllers
If this is the first time your headset is being used, or you are having issues with your controllers, the following is a list of steps and checks you can do to help identify the problem.
Check for Battery Tags
It could be that the tag for the controller's battery has not been removed which would mean the current from the battery is not able to flow. The left side of the left controller or the right side of the right controller can be removed by sliding it (with a little bit of force) towards the bottom of the controller. Check if there is a small white tag on one end of one of the batteries and if so, remove it.
Test for Dead Batteries
If this is not the case, the issue could simply be that the batteries have run out. If you have two spare AA batteries available, you could try replacing the batteries.
Re-bind the Controller to the headset
If this still does not solve the issue, then you may need to bind the controller to the headset again. Follow the instructions below to un-bind and re-bind a controller.
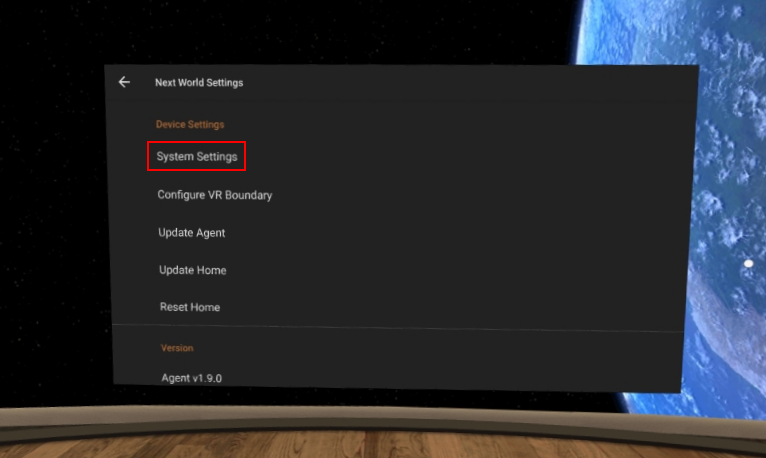
Press the Settings button on Next World Agent.

Press the System Settings button.
Go to Controller and then press either Unbind the left controller if you are having issues with your left controller or Unbind the right controller if it is the right controller that is having issues.
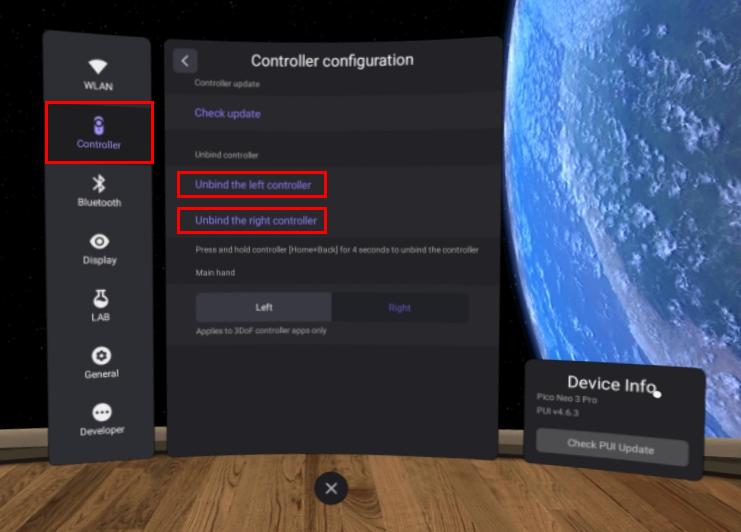
Now press Add controller for the controller you unbound and follow the instructions displayed in green to re-bind your controller.

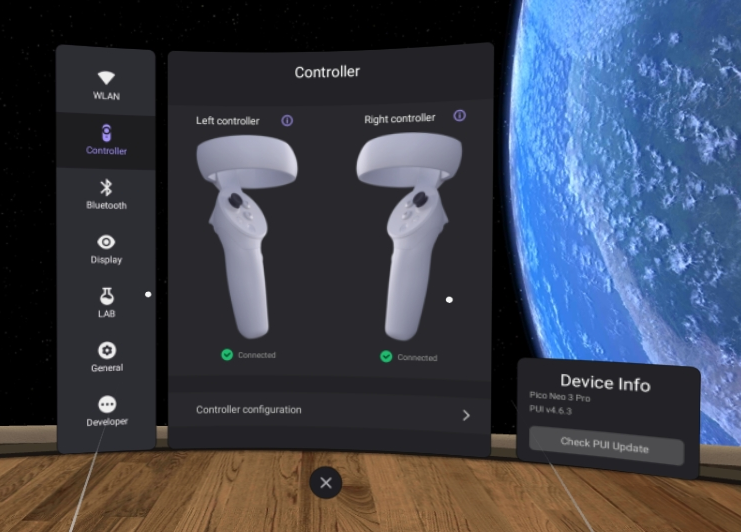
Both controllers should now be working, with Connected appearing on screen below each of the controllers.
If none of these troubleshooting steps solved the issue you are having with the controller, please send Next World Support an email stating you have tried all the possibilities in this article, and we will assist you further.
How to Access Other VR Applications
How to Access Non-Next World Applications
The Next World software natively runs in kiosk-mode, meaning it only allows one application (Next World Home) to run. However, if you need to access other Apps installed on your device, you can do so by following the below steps:
-
From the main agent screen, select the Settings button on the bottom right to go to Next World Agent's settings
- Scroll down and select System Apps
- Click on Appmanager and select "yes" to launch. This will show you all of the currently installed Apps on your device
To go back to the Next World Agent, select Back or Exit on the bottom navigation buttons until your reach the home screen.
Screencasting to an Android Device Completely Offline
The below steps will walk you through how to set up a hotspot on your Android device so that you can screencast your Pico to your Android device completely offline.
Step 1. Turn off mobile data
-
Open the "Settings" app on your Android device. You can usually find it in the app drawer or by swiping down and tapping the gear-shaped Settings icon in the notification shade.
-
In the Settings app, look for the "Network & internet" or "Connections" section (the name might vary depending on your device’s manufacturer and Android version).
-
Within this section, you should see "Mobile data”, "Data usage", or similar options. Tap on it to access the mobile data settings.
-
On the mobile data settings page, you'll see a toggle switch or checkbox to enable or disable mobile data. Tap on the switch or uncheck the box to turn off mobile data.
-
A confirmation dialog may appear. Tap "OK" or "Disable" to confirm the action.
Step 2. Turn on the hotspot
-
Within the "Network & internet" or "Connections" section, look for the "Hotspot & tethering" or "Mobile hotspot & tethering" option, and tap on it.
-
You should see a toggle switch or an option labeled "Mobile Hotspot," "Portable Hotspot," or "Tethering." Tap on the toggle switch or the option to turn on the hotspot.
Do not turn off (or disable) the Wi-Fi/WLAN because Hotspot needs the Wi-Fi/WLAN to work.
Step 3. Connect your VR Headset to the Mobile Hotspot of your Android device
-
Within Next World Agent, go to its settings and press on the first option (“Configure Connection”).
-
Select the mobile hotspot of your Android device
Step 4. Screen cast to your browser
-
Press the Pico button on your controller to open the Pico menu in your headset.
-
Press the “Screencast” Icon on the left.
-
Choose the “Cast to Browser” option in the middle.
-
Type the Screencast web address shown on your headset to your mobile device’s web browser.
-
Click the “Start Screencast” button on your mobile device’s web browser.
-
A dialog will open in your headset requesting permission to allow Screencast. Select the “Allow” button.
All set. Your headset will now screencast to your Android device completely disconnected from the internet.
Screencasting to an Apple Device Completely Offline
The below steps will walk you through how to set up a hotspot on your Apple device so that you can screencast your Pico to your Apple device completely offline.
Step 1. Turn off mobile data
-
Unlock your iOS device and find the "Settings" app on the home screen. The Settings app icon looks like a gear.
-
In the Settings app, scroll down and look for the "Cellular" or "Mobile Data" option. The name may vary depending on your iOS version and region.
-
You'll see a toggle switch next to "Cellular Data" or "Mobile Data." Tap on the toggle switch to turn off mobile data. When the toggle switch is in the off position, it will be grayed out.
-
A pop-up message may appear to confirm that you want to turn off mobile data. Tap "Turn Off" to confirm.
Step 2. Turn on the hotspot
-
In the Cellular or Mobile Data settings, you'll see an option called "Personal Hotspot" or "Mobile Hotspot." Tap on it to access the Personal Hotspot settings.
-
On the Personal Hotspot screen, you'll see a toggle switch next to "Personal Hotspot" or "Allow Others to Join". Tap on the toggle switch to turn on the hotspot. The switch should turn green or show "On" when the hotspot is active.
Do not turn off (or disable) the Wi-Fi because Hotspot needs the Wi-Fi to work.
Step 3. Connect your VR Headset to the Mobile Hotspot of your Apple device
-
Within Next World Agent, go to its settings and press on the first option (“Configure Connection”).
-
Select the mobile hotspot of your Apple device
Step 4. Screen cast to your browser
-
Press the Pico button on your controller to open the Pico menu in your headset.
-
Press the “Screencast” Icon on the left.
-
Choose the “Cast to Browser” option in the middle.
-
Type the Screencast web address shown on your headset to your mobile device’s web browser.
-
Click the “Start Screencast” button on your mobile device’s web browser.
-
A dialog will open in your headset requesting permission to allow Screencast. Select the “Allow” button.
All set. Your headset will now screencast to your Apple device completely disconnected from the internet.
Screencasting to a Windows Device Completely Offline
The below steps will walk you through how to set up a hotspot on your Windows device so that you can screencast your Pico to your Windows device completely offline.
Step 1. Turn on Mobile Hotspot
-
Press the "Windows + I" keys on your keyboard to open the Settings app.
-
In the Settings window, select "Network & Internet" from the available options.
-
On the left pane, choose "Mobile hotspot."
-
In the Mobile hotspot section, toggle the switch to turn on "Share my Internet connection with other devices."
Step 2. Disconnect From Wi-Fi Network
-
Look at the bottom-right corner of your screen, where you'll find the system tray and the network icon (it looks like Wi-Fi signal bars or a computer monitor with wireless signals).
-
Click on the network icon once. A list of available Wi-Fi networks should appear.
-
From the list, locate and click on the Wi-Fi network to which you are currently connected. It will have a checkmark or say "Connected" next to it.
-
Click on the "Disconnect" button for the selected network. This will disconnect your computer from the Wi-Fi network.
-
Uncheck “Connect Automatically” to keep your computer not connected to any Wi-Fi network.
-
Try opening a website on your browser to confirm that your computer doesn’t have the internet.
Do not turn off or disable the Wi-Fi adapter because Hotspot needs the Wi-Fi adaptor to work.
Step 3. Connect your VR Headset to the Mobile Hotspot of your Windows device
-
Within Next World Agent, go to its settings and press on the first option (“Configure Connection”).
-
Select the mobile hotspot of your Windows device
Step 4. Screen cast to your browser
-
Press the Pico button on your controller to open the Pico menu in your headset.
-
Press the “Screencast” Icon on the left.
-
Choose the “Cast to Browser” option in the middle.
-
Type the Screencast web address shown on your headset to your mobile device’s web browser.
-
Click the “Start Screencast” button on your mobile device’s web browser.
-
A dialog will open in your headset requesting permission to allow Screencast. Select the “Allow” button.
All set. Your headset will now screencast to your Windows device completely disconnected from the internet.
How Do I Find My Pico Device's MAC Address
Your IT department may request you to find the MAC address of the Pico you use. In this case, it is reasonably easy to view it to then pass along to your IT department.
1. Within Next World Agent on the headset, click on the connection button down the bottom.

2. Scroll right down to the bottom of the WLAN settings. You will see an option "Add Network". Click this option.

3. Scroll right down to the bottom and you will see an option called "Wi-Fi preferences". Click this button.

4. Click on "Advanced" and you will see one of the options is "MAC address". Copy it down and send it to the relevant person in your IT department.


How Do I Find My Meta Device's MAC Address
Your IT department may request you to find the MAC address of the Meta device you use. In this case, it is reasonably easy to view it to then pass along to your IT department.
1. Within Next World Agent on the headset, click on the connection button down the bottom.
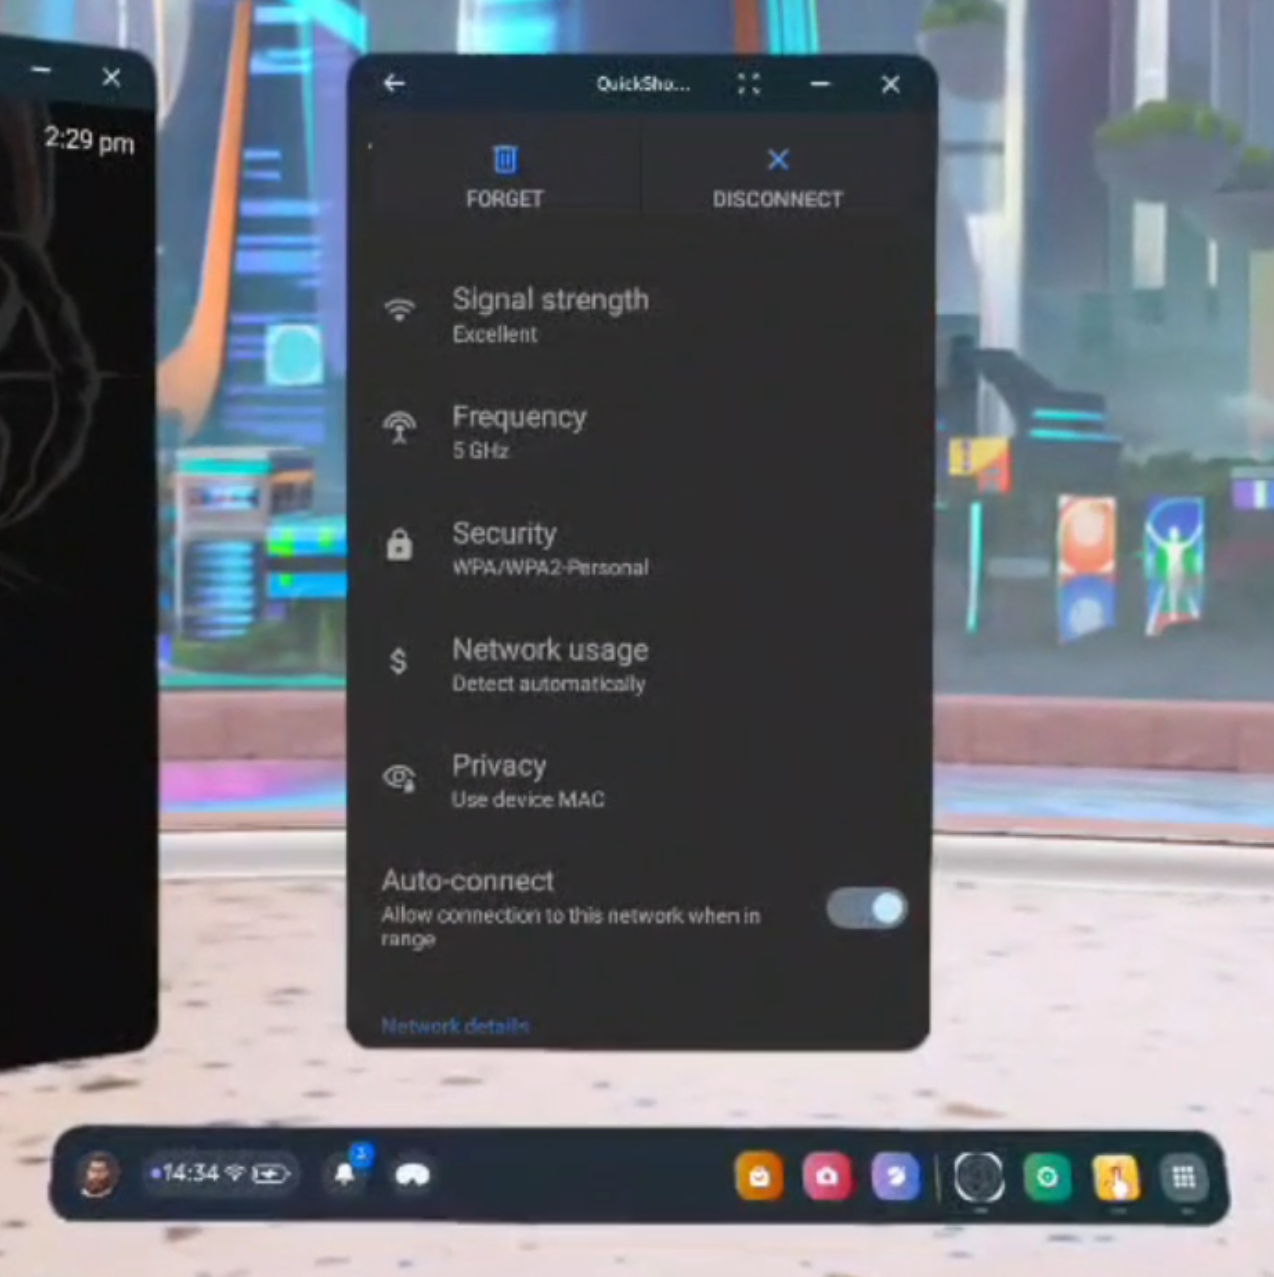
2. A list of Wi-Fi connections will appear, click on the one your device is connected to.

3. Scroll down until you see an option titled 'Privacy'. If it says Use randomised MAC (default) then continue to step 4, otherwise if it says Use device MAC then skip to step 5.
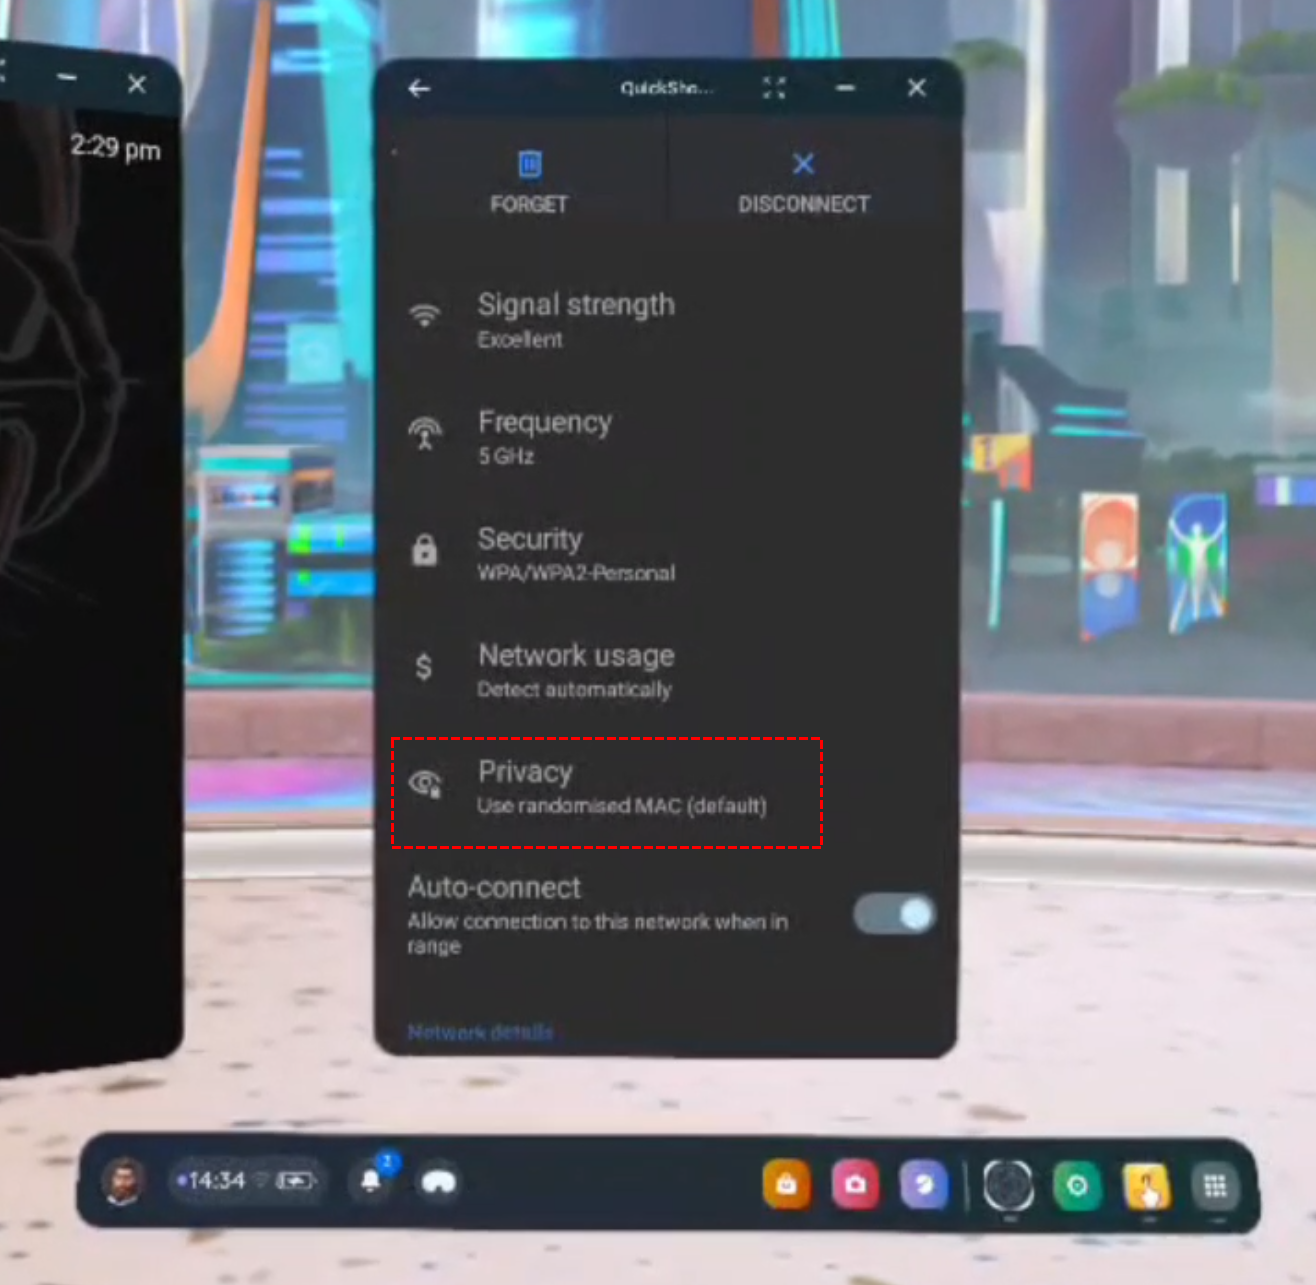
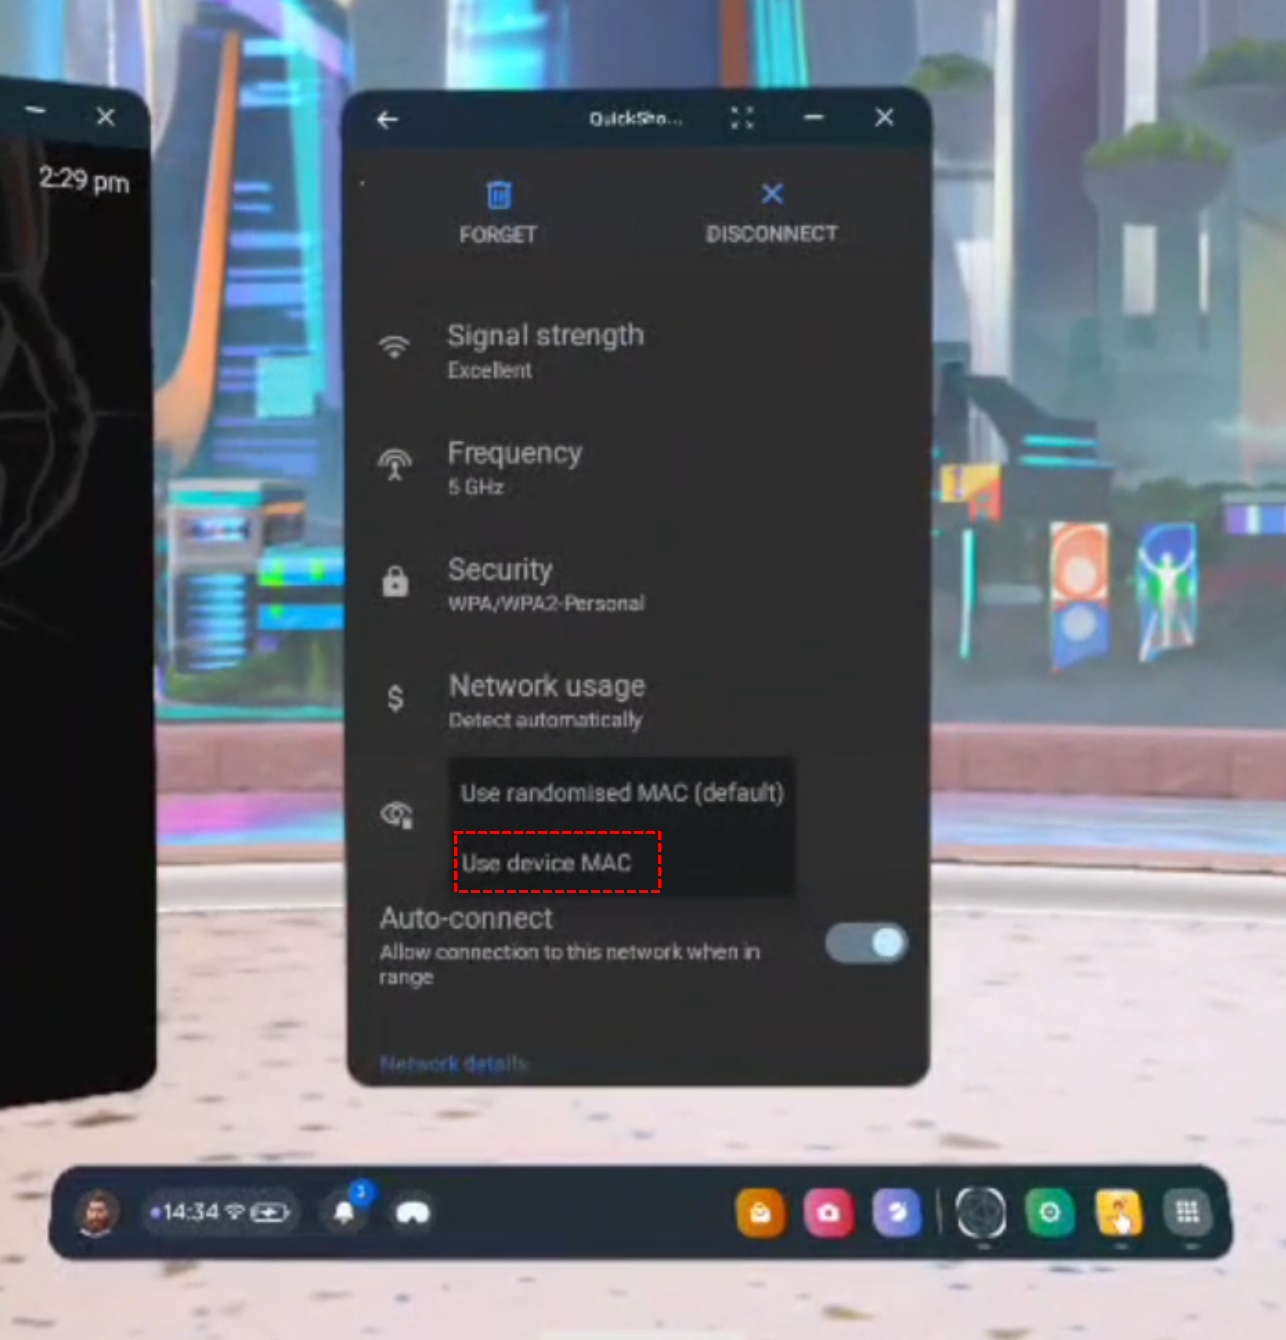
4. Clicking on the Privacy option highlighted above, a small menu will appear as shown below. Select Use device MAC.
5. Now scroll down until you see an option that says Device MAC address. on the line below the title you will see a MAC address, for example in the below image the device's MAC address is c0:dd:8a:3f:1a:40.
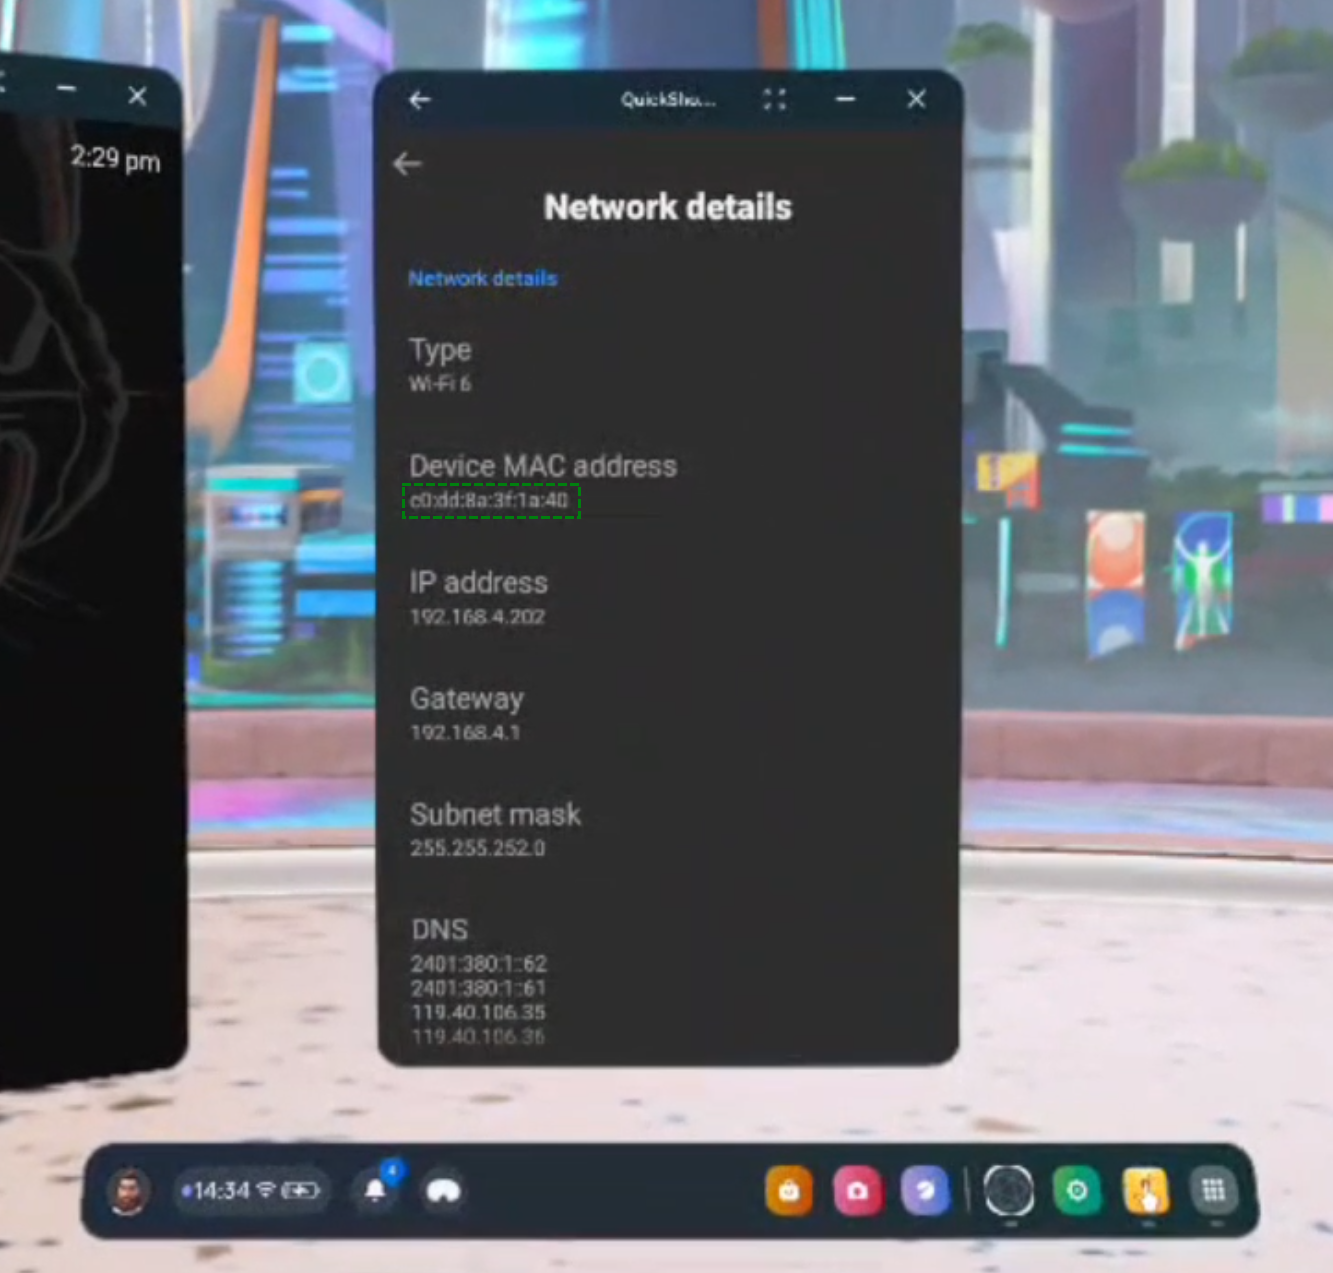
Success! Take note of your device's MAC address to send to the relevant people.