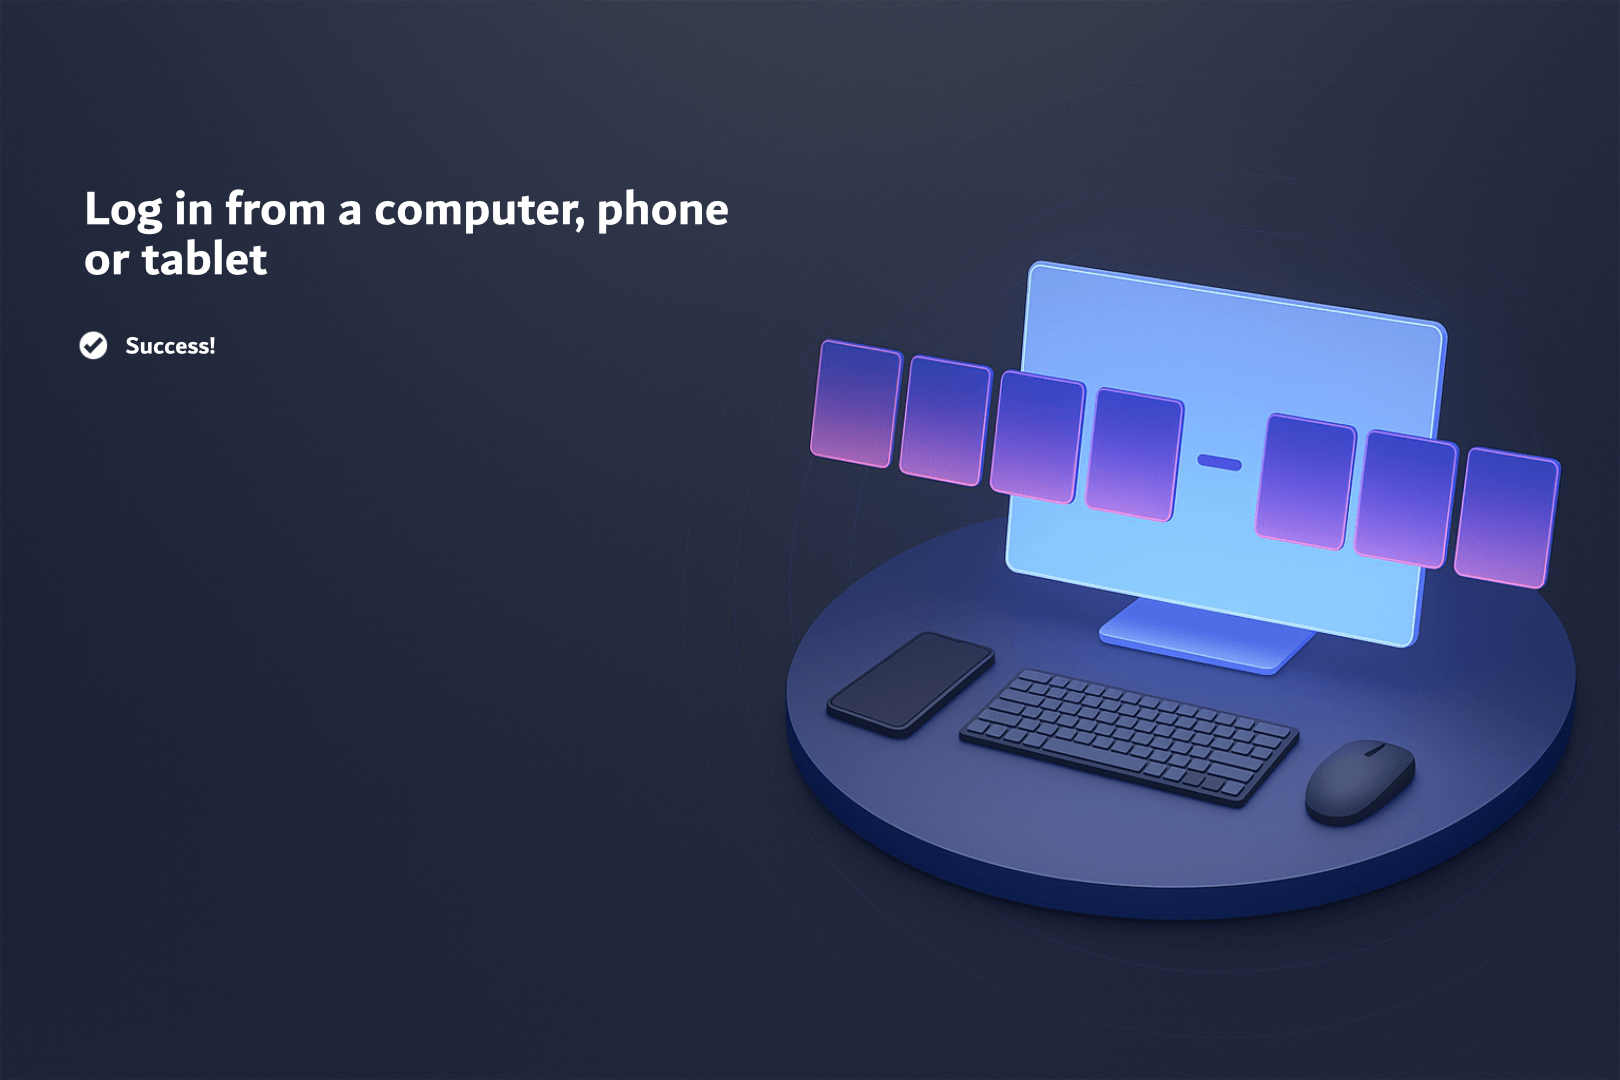
# Setting up Next World and Software Installation
Information on how to get going on Next World training and management.
# Components, Glossary and Terms
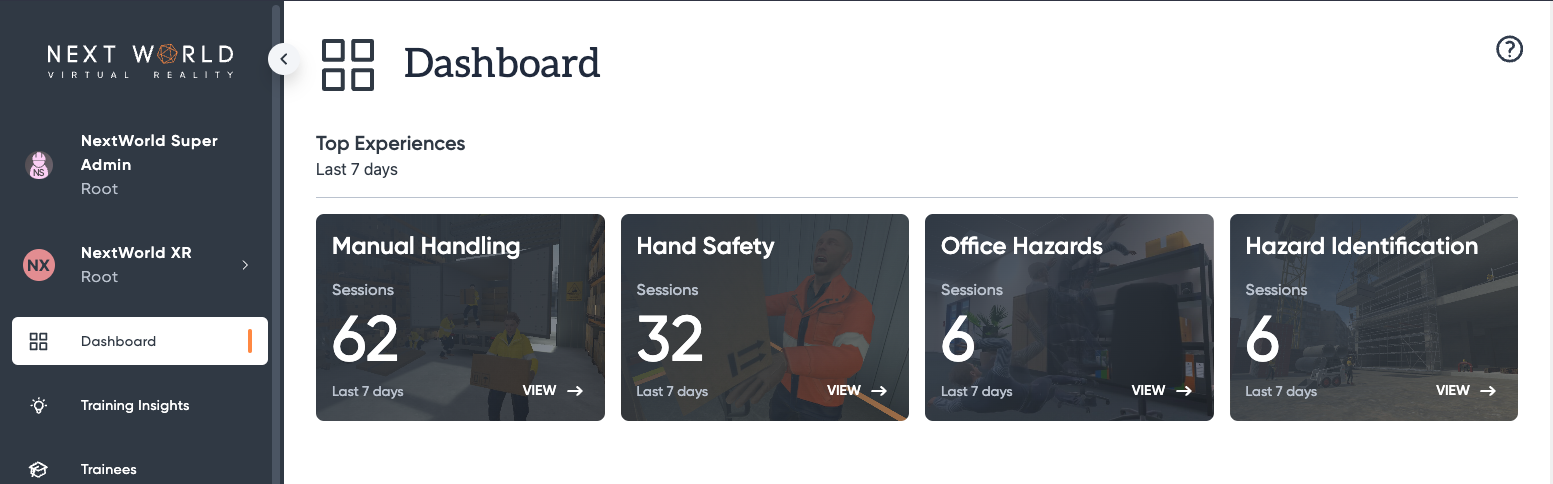
### The Portal
**The Next World Portal** is the web application used to manage trainees, schedule training and view insights and results for training undertaken on **The Next World Platform.**
[](https://docs.nwxr.app/uploads/images/gallery/2023-05/ayDimage.png)
Here's a few things you can do on the Portal:
- Administer your company
- Get an overview of your company's training
- Enrol your trainees in training programs
- Find out who needs training
- View the outcomes from training
### The Agent
**The Next World Agent** is an application and service that runs within your VR headset. Its purpose is to feed data to the Next World Platform and monitor for updates. Other than managing your system and connection settings, you shouldn't need to interact with this too much.
[](https://docs.nwxr.app/uploads/images/gallery/2023-05/8fUimage.png)
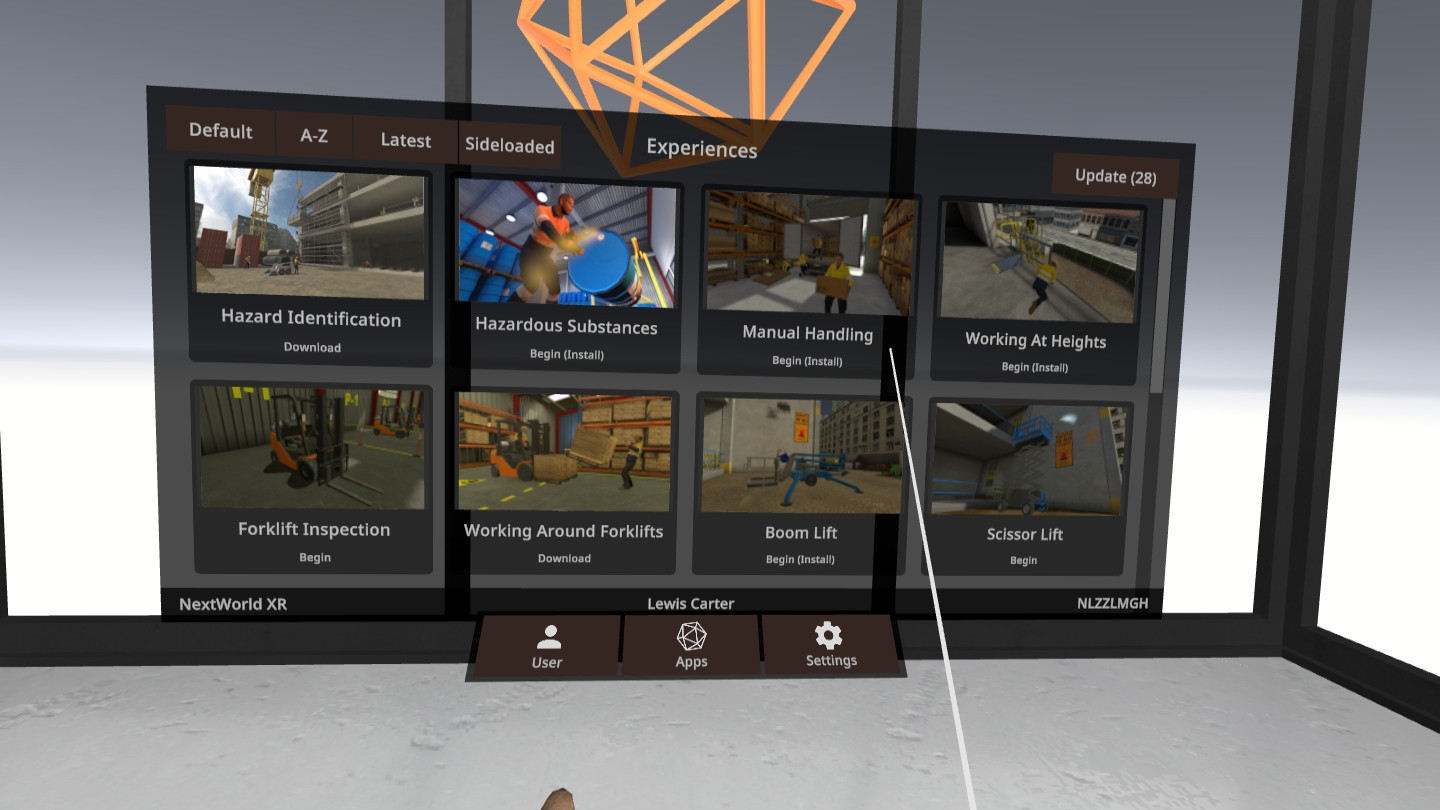
### Home
**Next World Home** is the app you'll become most familiar with on your VR headset. It allows you to select and undertake training and provides access to the various learning experiences.
[](https://docs.nwxr.app/uploads/images/gallery/2023-05/Gneimage.png)
### The Platform
**The Platform** is the umbrella term for Next World's software and cloud infrastructure. Next World's service and software constitute an absolutely massive technology base and The Platform is our name for it.
# Setting Up a VR Device for the Next World Environment
If you've received a headset from Next World, you'll have received a getting started guide.
This article aims to provide details on how to set up a Next World-supported VR headset for the Next World experience environment.
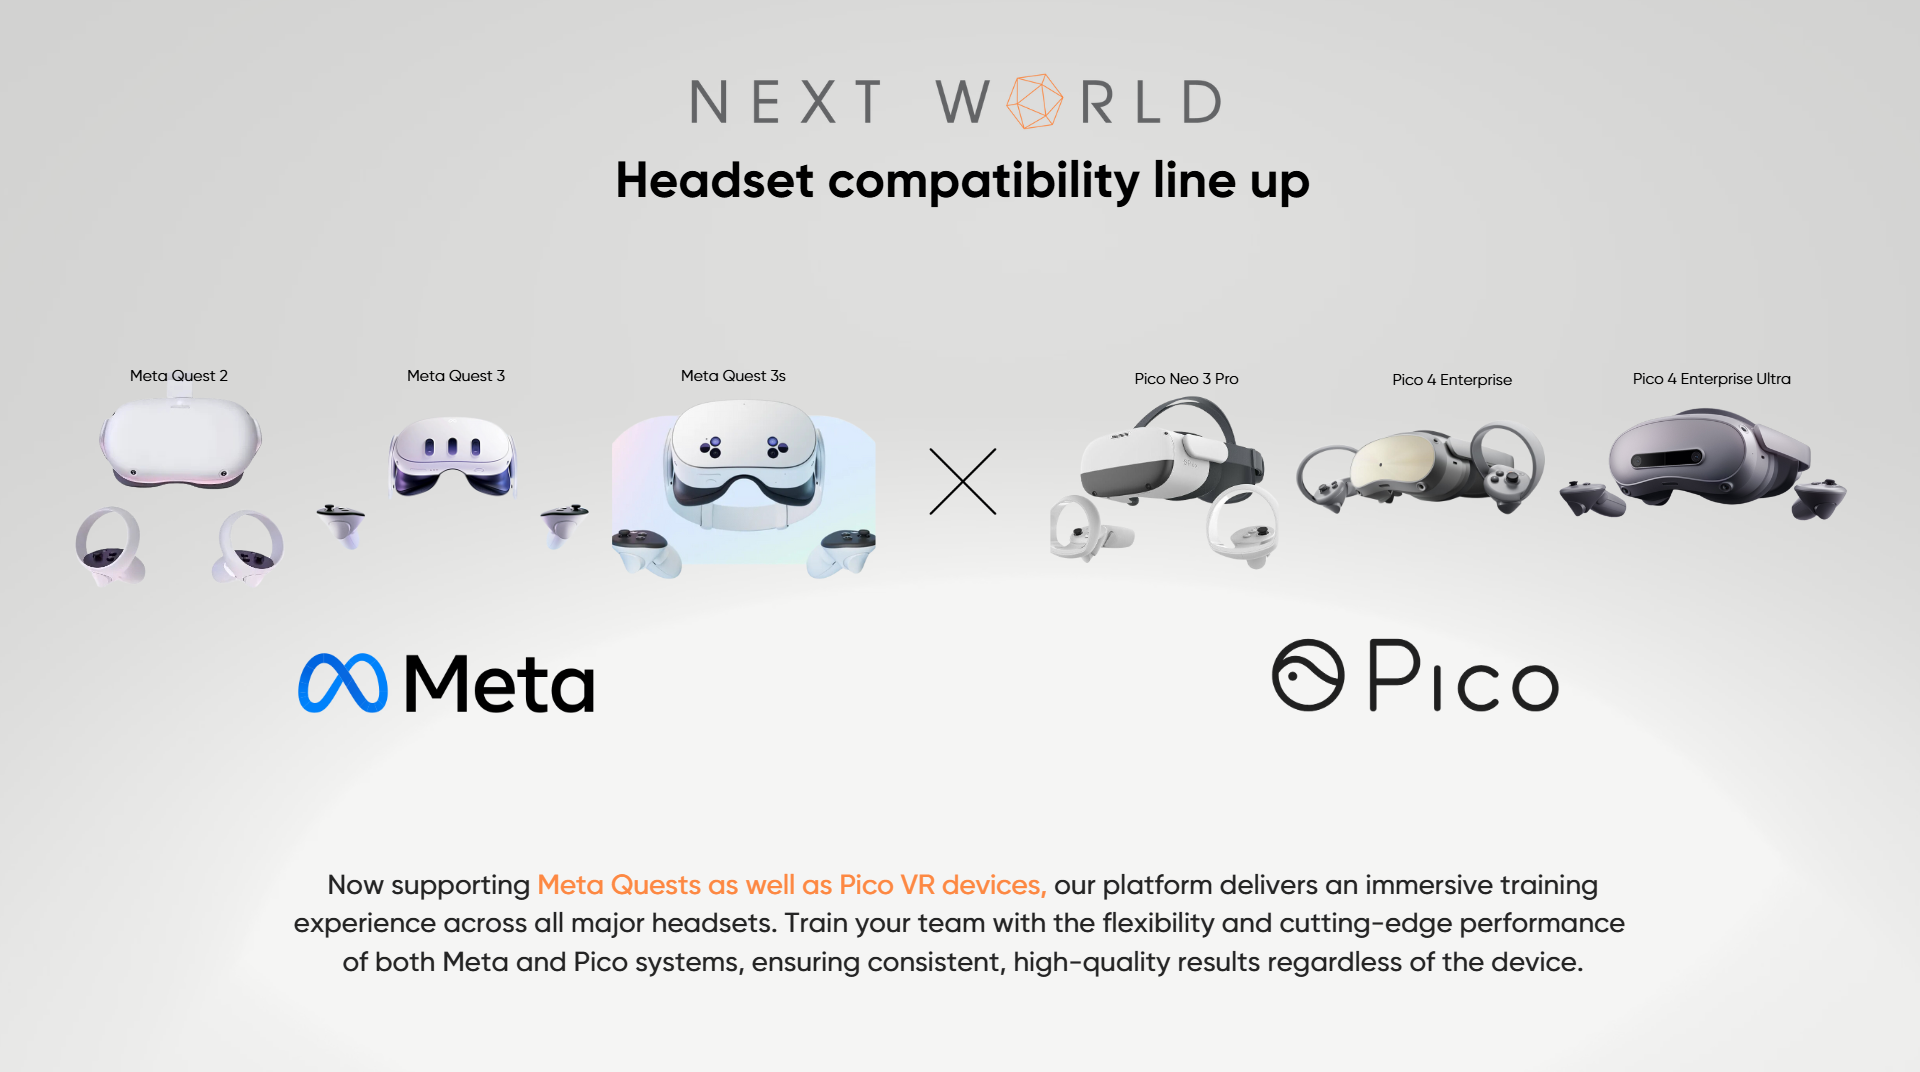
Below are the headsets that Next World support. More headsets may be supported in the future.
After confirming the headset type you possess is supported by Next World, please visit the relevant article below to read through the instructions on how to set up either a Meta or a Pico device.
Meta Devices: [Preparing a Meta VR Device for Usage With Next World Software](https://nwxr.app/support/setting-up-next-world-and-software-installation/preparing-a-meta-vr-device-for-usage-with-next-world-software "Preparing a Meta VR Device for Usage With Next World Software")
Pico Devices: [How to Install Next World Software on to a New Headset](https://nwxr.app/support/setting-up-next-world-and-software-installation/how-to-install-next-world-software-on-to-a-new-headset "How to Install Next World Software on to a New Headset")
# How to Install Next World Software on to a New Headset
To get your headset started with Next World, you'll need to run installation from a Windows or Mac PC and register your device with Next World. This article can run you through those steps.
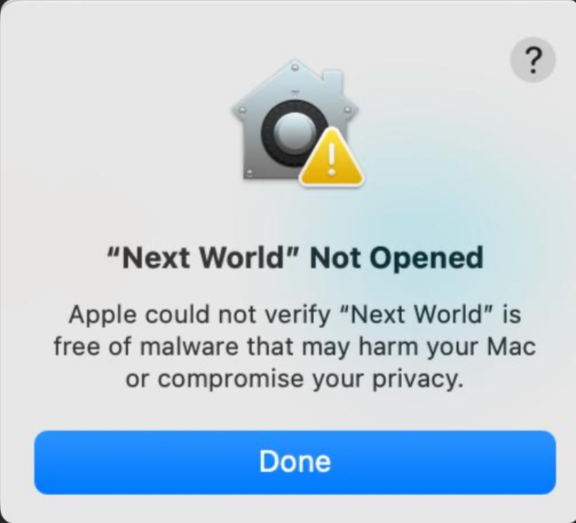
#### 1. Download the Next World ManagerThe Next World Manager is a Windows and Mac application that can administer your device or get it set up.**To grab the manager, head to:**[ http://app.nextworldenterprises.com/](http://app.nextworldenterprises.com/)From that website, you'll be able to download the Next World Manager for Windows or Mac.For **Windows** computers, simply open the Next World Manager application and go to step 2.For **Mac** computers, it may show a message as seen below:
[](https://docs.nwxr.app/uploads/images/gallery/2025-11/2.png)
In this case, press OK or Done, then instead of double-clicking on the application, Command+Click or simply right-click on the application and press "Open" from the context menu. The same message as seen in the above image will show up, but instead of the "OK" or "Done" button, it will show "Open". Click the "Open" button to continue.
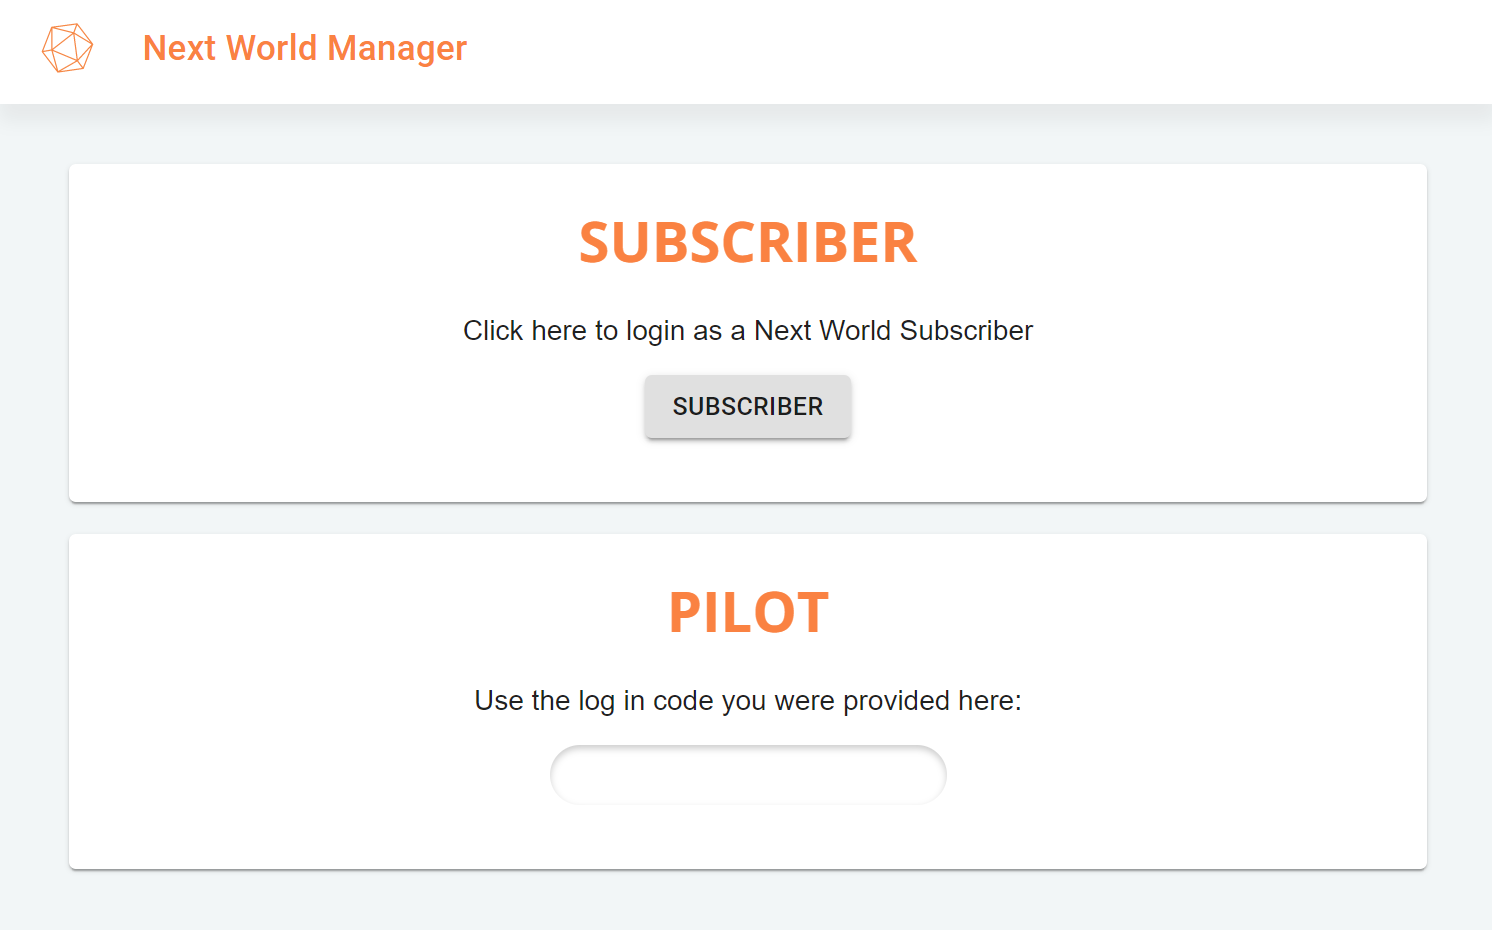
#### 2. Install Agent from the Next World ManagerPlug-in your device to your computer, open the manager and select **SUBSCRIBER** if shown the below screen.
[](https://docs.nwxr.app/uploads/images/gallery/2025-11/3.png)
You may get a message showing that says "*No headset detected*", try pressing the "*Rescan Devices*" button.From there, you can click **INSTALL** for the Next World Agent.
If the Next World application successfully installed on your device, your device will restart within 10 seconds, and you will now have the Agent application available on your headset. At this stage you may disconnect your headset from your computer.
---
***If you have just set up a Meta Quest device and are not using Meta Quest for Business, the Next World app is available in the Unknown Sources category in the Library on your device. Open the Library application on your Meta device and you should see a filter dropdown in the top bar which has the current selected option as "All Apps". You will need to click on this and select "Unknown Sources" from the dropdown menu, you should then be able to see the "Next World" application.***
***[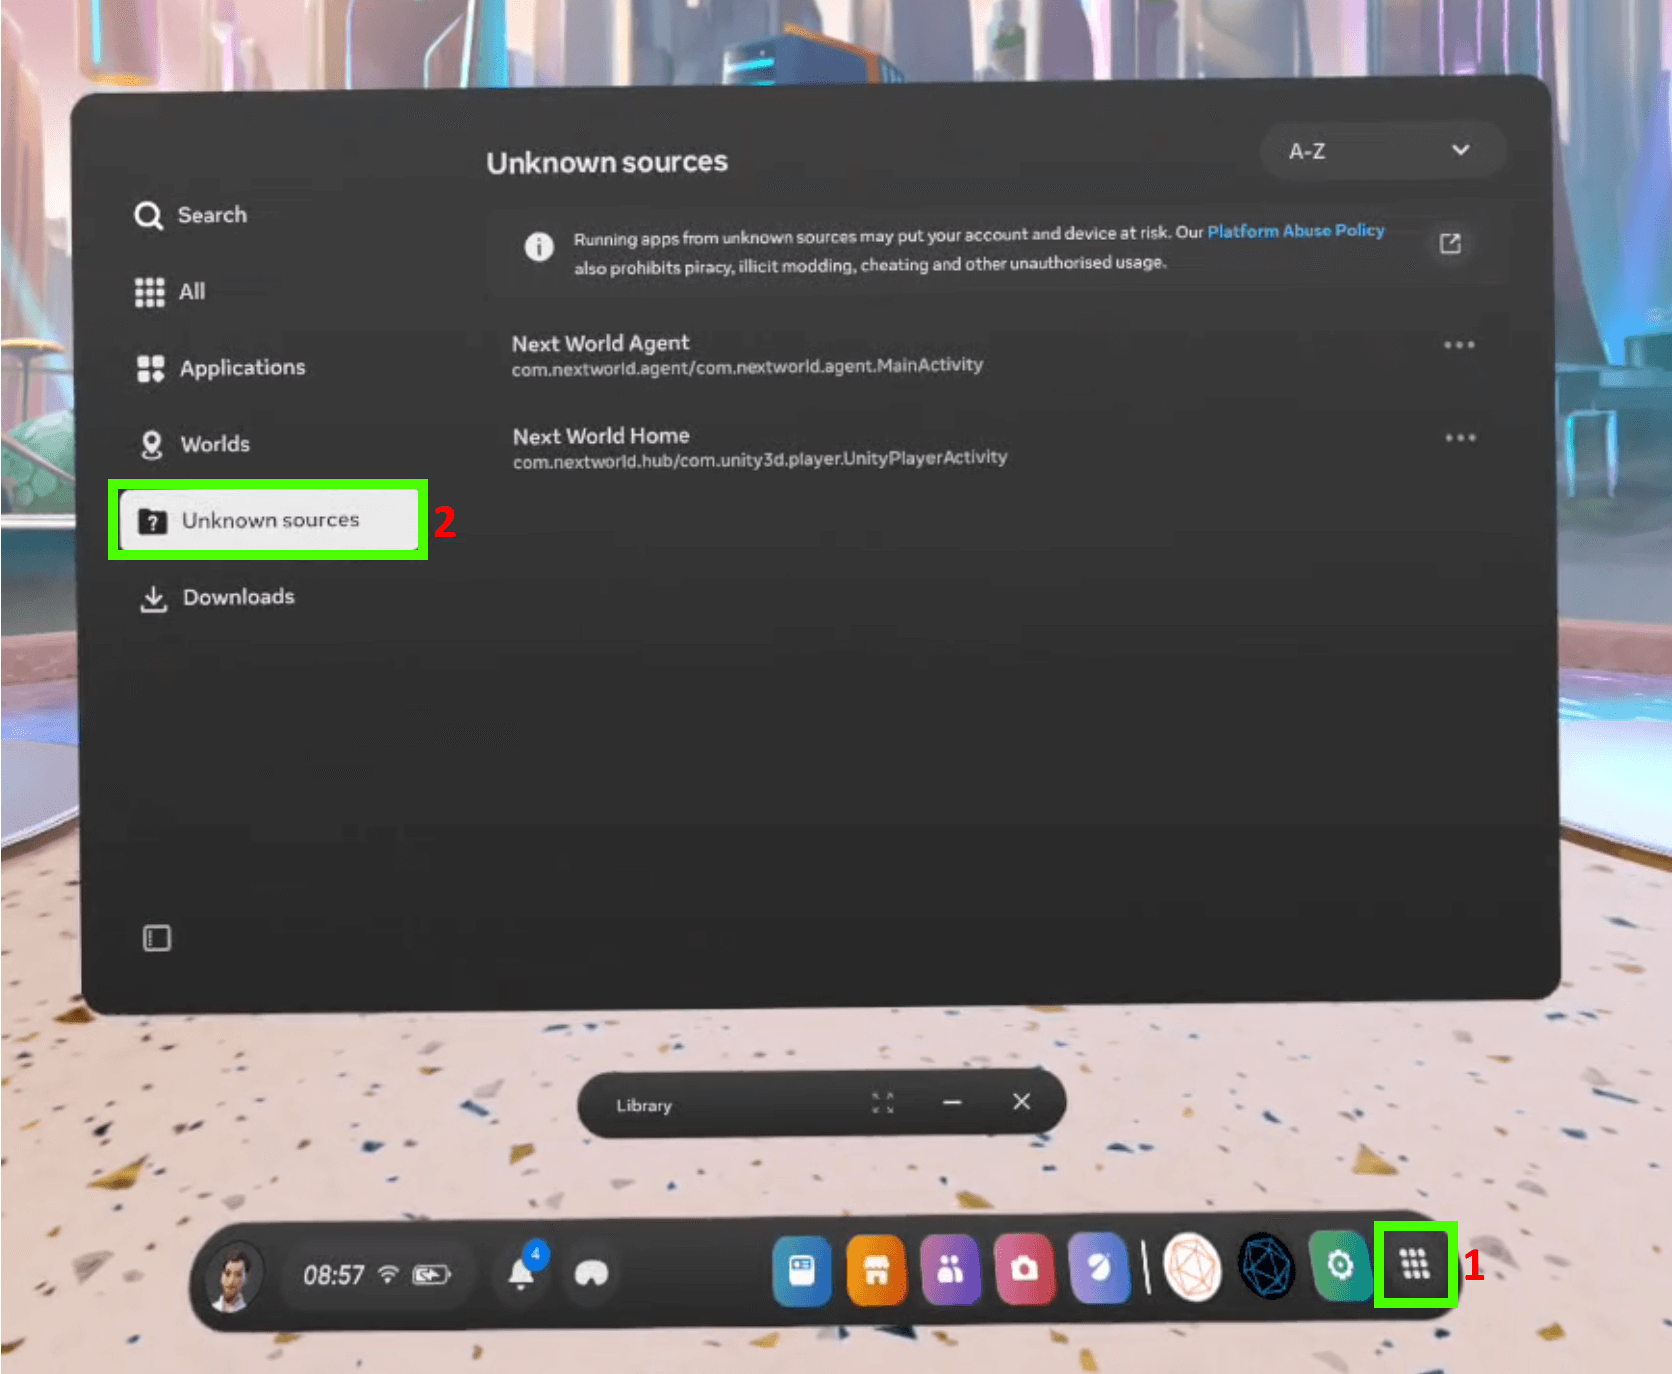](https://docs.nwxr.app/uploads/images/gallery/2025-07/unknown-sources-1.png)***
---
If you are not already subscribed to Next World's VR training solution, your devices will be unregistered and therefore will display as being in "*Demo Mode"*. You will only have access to one of our experiences as part of Demo Mode. In order to experience the full VR Training solution Next World has to offer, you will need to contact Next World to discuss a subscription.
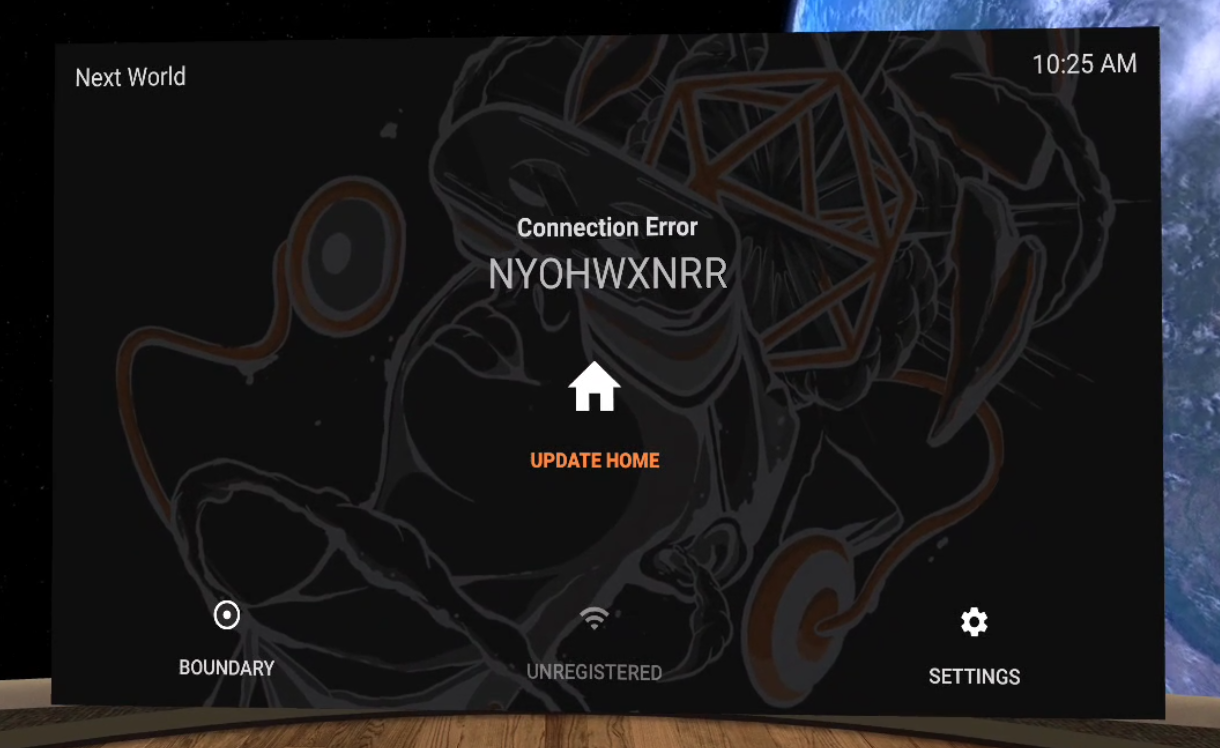
#### 3. Registering Your Headset With an Active SubscriptionOnce subscribed to Next World's VR Training solution, you will need to register your headset in order to upgrade your device from Demo Mode to our full solution, allowing access to our full VR Library. The 9-character code shown in your headset will need to be added to the Next World Portal (our LMS). If you are unsure of how to do this, you'll need to send your 9-character code shown in your headset to your Next World representative or contact . Your Next World rep or support agent will add your device to the registry to get you started.
*An example of the 9-character code is pictured below:*
[](https://docs.nwxr.app/uploads/images/gallery/2023-12/image.png)
Once you or your Next World rep have registered the device on the Next World Portal, you may move on to the next step.
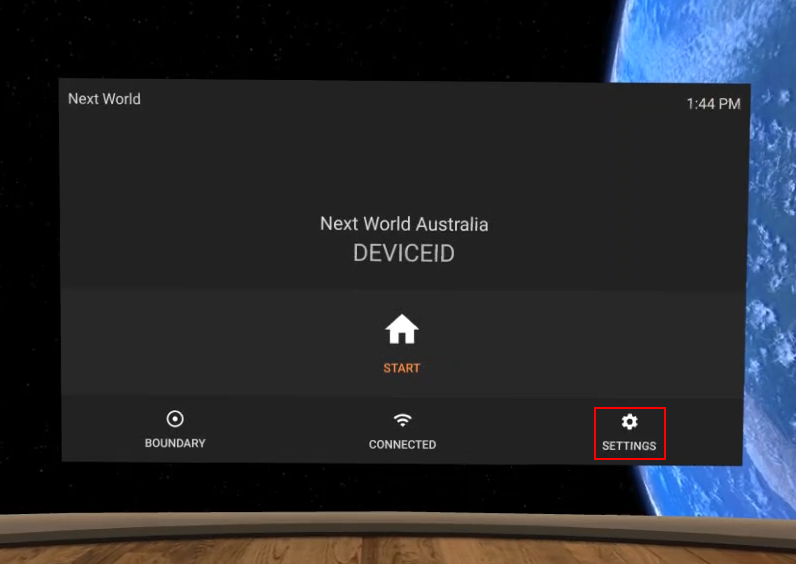
#### Using the VR DeviceYou should be greeted with a screen showing your device ID and company name if the device is registered. If the device is not registered, see the above instructions.
Open the menu by selecting the **Start** button with a house icon from the Agent dashboard. If there is an update pending, the home button will read **Update.** If that happens, follow the update and, once complete, the button will say Start.
Go through the tutorial/set-up process, and when you reach the screen to log in, enter your 4-character login code. If you do not know your code, you can find it in the Next World Portal, or contact your Next World representative and they will let you know your code. Next, select an experience from the list. If the experience isn't installed and your device is currently connected to the internet it will download and install automatically. If it has already been downloaded and installed, the experience will load and begin.
You're device is now up and running and you may start training on it!
# Preparing a Meta VR Device For Usage With Next World Software
This article provides the steps to set up your Meta VR device before installing Next World's software on to the headset. Next World currently support Meta Quest 2, Meta Quest 3 and Meta Quest 3S.
In the current state of Next World supporting Meta headsets, you must enable developer mode for the Meta device from within the Meta Horizon mobile app on your mobile phone. Before you can put your device in developer mode, you must belong to (or have created) a developer organization on the [Meta Quest Developer Dashboard](https://developers.meta.com/horizon/manage/).
To create a new organization, go to the [Create New Organization](https://developers.meta.com/horizon/manage/organizations/create/) page of the Meta Quest Developer Dashboard and fill in the appropriate information.
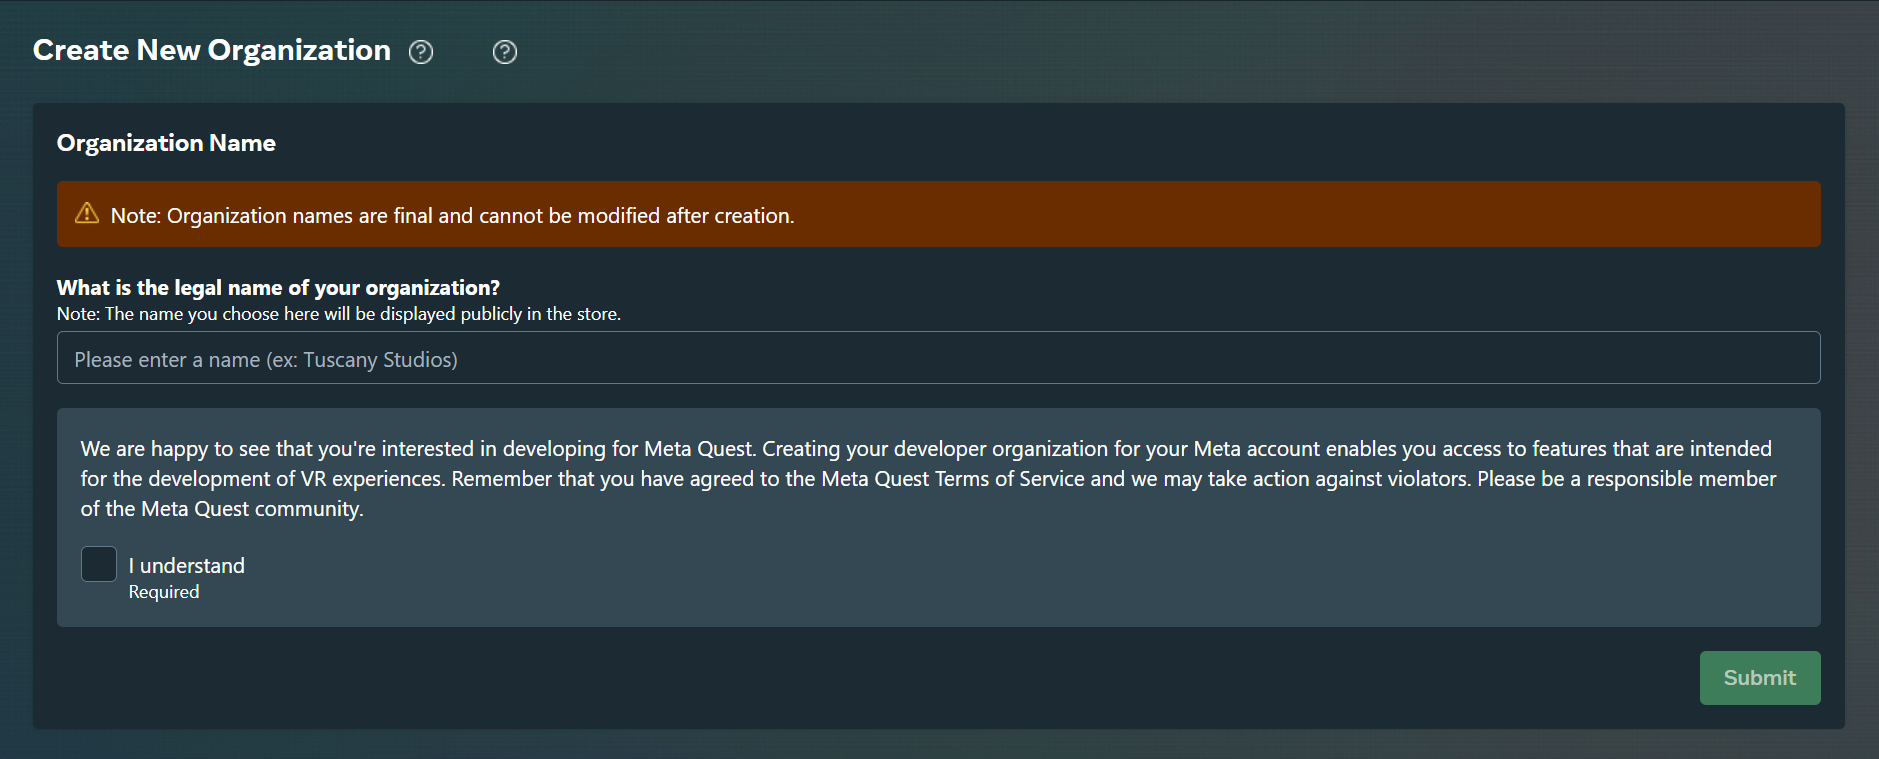
Next, go to the [verification tab](https://developers.meta.com/horizon/manage/verify/) of the Meta Quest Developer Dashboard. If prompted, login with your Meta Developer account.
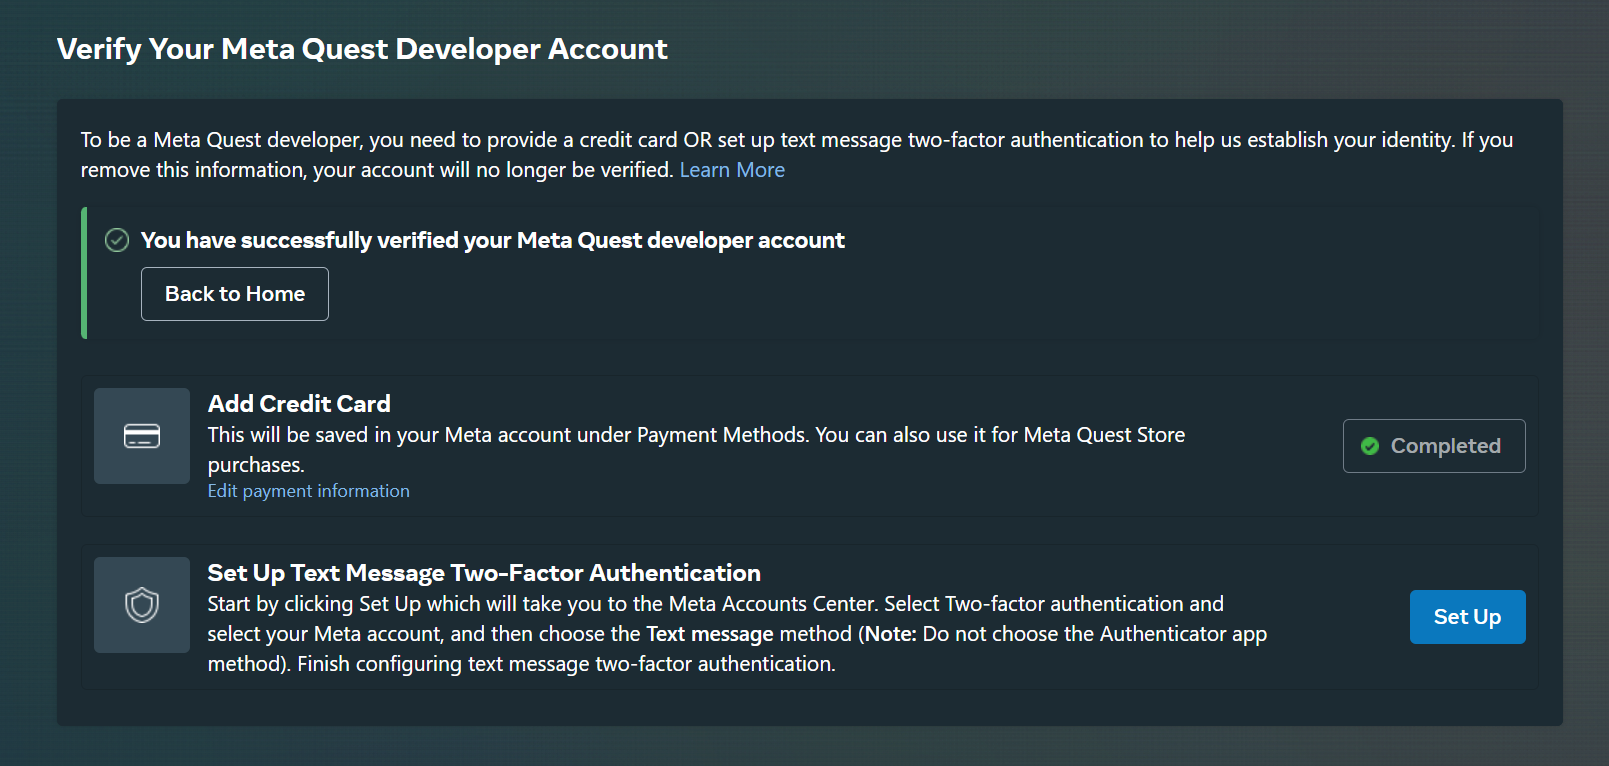
Verify your account with one of the two following options:
- Confirm your mobile number to set up SMS two-factor verification
OR
- Add a payment method to your account (no payment will be made, this is purely for verification purposes).
**Enable Developer Mode**
Once you have set up the Meta developer organization, follow these steps to put your device in developer mode:
1. First, download the Meta Horizon mobile app from your mobile device's app store, it is available for both Android and iOS.
2. Login to your newly created developer account on the app.
*If your mobile device has the Meta Horizon app installed already, you have likely created a personal Meta account and set up your Meta device inside the app under this personal account. If this is the case,* *you will need to remove the device from your personal Meta account before continuing. After removing the device, log out of your personal account before logging into the newly created Meta developer account.*
3. There are two different steps depending on if your device has completed the initial set up phase or not.
a. If you have not yet completed the setup of your Meta device, as part of the setup it will ask you to connect your device to your Meta Horizon mobile app. At this stage it gives you a pairing code, displaying some numbers you must enter on the app to connect the device. The app may auto-detect there is a device waiting to be linked in which case you do not need to enter the pairing code, but if this is not the case, you will need to add a new device, following the instructions, starting with selecting your Meta device type as shown in the images below.
b. If the device has already completed set up, you likely had to remove the device from your personal Meta account. After doing this, you will need to add the device to your developer Meta account. Open the Meta Horizon app (and ensure you are logged into the developer Meta account), follow the steps shown in the images below to add your device.


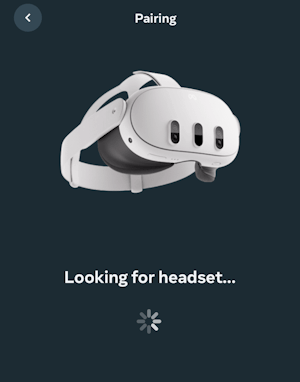

1. If the Meta Horizon app did not auto-complete the device setup and you see the above pairing code screen, you can view your pairing code from the Meta device's settings. Put on your headset and go to **Settings** > **General > About** and under the **Device** section you will see your 5-digit Pairing code. Enter this code into the mobile app and continue with the setup. The below images show how you may access the pairing code in the settings.
[](https://docs.nwxr.app/uploads/images/gallery/2025-04/pairing-code-1-1.png)[](https://docs.nwxr.app/uploads/images/gallery/2025-04/pairing-code-2-1.png)[](https://docs.nwxr.app/uploads/images/gallery/2025-04/pairing-code-3-1.png)
2. Once your device has been successfully set up and added to the app, select the headset in the app, then select **Headset Settings** > **Developer Mode** and switch on **Developer Mode**
[](https://docs.nwxr.app/uploads/images/gallery/2025-04/hzrhorizon-1.jpg)
[](https://docs.nwxr.app/uploads/images/gallery/2025-04/IyMhorizon-2.jpg)
[](https://docs.nwxr.app/uploads/images/gallery/2025-04/Rz2horizon-3.jpg)
[](https://docs.nwxr.app/uploads/images/gallery/2025-04/KCxhorizon-4.jpg)
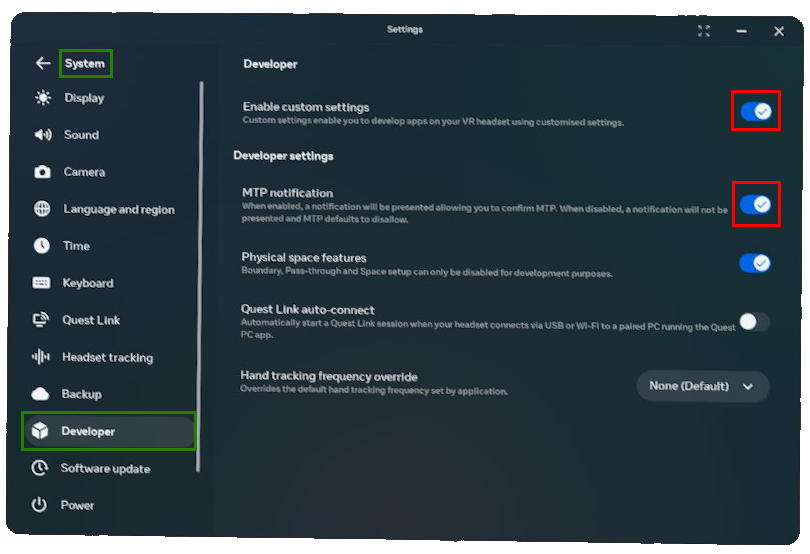
3. Connect the headset to the computer using a USB-C cable and put on the headset. In the headset, go to **Settings** > **System** > **Developer**, and turn on **Enable custom settings** and **MTP Notification**.
4. When prompted to allow USB debugging, select **Always allow from this computer** as shown below and then press **OK**
[](https://docs.nwxr.app/uploads/images/gallery/2025-04/pairing-code-4.png)
Once all the above steps are completed, your device is now set up and is ready to install the Next World software onto the headset. Please follow the instructions from the below link to continue with the installation of Next World's software onto your Meta headset: [How to Install Next World Software on to a New Headset](https://nwxr.app/support/setting-up-next-world-and-software-installation/how-to-install-next-world-software-on-to-a-new-headset "How to Install Next World Software on to a New Headset")
# Setting Up a Meta Quest 2/3 for Horizon Managed Services (HMS)
\_Last updated: April 17, 2025\_
This guide walks you through the process of factory resetting a Meta Quest headset and configuring it for use under Horizon Managed Services (HMS).
**Important:** Performing a factory reset will erase all apps, files, and settings from the headset. Ensure any important data is backed up before proceeding.
**Note:** The images in this guide are representative only and may not exactly match what you will see in the headset. This is because it’s not possible to record or screenshot the headset display during the factory reset or initial setup process. The visuals provided are intended to give a general idea of what to expect.
---
## **Section 1: Factory Reset Your Device**
1. **Turn off the headset completely.**
- Press and hold the power button until the shutdown menu appears.
- Select **Power Off** or hold the button until the device shuts down.
2. **Enter the Android Recovery Menu (Bootloader):**
- Press and **hold the Volume Down (-)** button.
- While holding Volume Down, press and hold the **Power** button
- Continue holding both buttons until the **bootloader menu** appears on the screen.
3. **Navigate to Factory Reset Option:**
- Use the **Volume buttons** to scroll through the bootloader options.
- Highlight **“Factory Reset”**.
- Press the **Power button** to select it.
[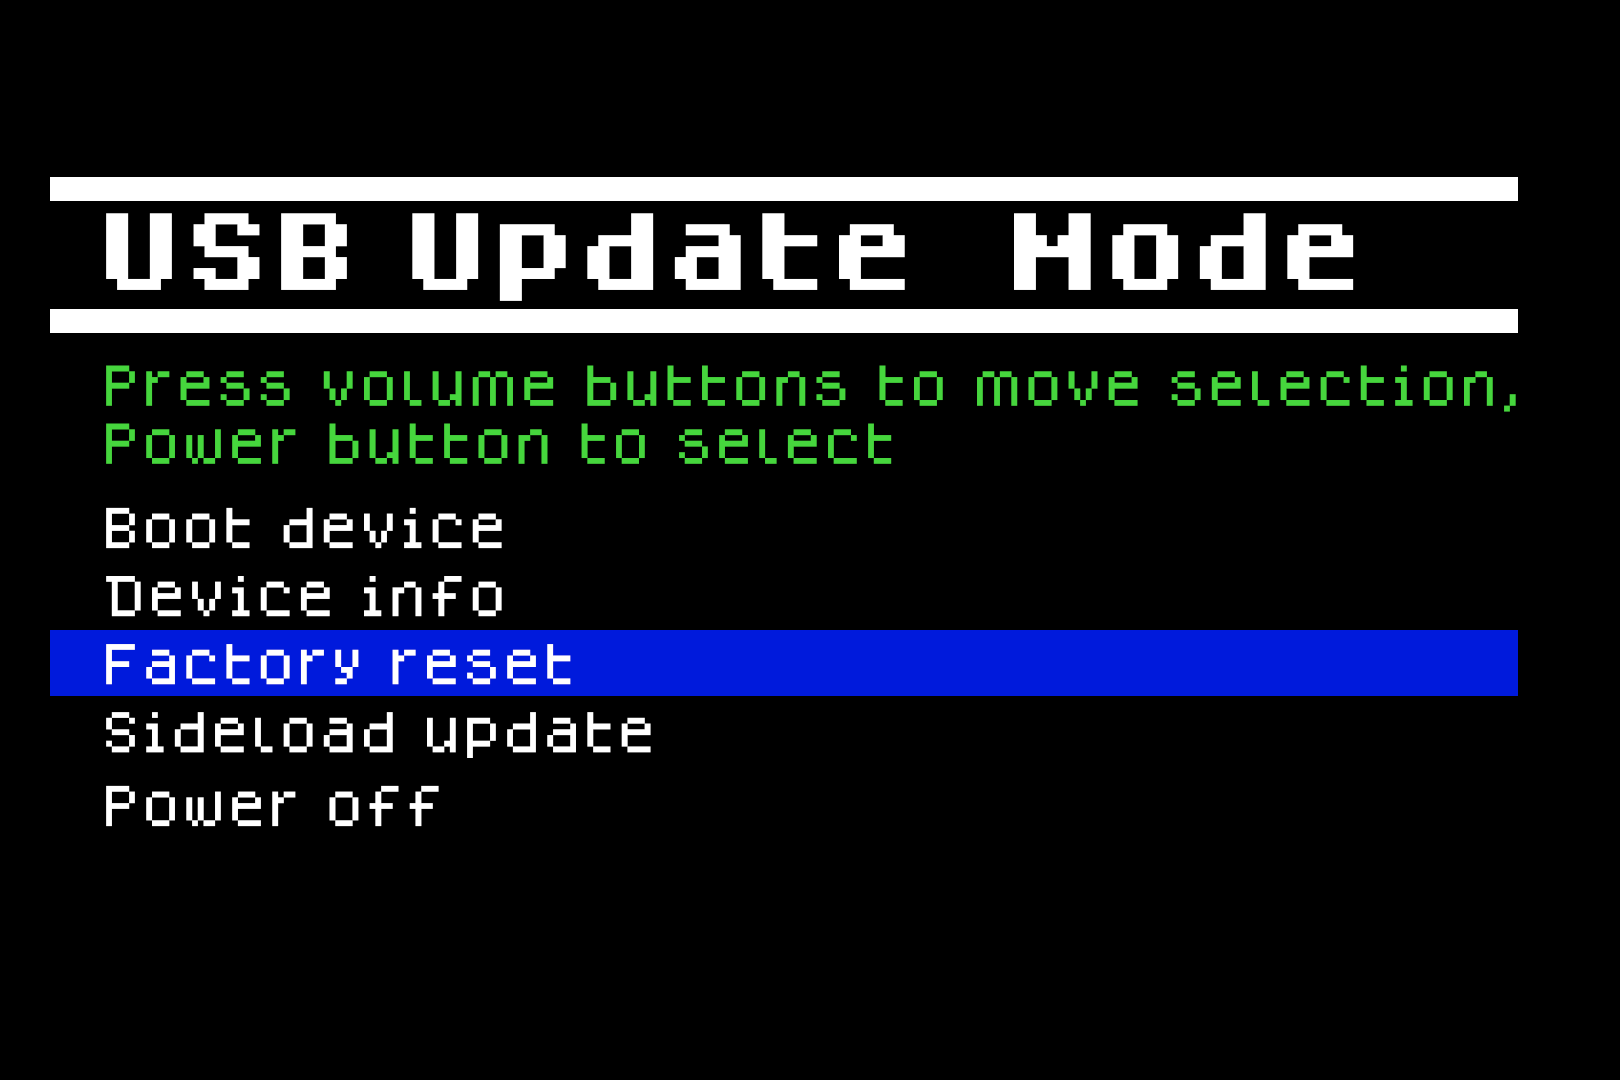](https://docs.nwxr.app/uploads/images/gallery/2025-04/questfactoryresetfrombootloader1.png)
4. **Confirm Factory Reset:**
- When prompted with **“Are you sure?”**, highlight **“Yes, erase and factory reset”**.
- Press the **Power button** again to confirm.
[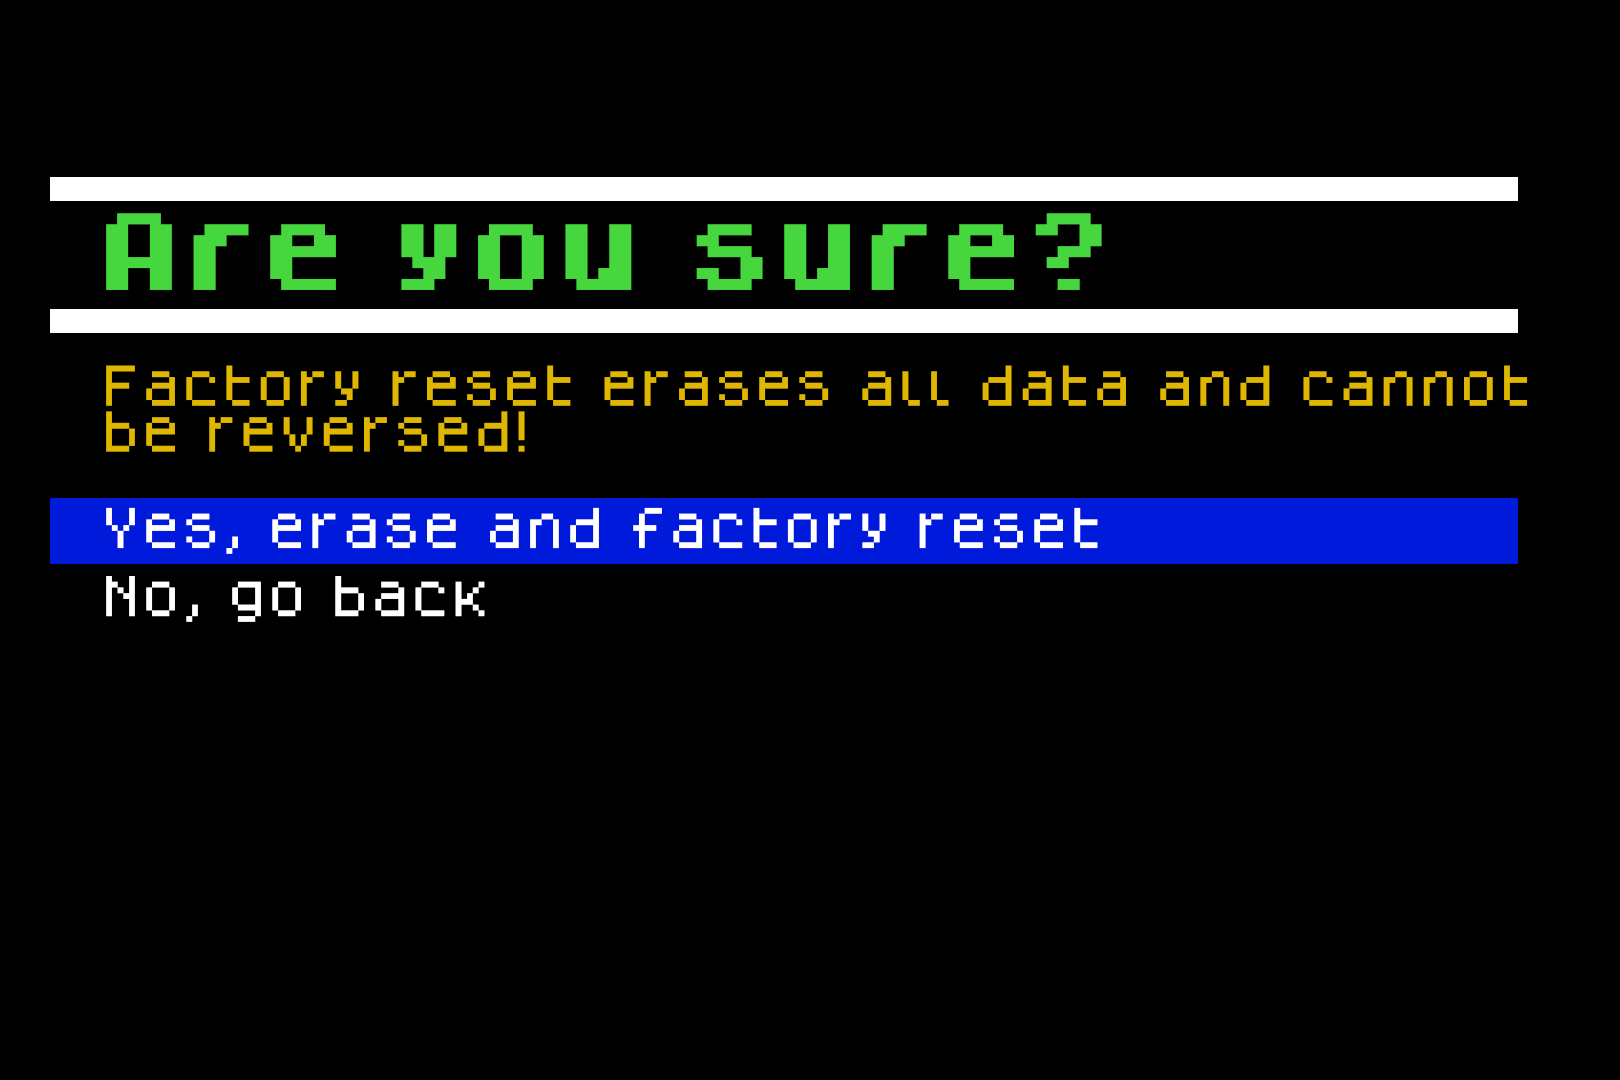](https://docs.nwxr.app/uploads/images/gallery/2025-04/klpquestfactoryresetfrombootloader2.png)
5. **Wait for Device to Reboot:**
- The headset will wipe all data and automatically restart.
---
## **Section 2: Initial Device Setup**
Once the headset restarts, follow the guided setup process:
6. **Controller Pairing Screen:**
- If the headset doesn’t detect controllers, a screen will appear instructing you to **pull the battery tab** from each controller.
- If your controllers are already active, this step will be skipped automatically.
[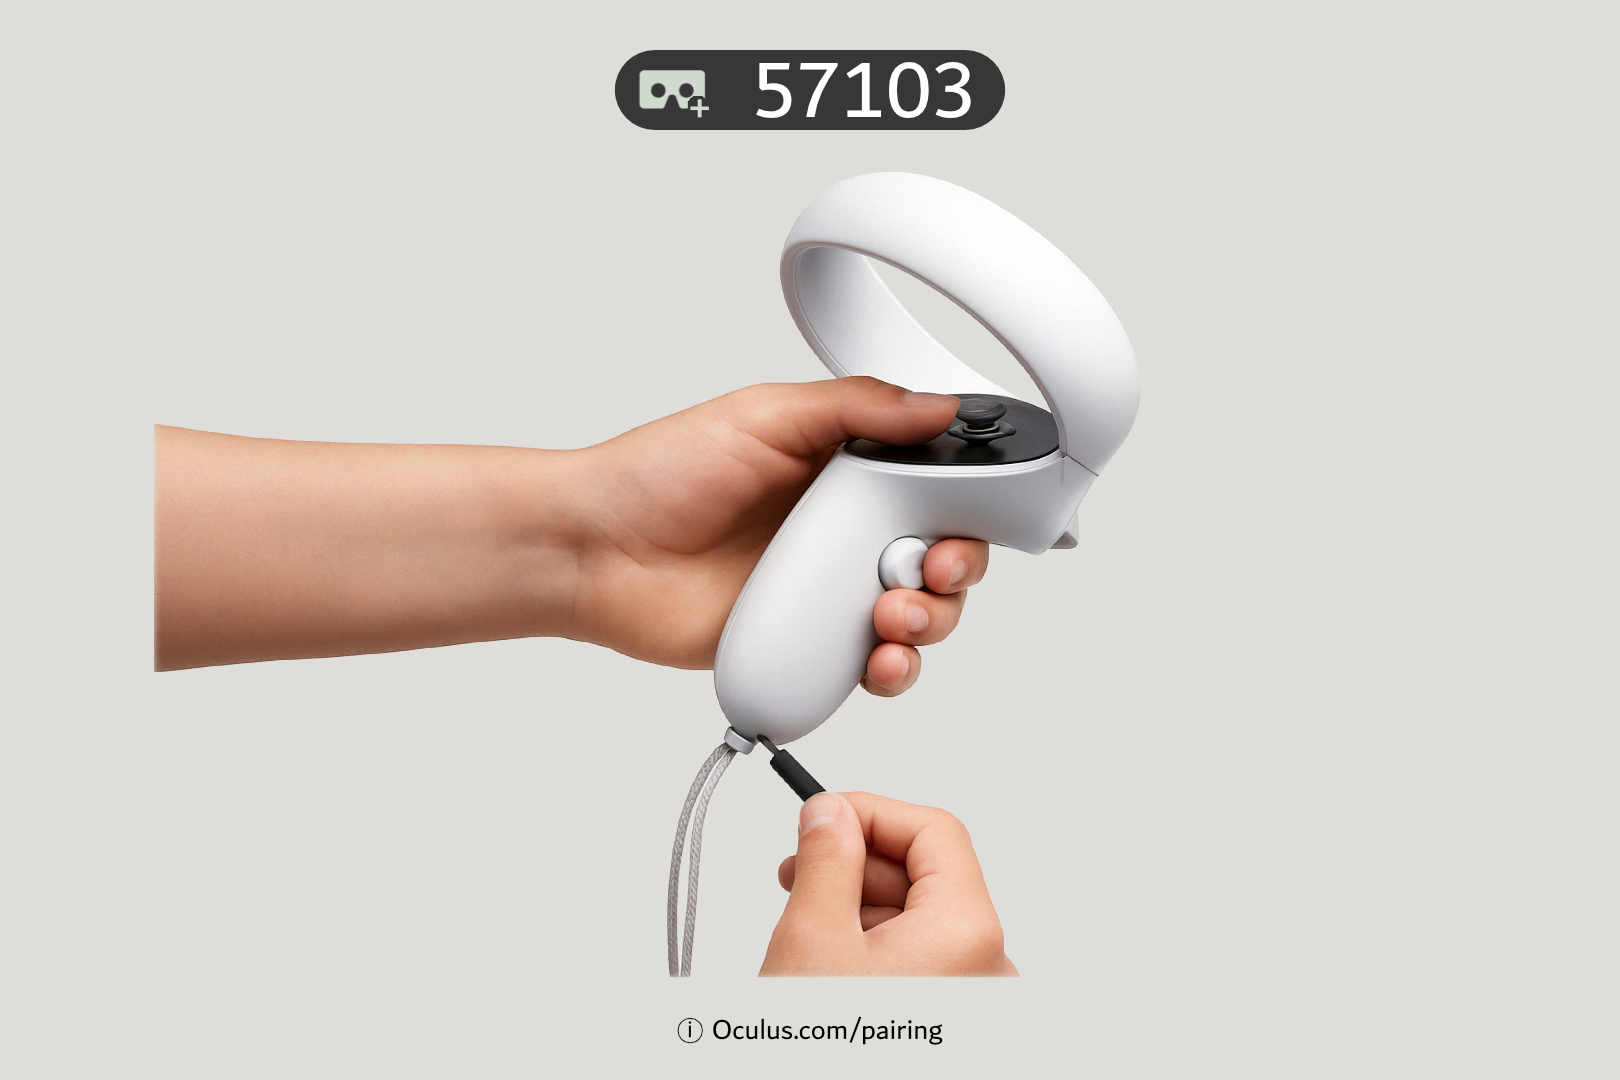](https://docs.nwxr.app/uploads/images/gallery/2025-04/pairingcontrollers1.png)
7. **Start Setup:**
- You’ll be prompted to point at a **“Continue”** button.
- Use the **trigger button** on the controller to select it.
[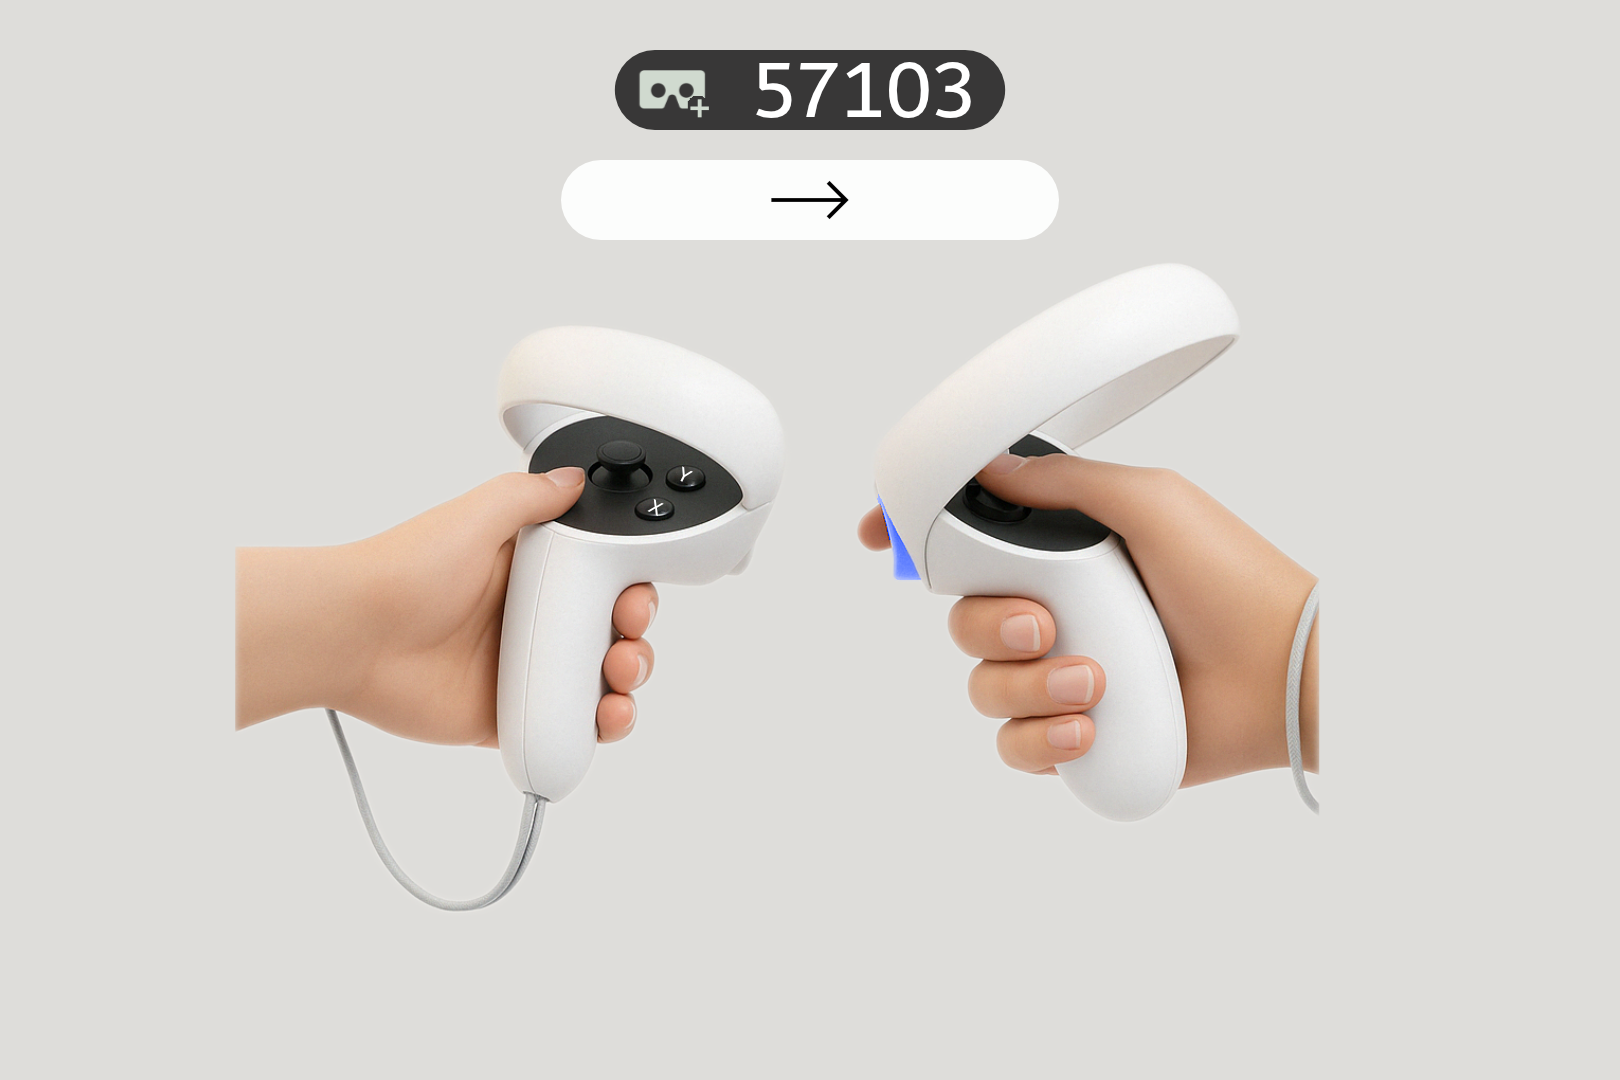](https://docs.nwxr.app/uploads/images/gallery/2025-04/pairingcontrollers2.png)
8. **Language Selection:**
- Scroll through the list using the **joystick**.
- Point and click on your preferred language.
[](https://docs.nwxr.app/uploads/images/gallery/2025-04/selectlanguage.png)
9. **Adjust Headset Fit (Visual Clarity):**
- Follow on-screen instructions to properly fit the headset.
- Ensure text and visuals are sharp before pressing **Continue**.
[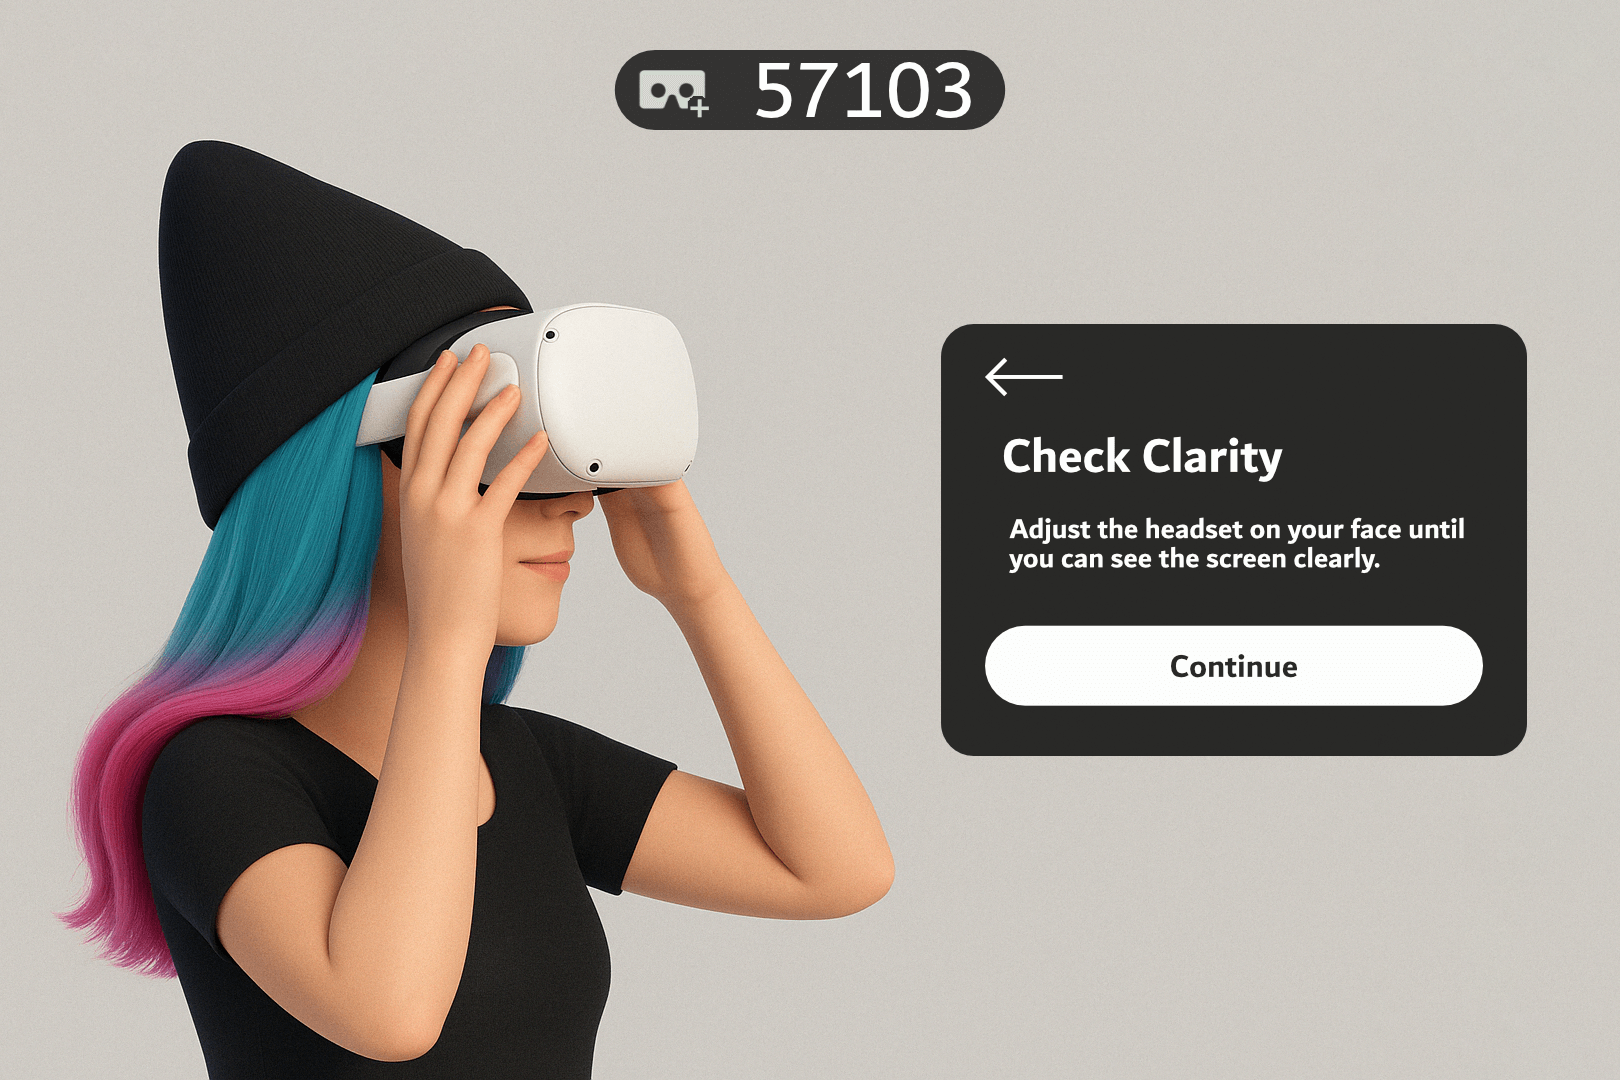](https://docs.nwxr.app/uploads/images/gallery/2025-04/checkforclarity.png)
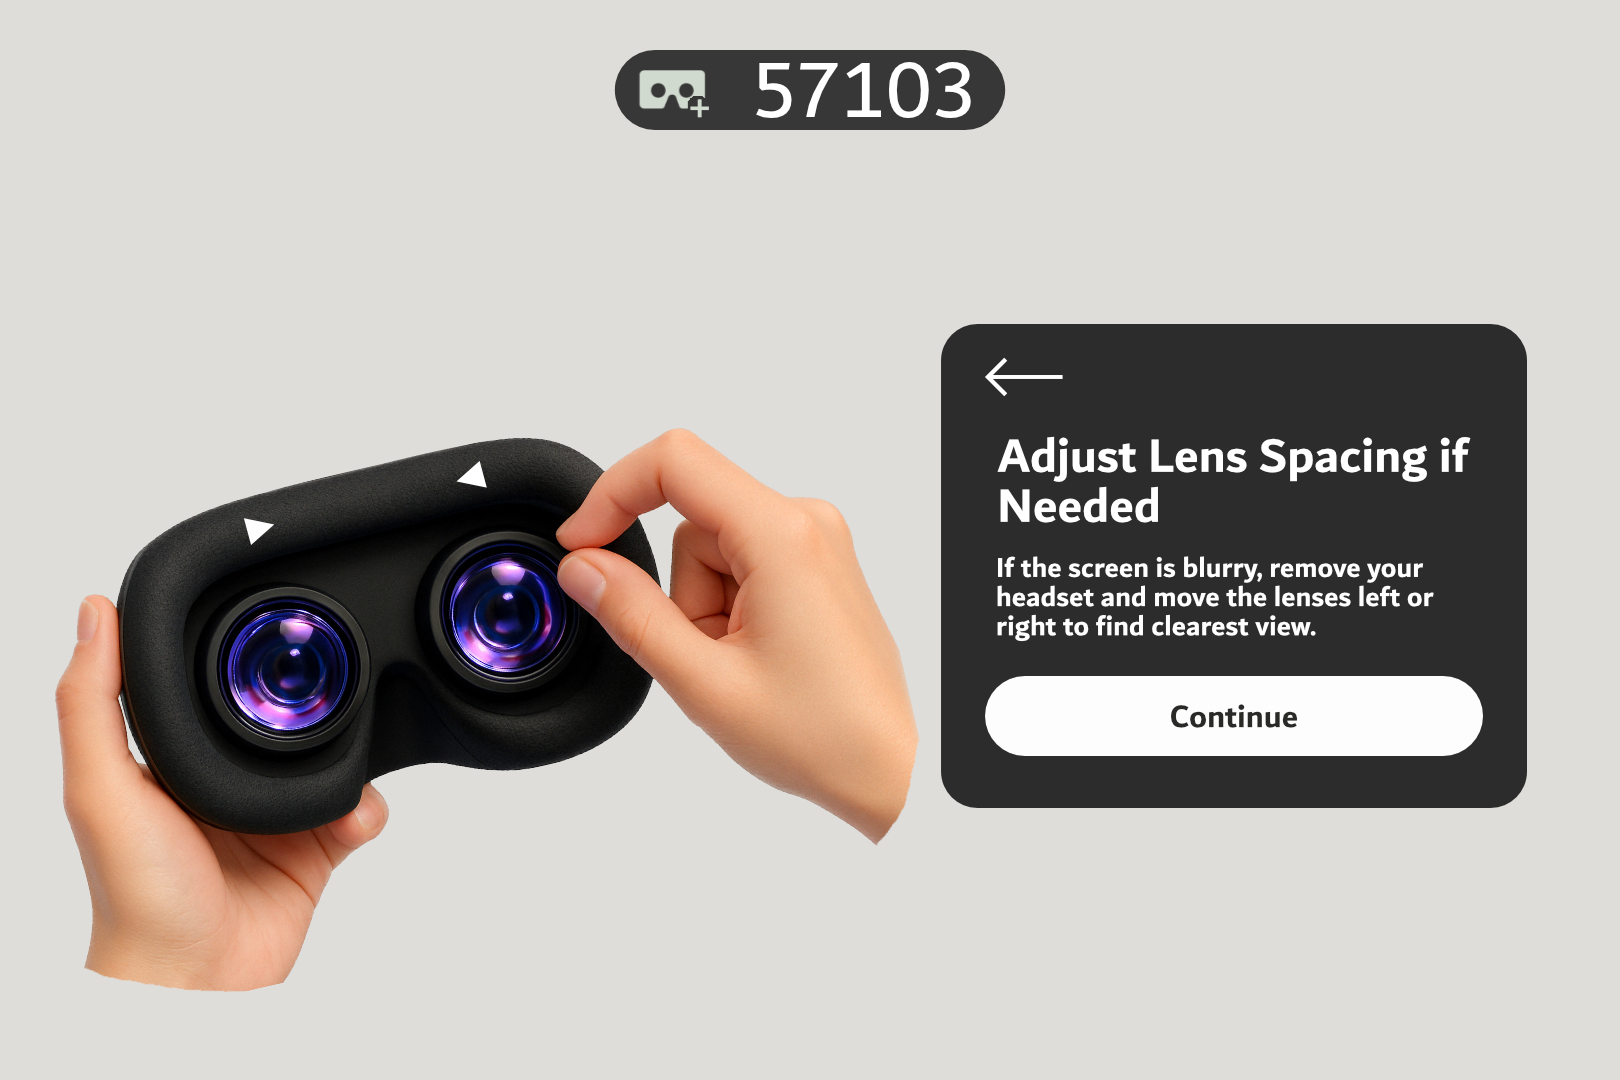
10. **Set IPD (interpupillary distance):**
- Adjust the lenses to match your interpupillary distance. Press **Continue** when ready.
[](https://docs.nwxr.app/uploads/images/gallery/2025-04/adjustlenses.png)
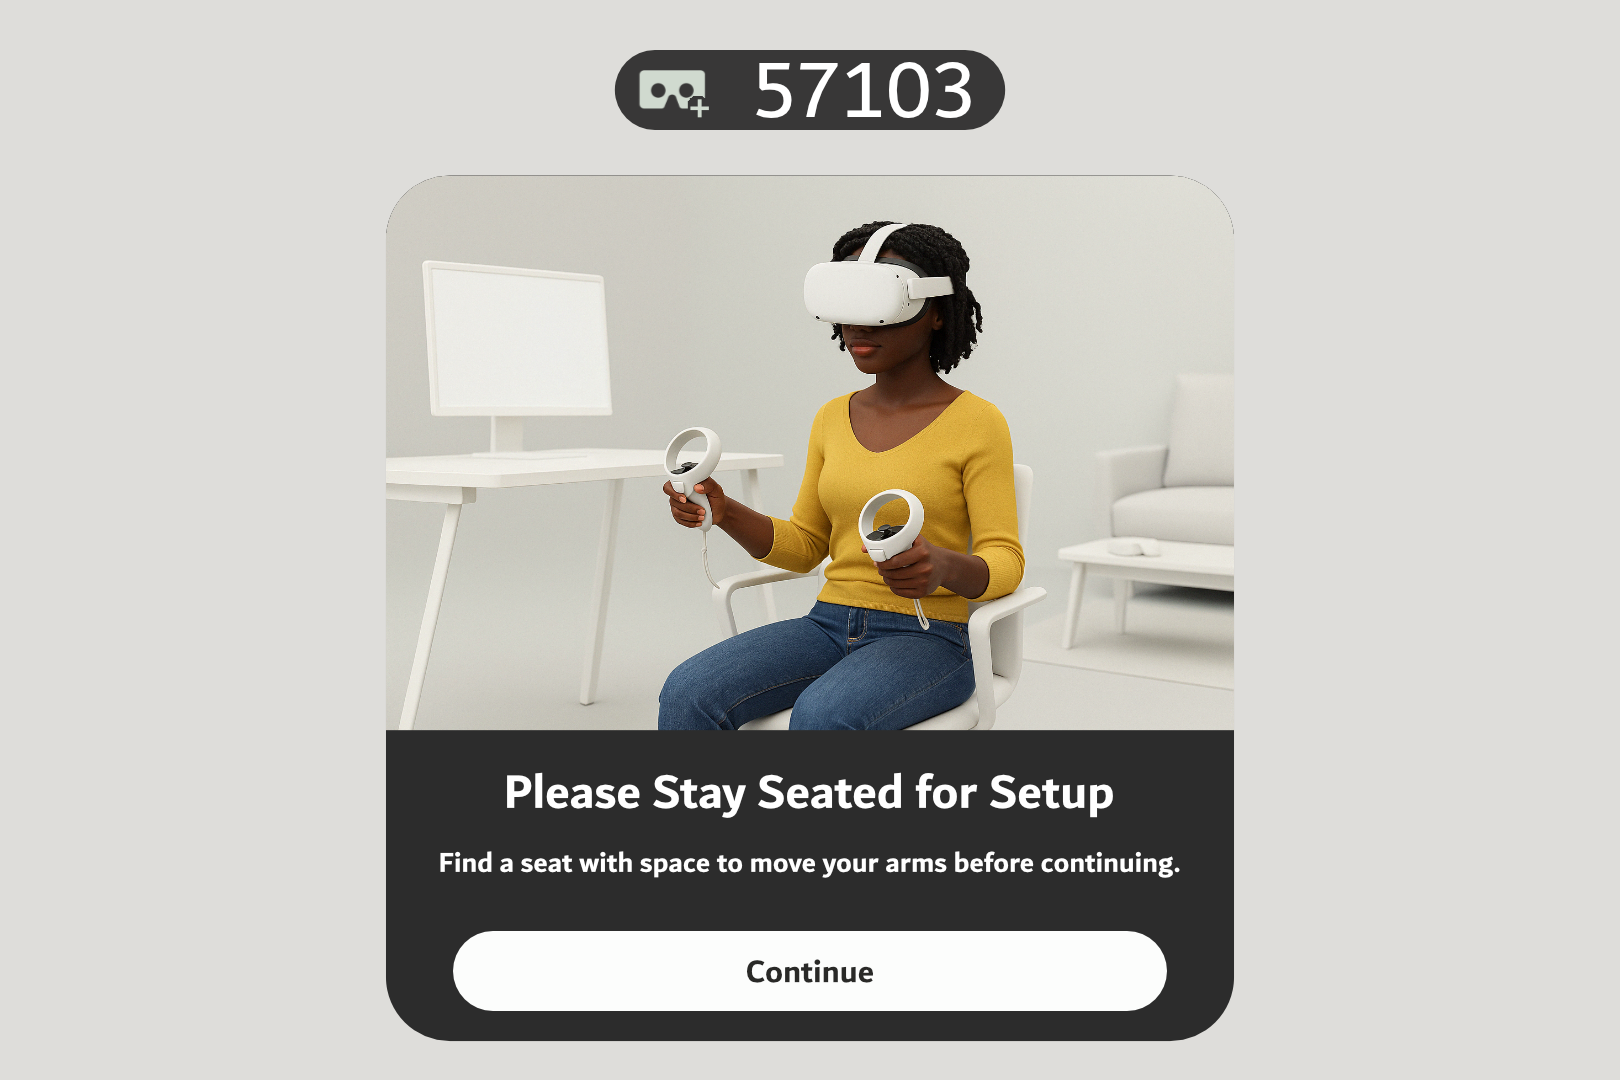
11. **Seating Position:**
- When asked, ensure you're seated in a safe space and press **Continue**.
[](https://docs.nwxr.app/uploads/images/gallery/2025-04/fDrstayseated.png)
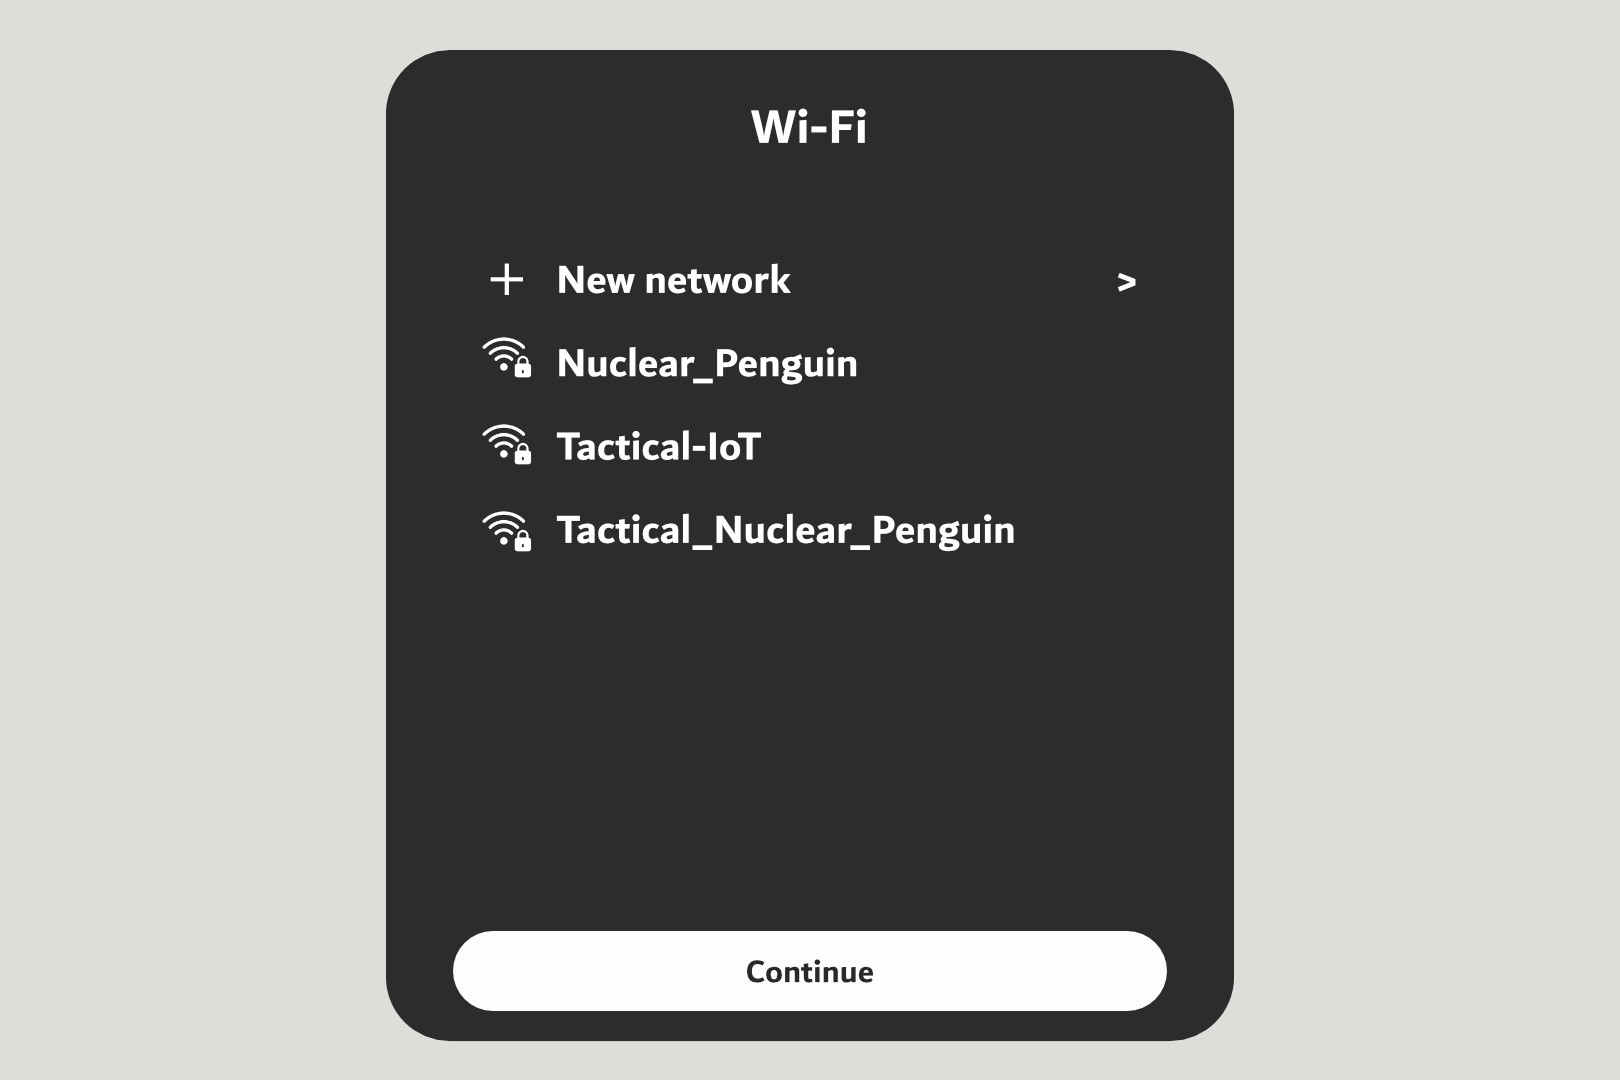
12. **Connect to Wi-Fi:**
- Use the joystick to scroll through available networks.
- Select your network and enter the password using the on-screen keyboard.
[](https://docs.nwxr.app/uploads/images/gallery/2025-04/7yQsetupwifi.png)
13. Watch the **safety guideline animation**, covering:
- Minimum age requirement (typically 13+).
- Use indoors to avoid sun damage to lenses.
- Remove obstacles from the play area.
- Use appropriate content in safe, supervised environments.
[](https://docs.nwxr.app/uploads/images/gallery/2025-04/surroundings.png)
14. **Acknowledge Safety Compliance:**
- After watching the video, you’ll be asked to confirm that you understand the safety guidelines.
[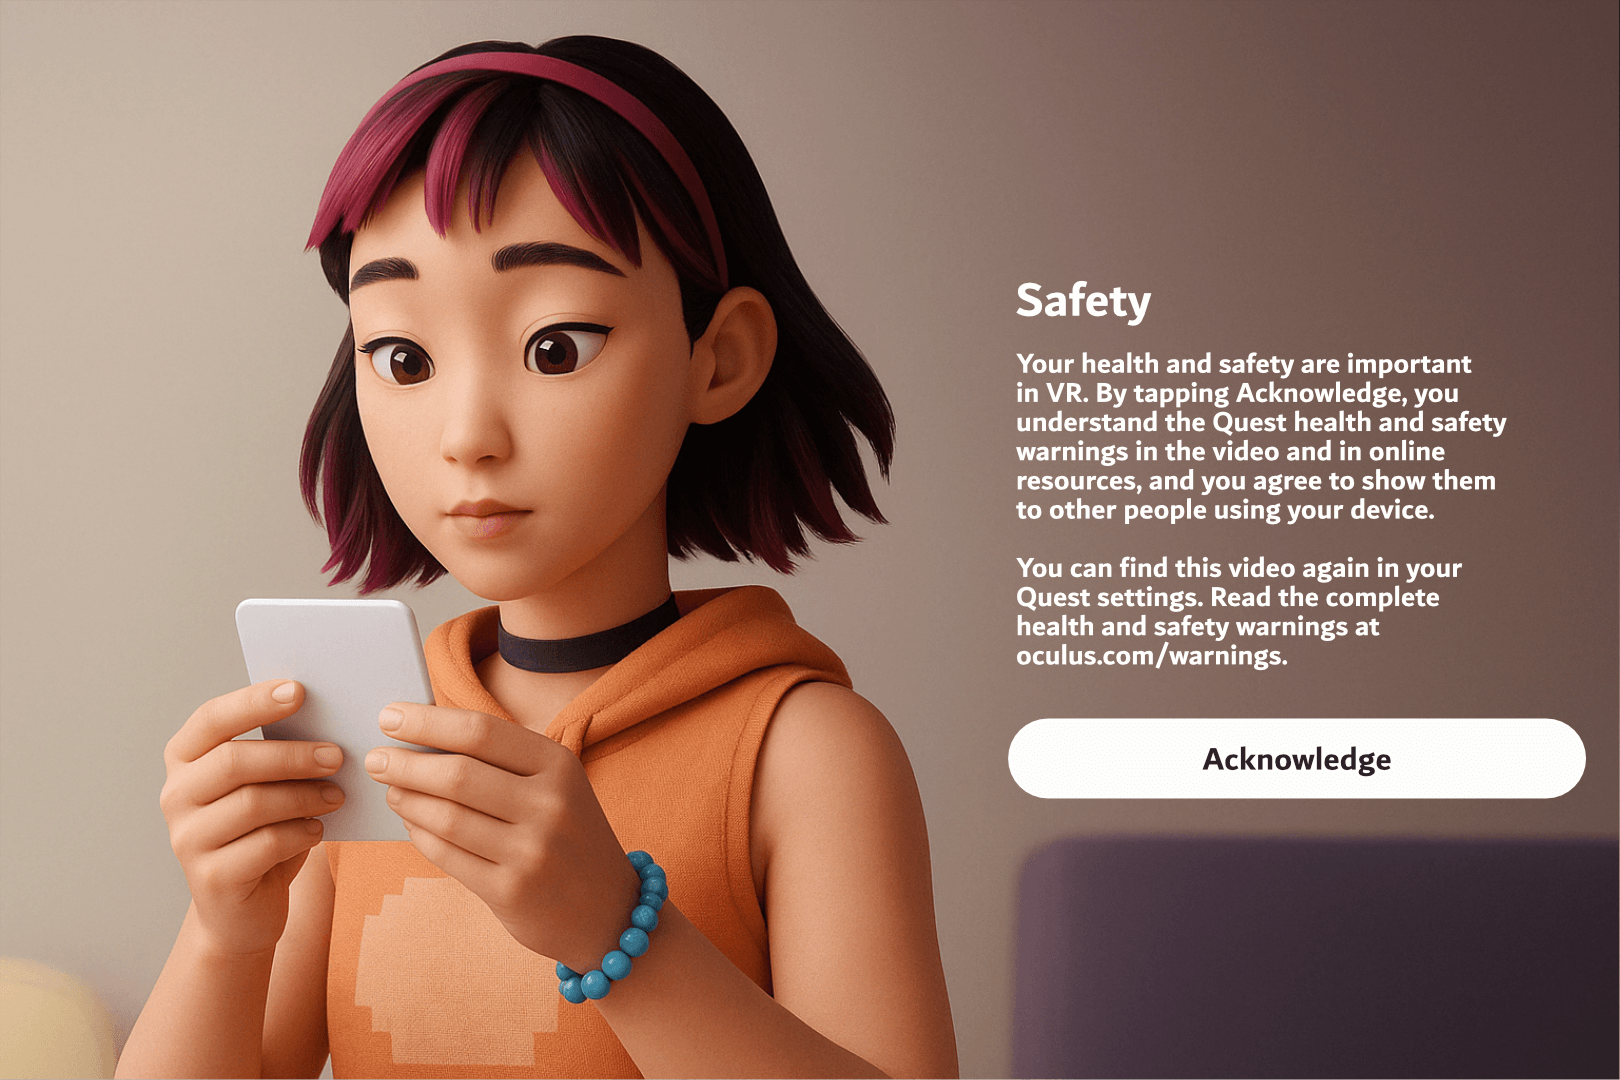](https://docs.nwxr.app/uploads/images/gallery/2025-04/safetyacknowledgement.png)
---
## **Section 3: Enroll the Headset with Horizon Managed Services (HMS)**
At this point, do not follow the instructions for pairing with the mobile app. Instead, proceed with enterprise configuration.
15. **Skip Mobile App Pairing – Select Organization Setup:**
- On the screen prompting you to connect using the Meta mobile app, click “Connect to your organization” instead.
[](https://docs.nwxr.app/uploads/images/gallery/2025-04/step1.png)
16. **Connect to Work/School Account:**
- The next screen is titled **“Connect your headset to your work or school”**.
- Click **Continue** to proceed.
[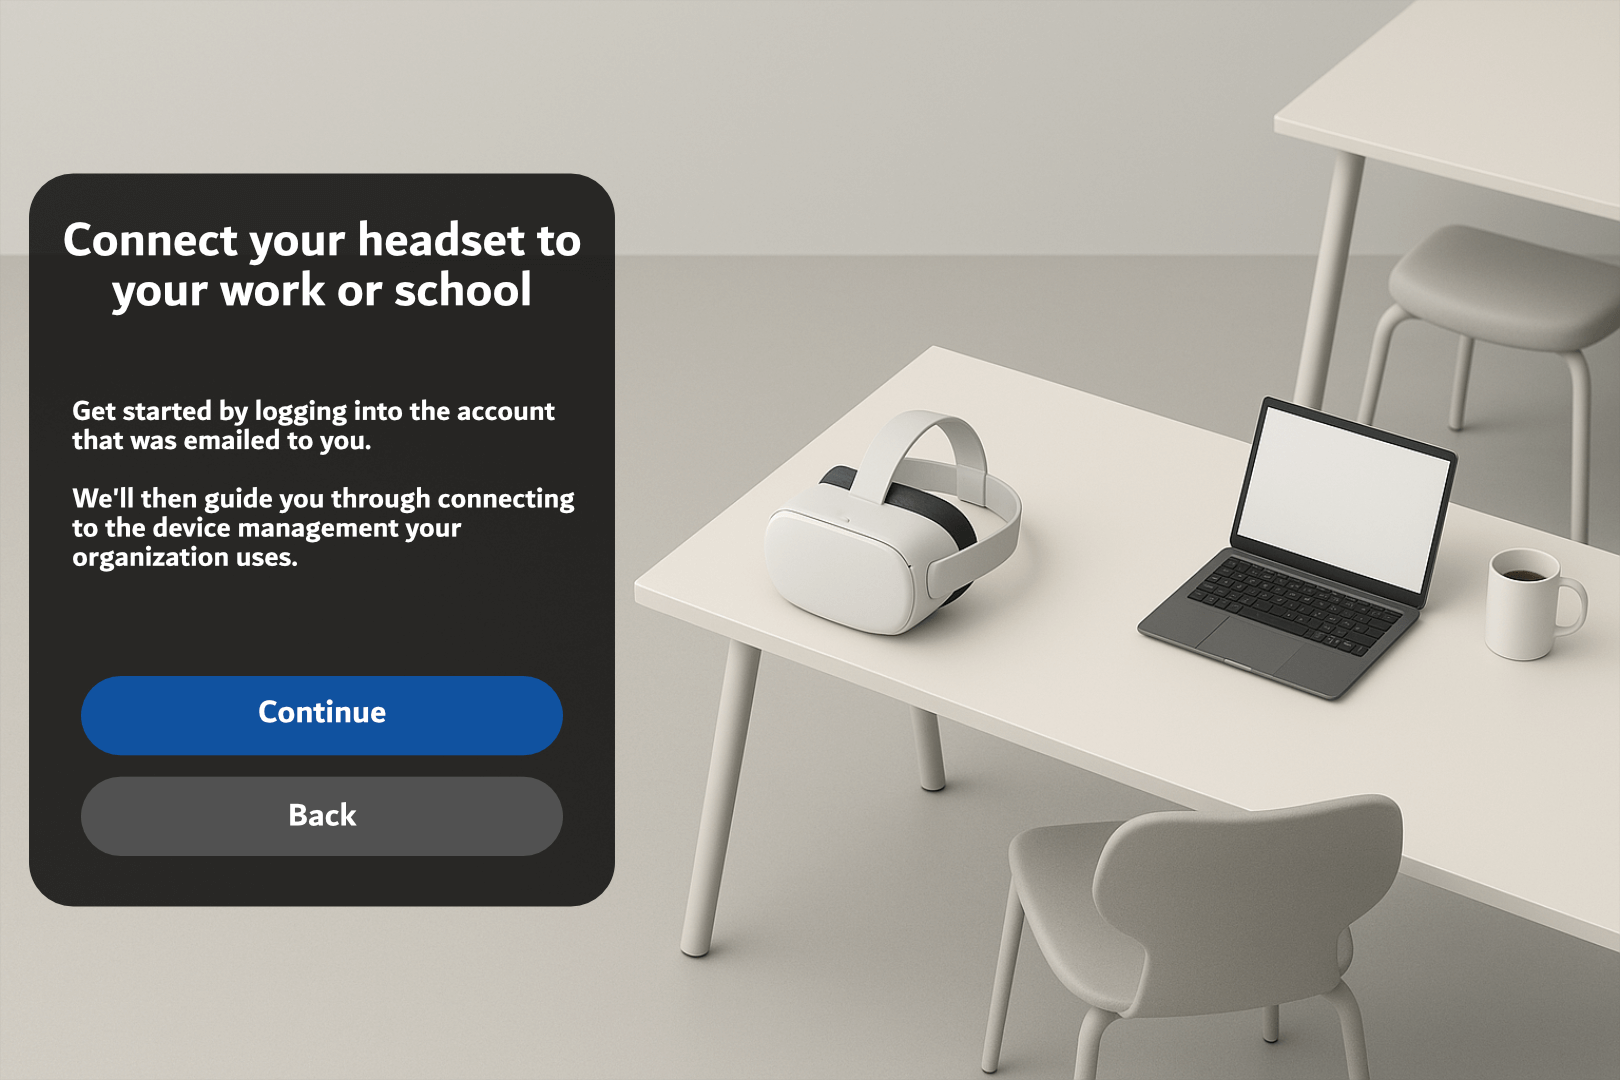](https://docs.nwxr.app/uploads/images/gallery/2025-04/step2.png)
17. **Enroll Using Work Meta Portal:**
- The headset will now display a unique **device code**.
- On a separate device (PC or smartphone), go to: [**work.meta.com/device**](https://work.meta.com/device)
- Log in with your organization's Meta admin credentials.
- Enter the device code to enroll the headset under your organization.
[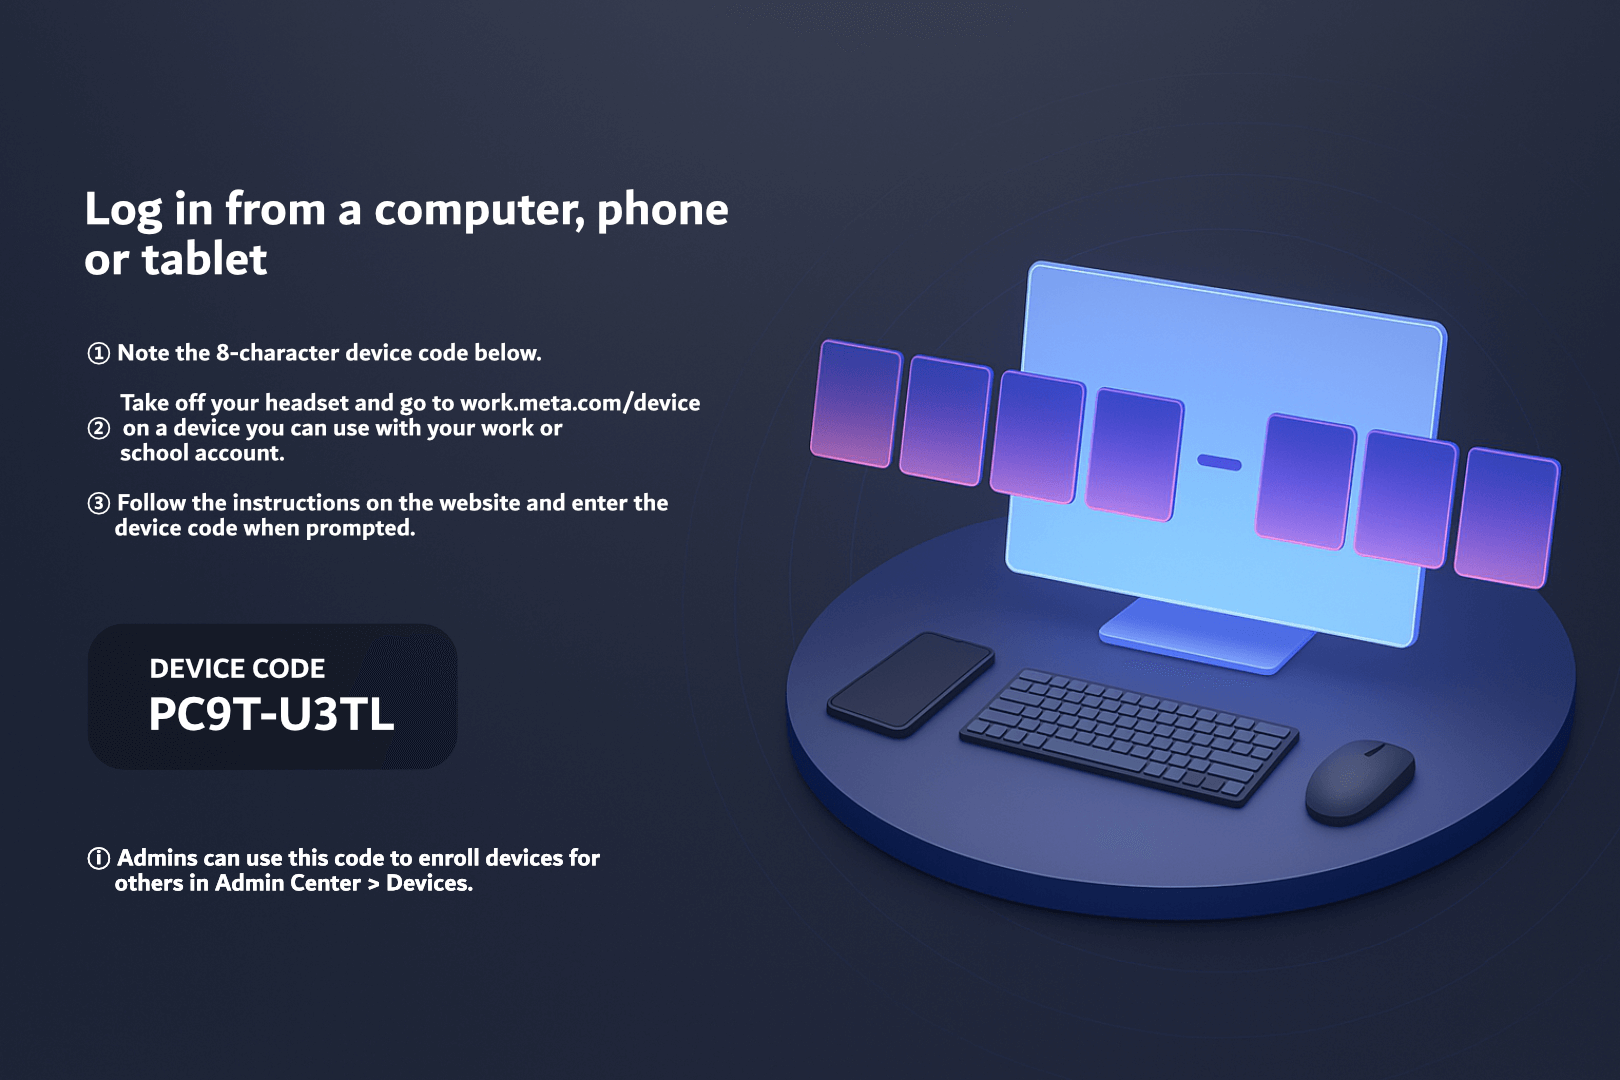](https://docs.nwxr.app/uploads/images/gallery/2025-04/yHqstep3.png)
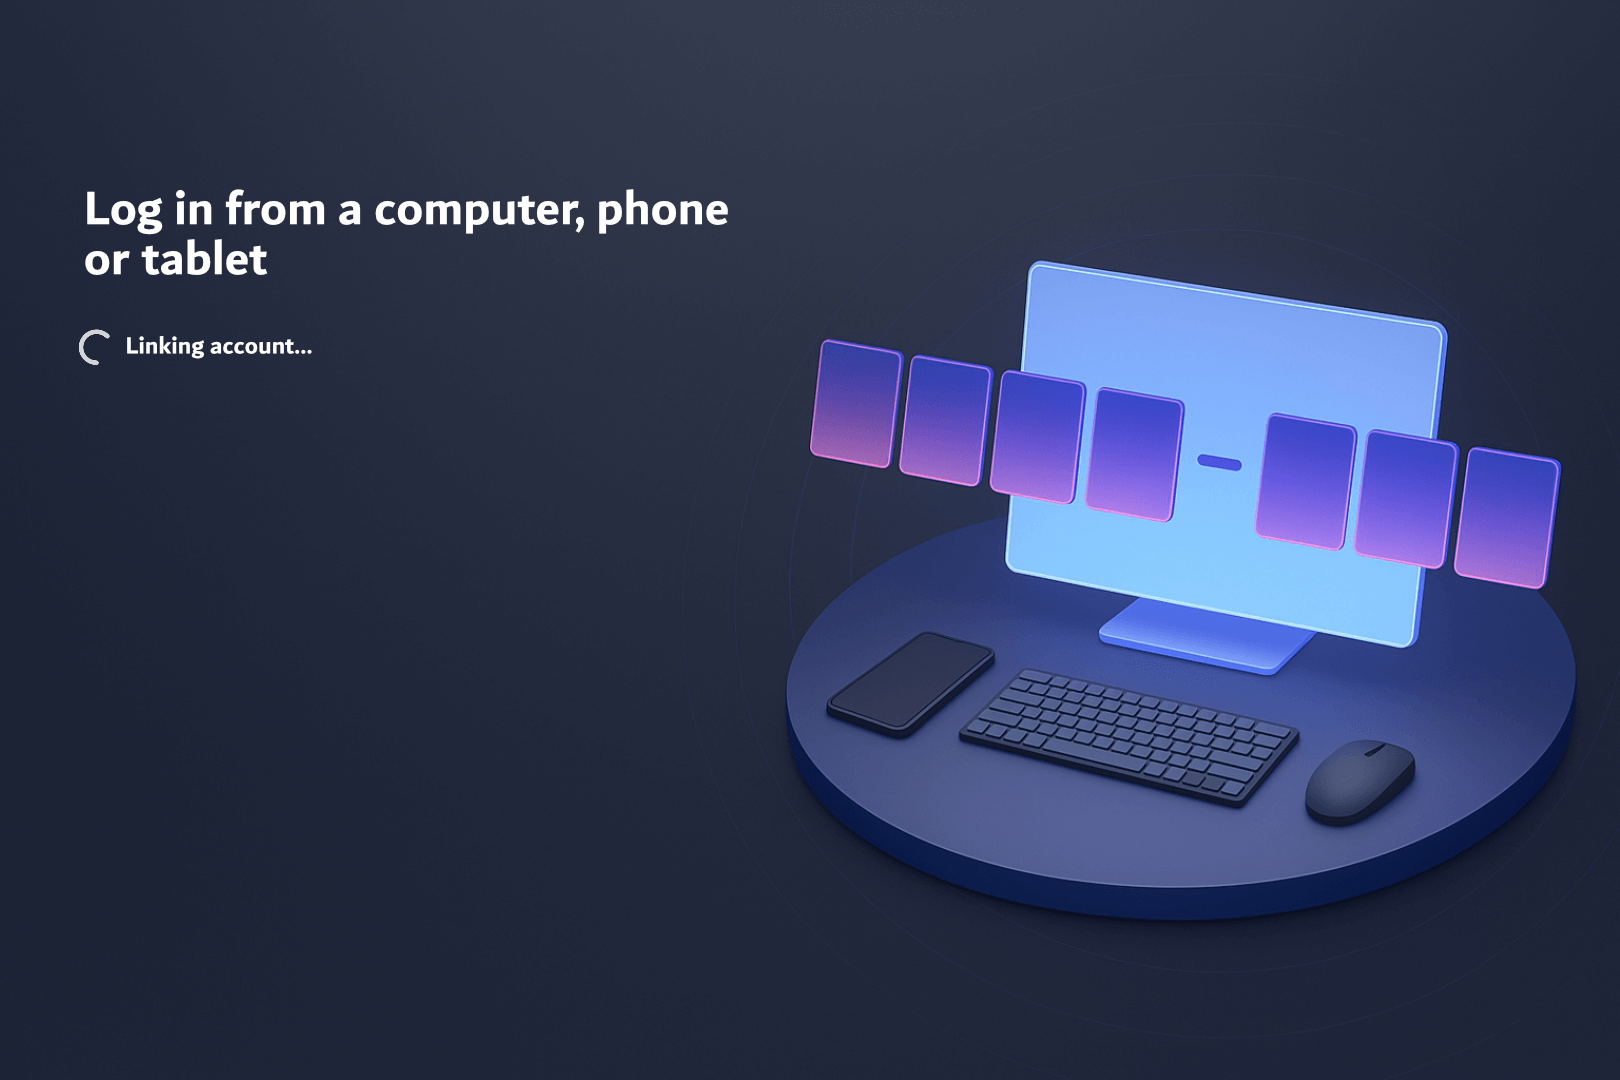
18. **Enrollment Confirmation:**
- You’ll see a **“Linking Account…”** message.
- Once successful, a confirmation will appear.
[](https://docs.nwxr.app/uploads/images/gallery/2025-04/RFpstep4.png)
[](https://docs.nwxr.app/uploads/images/gallery/2025-04/2p4step5.png)
19. **Install Required Components:**
- The headset will automatically begin **installing system components**.
- This process may take a few minutes.
[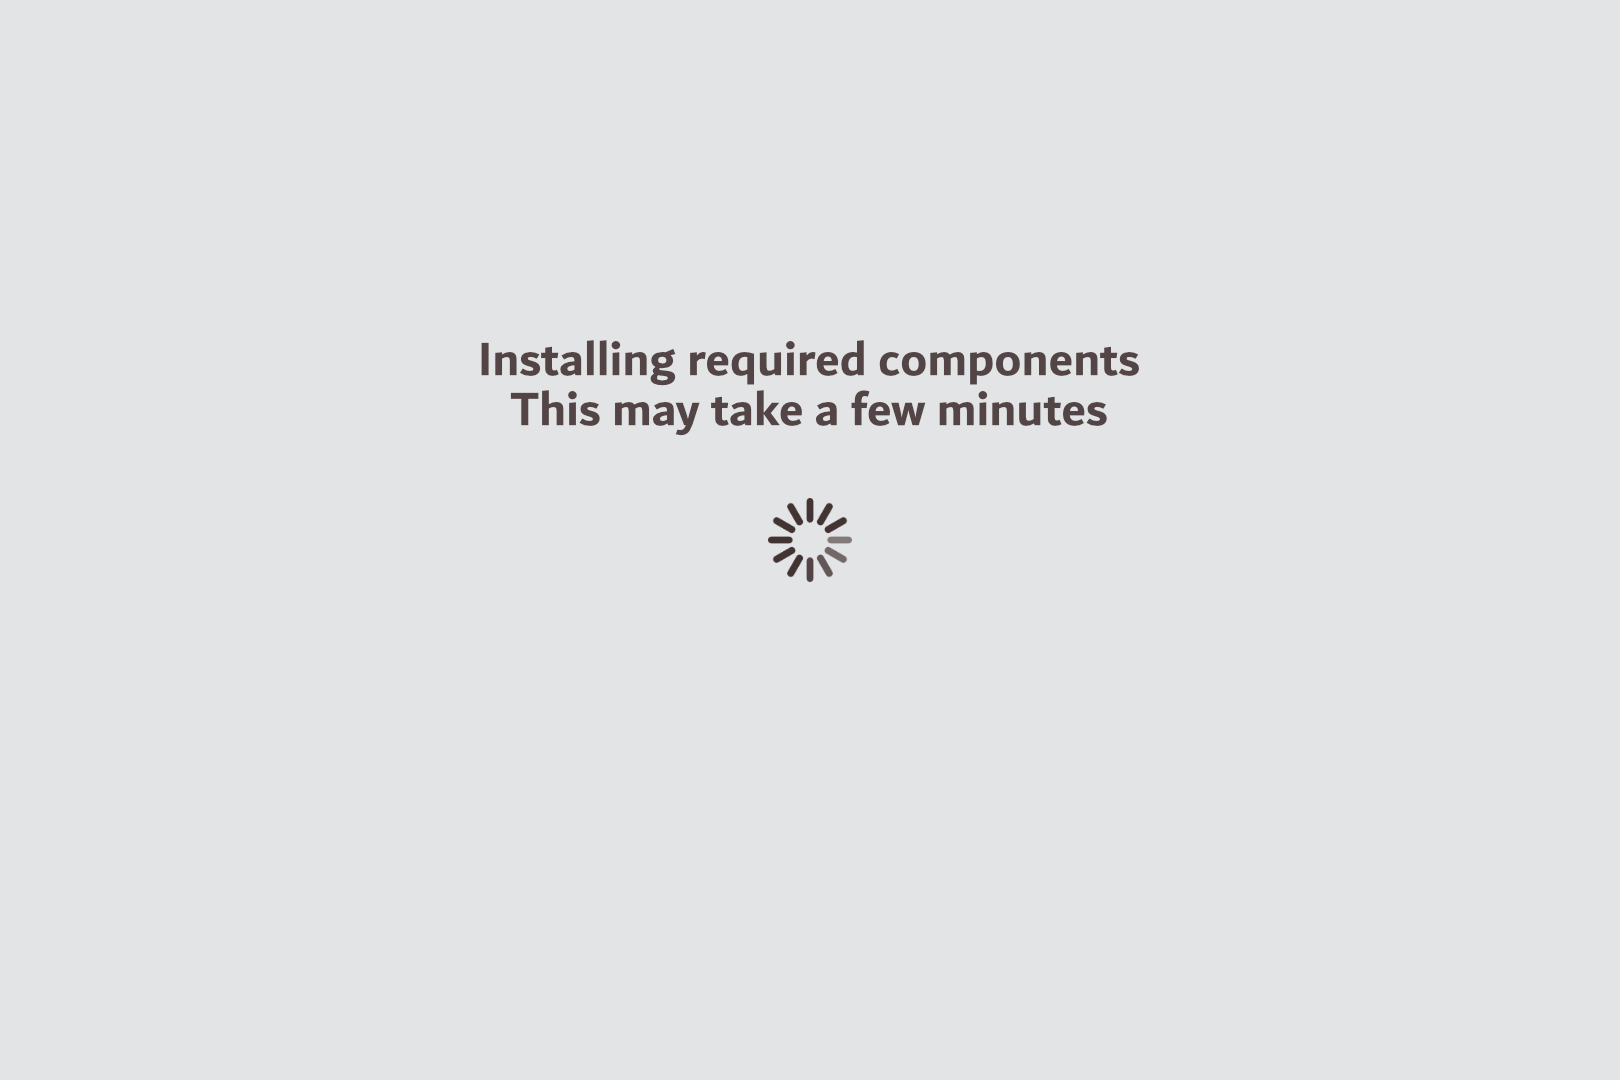](https://docs.nwxr.app/uploads/images/gallery/2025-04/step6.png)
20. **Connect to Device Management:**
- Press Continue when prompted.
[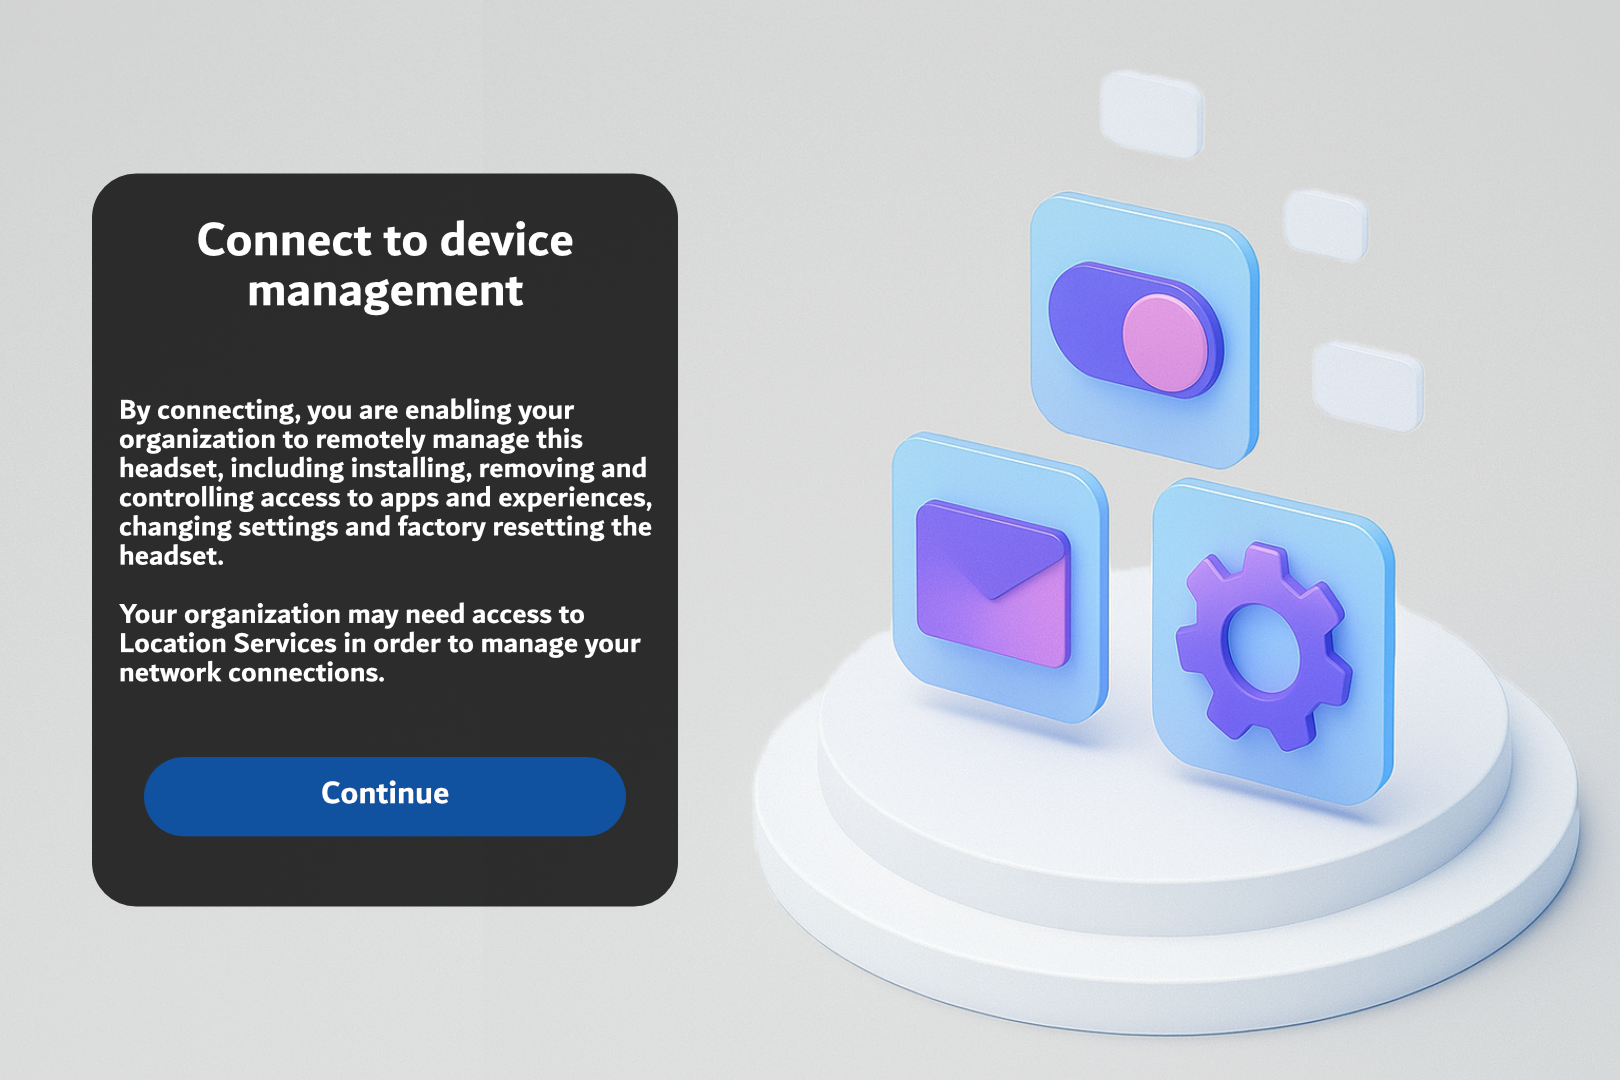](https://docs.nwxr.app/uploads/images/gallery/2025-04/step7.png)
21. **Configure Your Headset:**
- Click Continue to allow the system to auto-configure the device.
[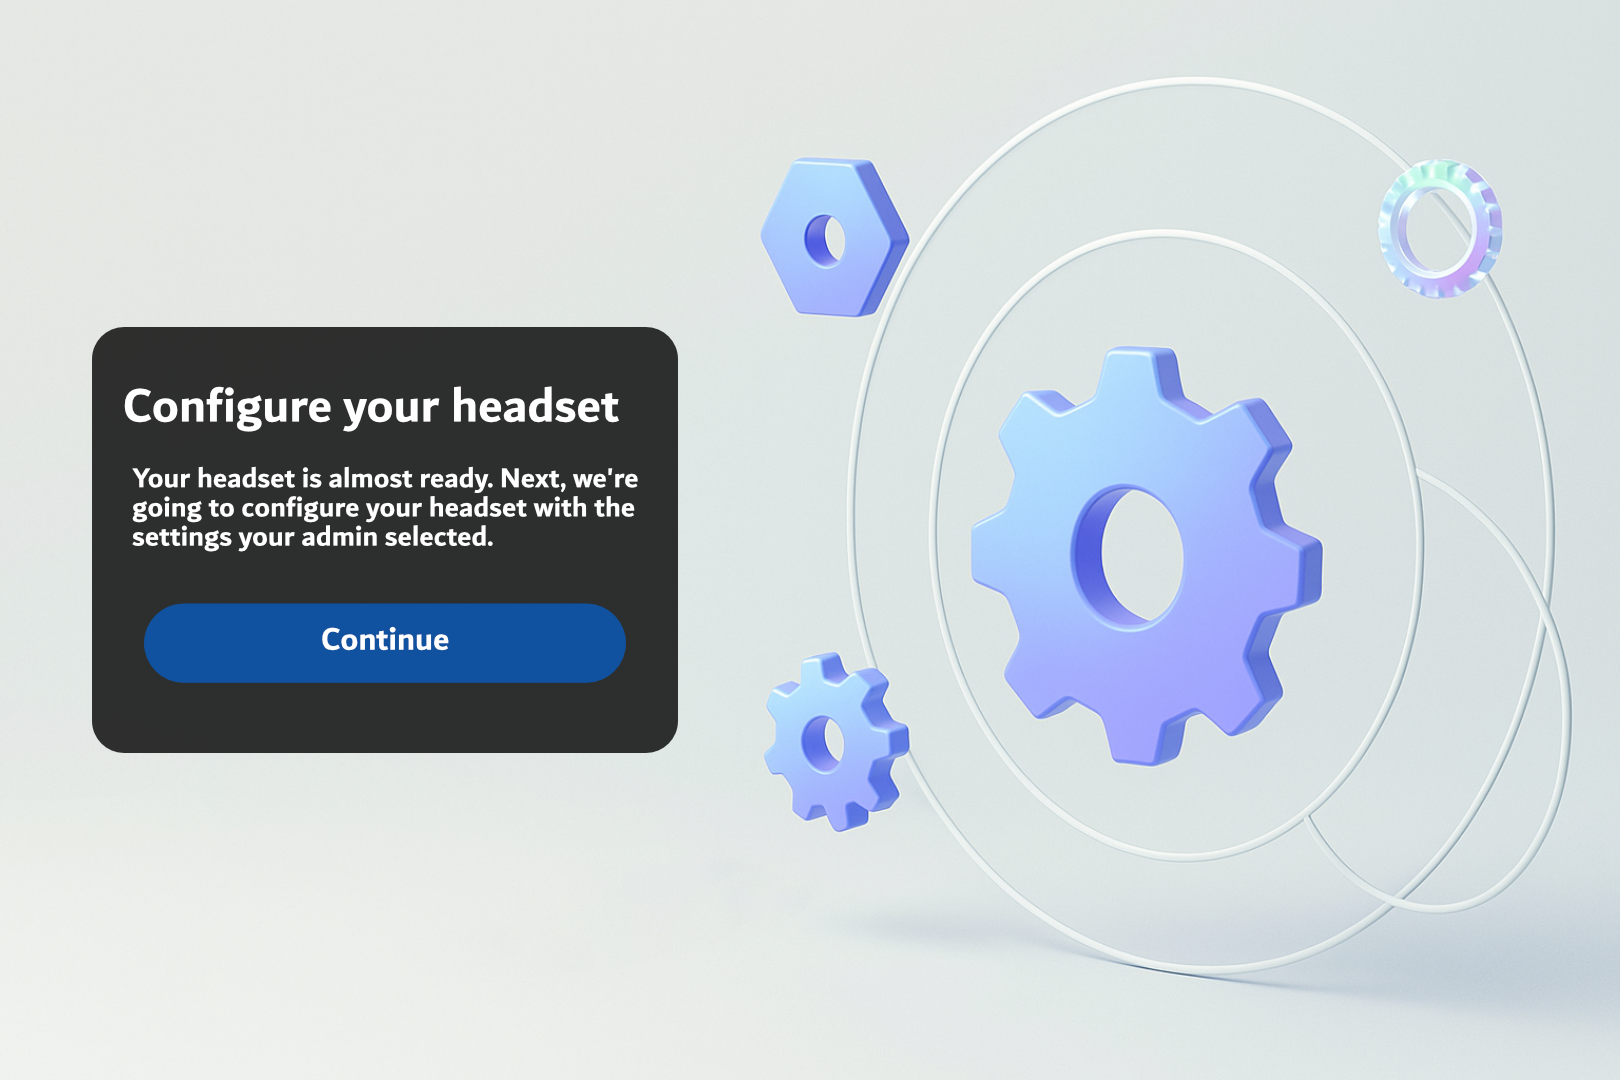](https://docs.nwxr.app/uploads/images/gallery/2025-04/step8.png)
22. **Wait for Configuration to Complete:**
- A progress screen will display. Wait until the process completes.
[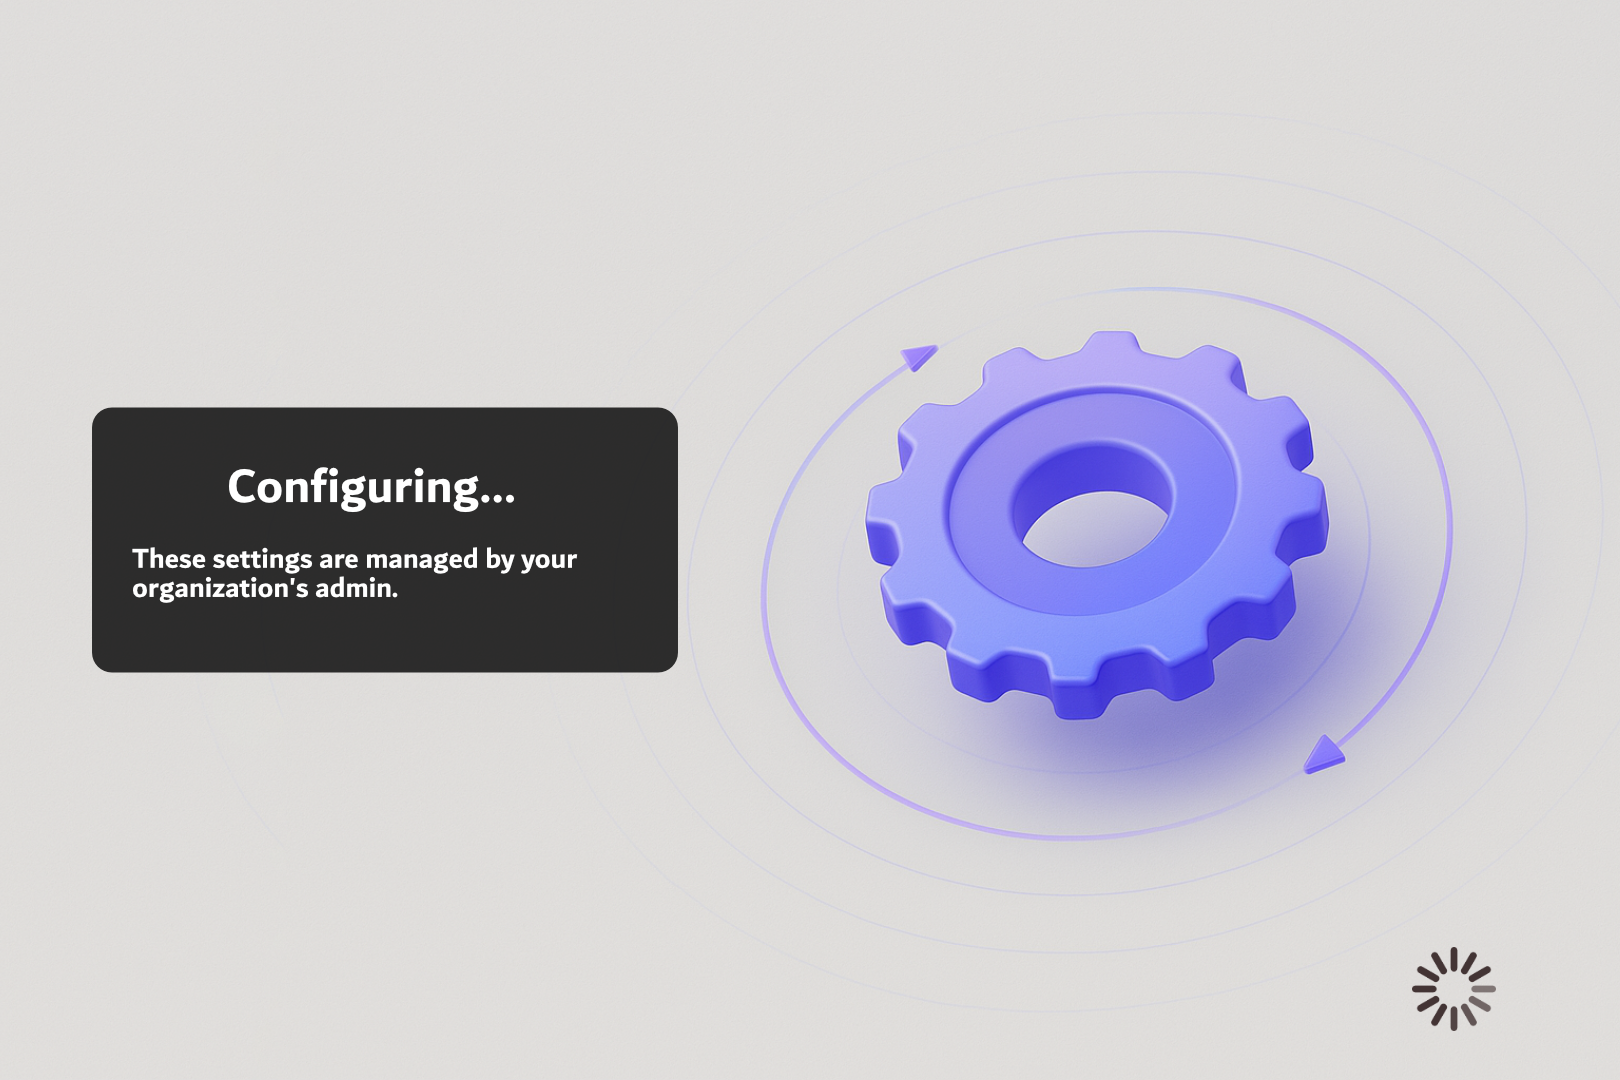](https://docs.nwxr.app/uploads/images/gallery/2025-04/step9.png)
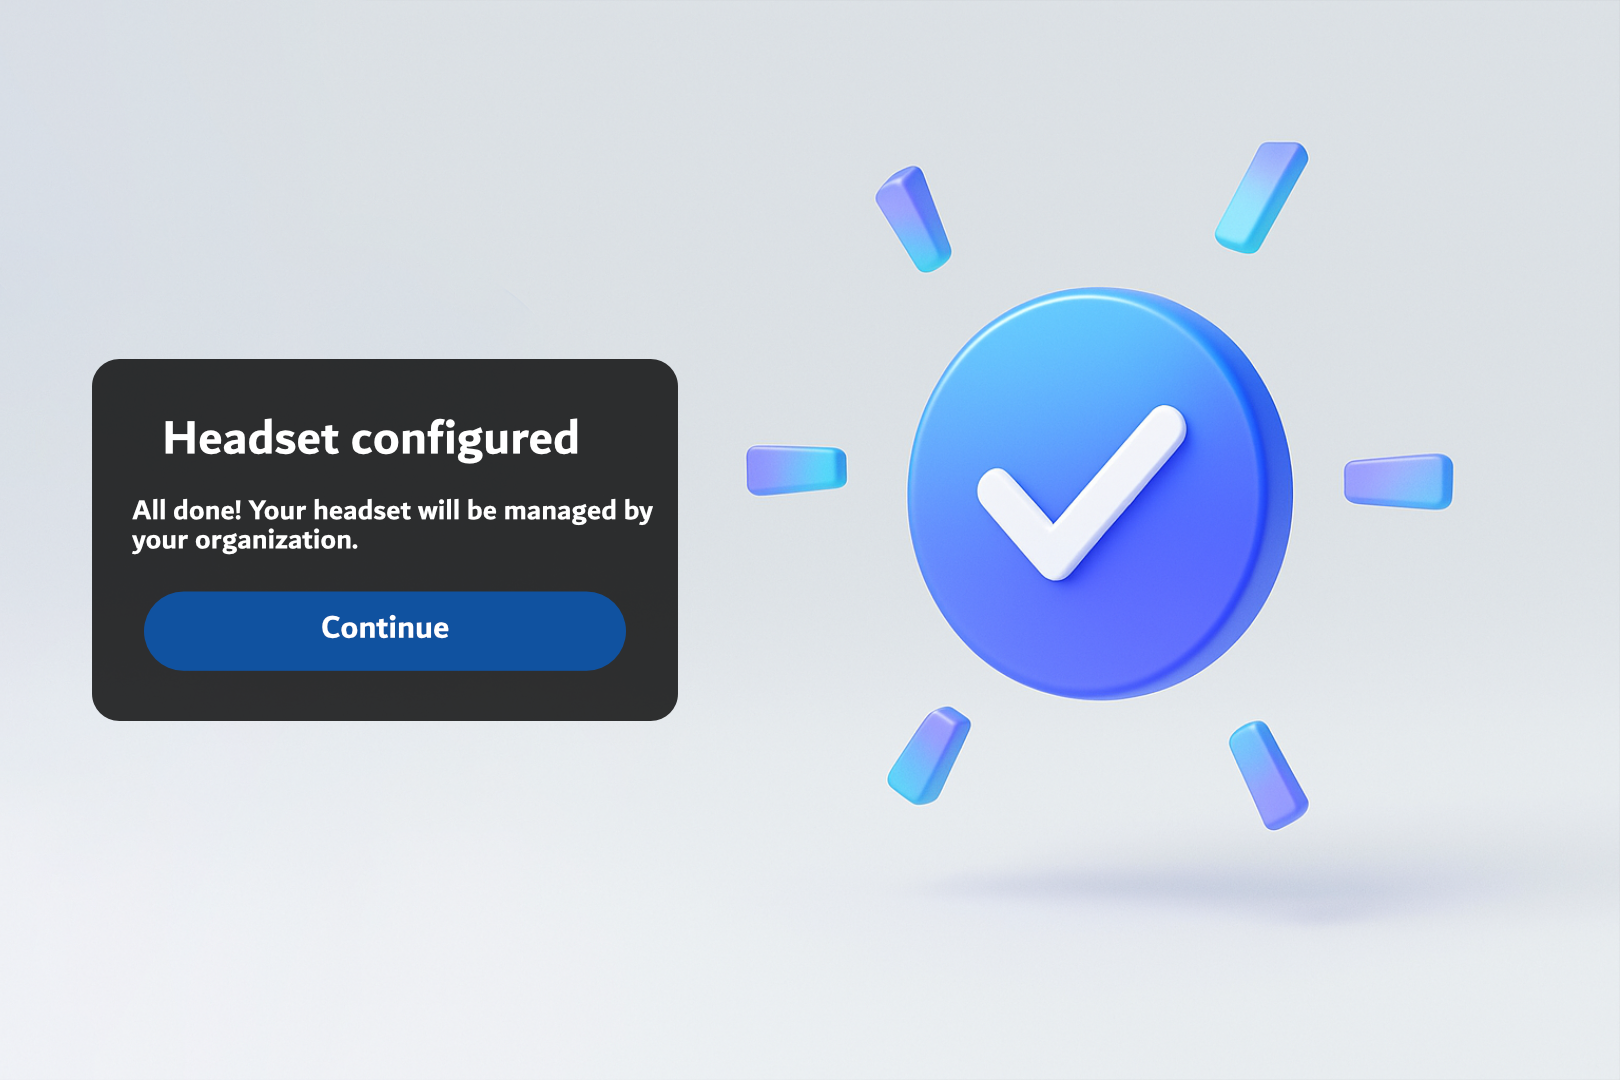
23. **Headset Configured Confirmation:**
- Once done, press Continue on the “Headset Configured” screen.
[](https://docs.nwxr.app/uploads/images/gallery/2025-04/step10.png)
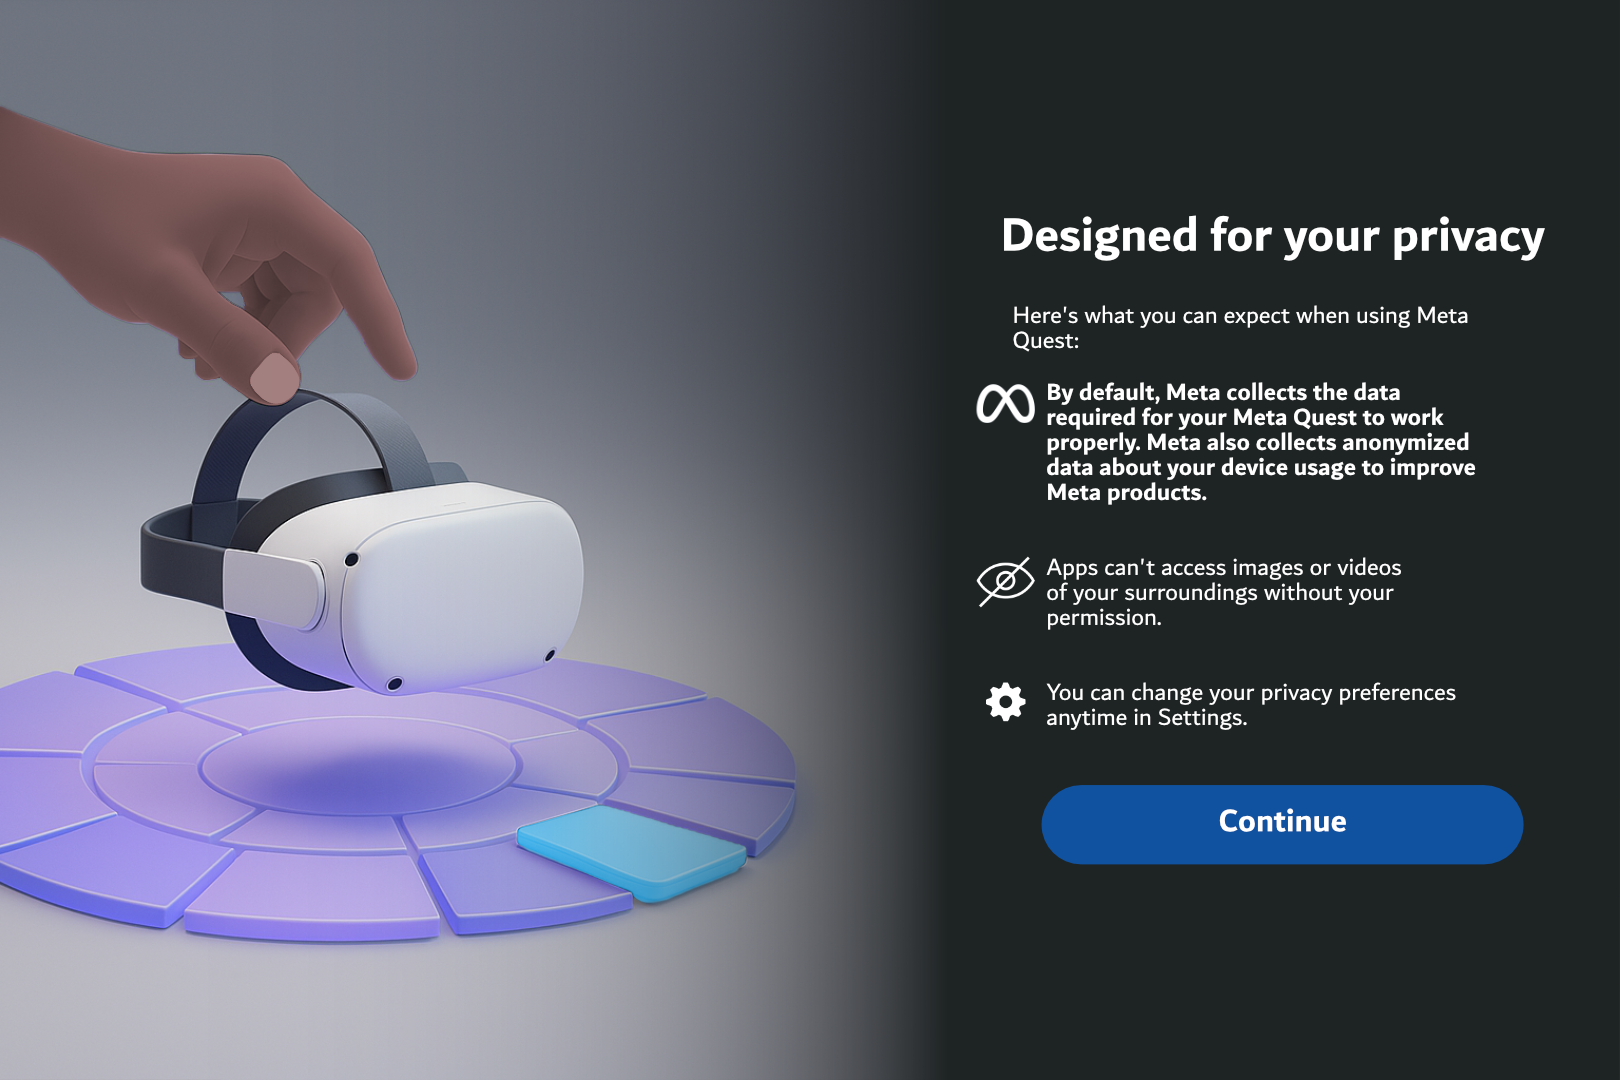
24. **Privacy Notice:**
- Read the **“Designed for your privacy”** message and click **Continue**.
[](https://docs.nwxr.app/uploads/images/gallery/2025-04/step11.png)
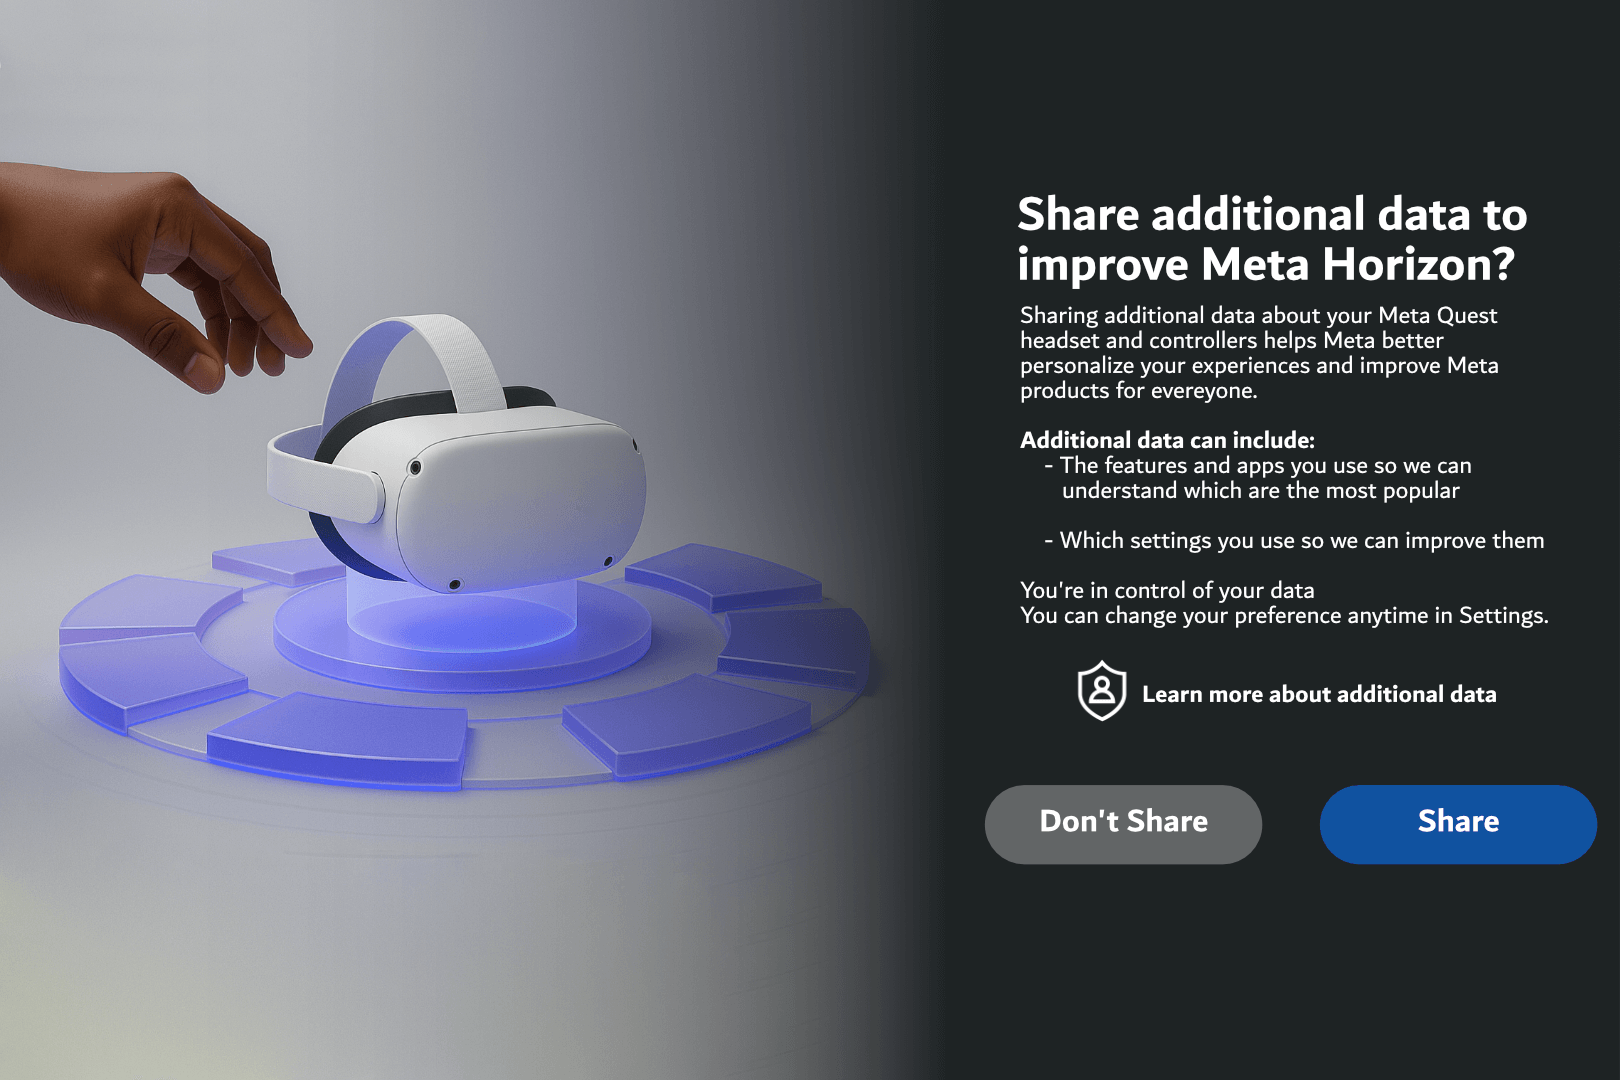
25. **Data Sharing Preferences:**
- Choose whether to share anonymized usage data with Meta.
- For enterprise devices, we recommend selecting **“Don’t Share”**, but this is optional.
[](https://docs.nwxr.app/uploads/images/gallery/2025-04/13wstep13.png)
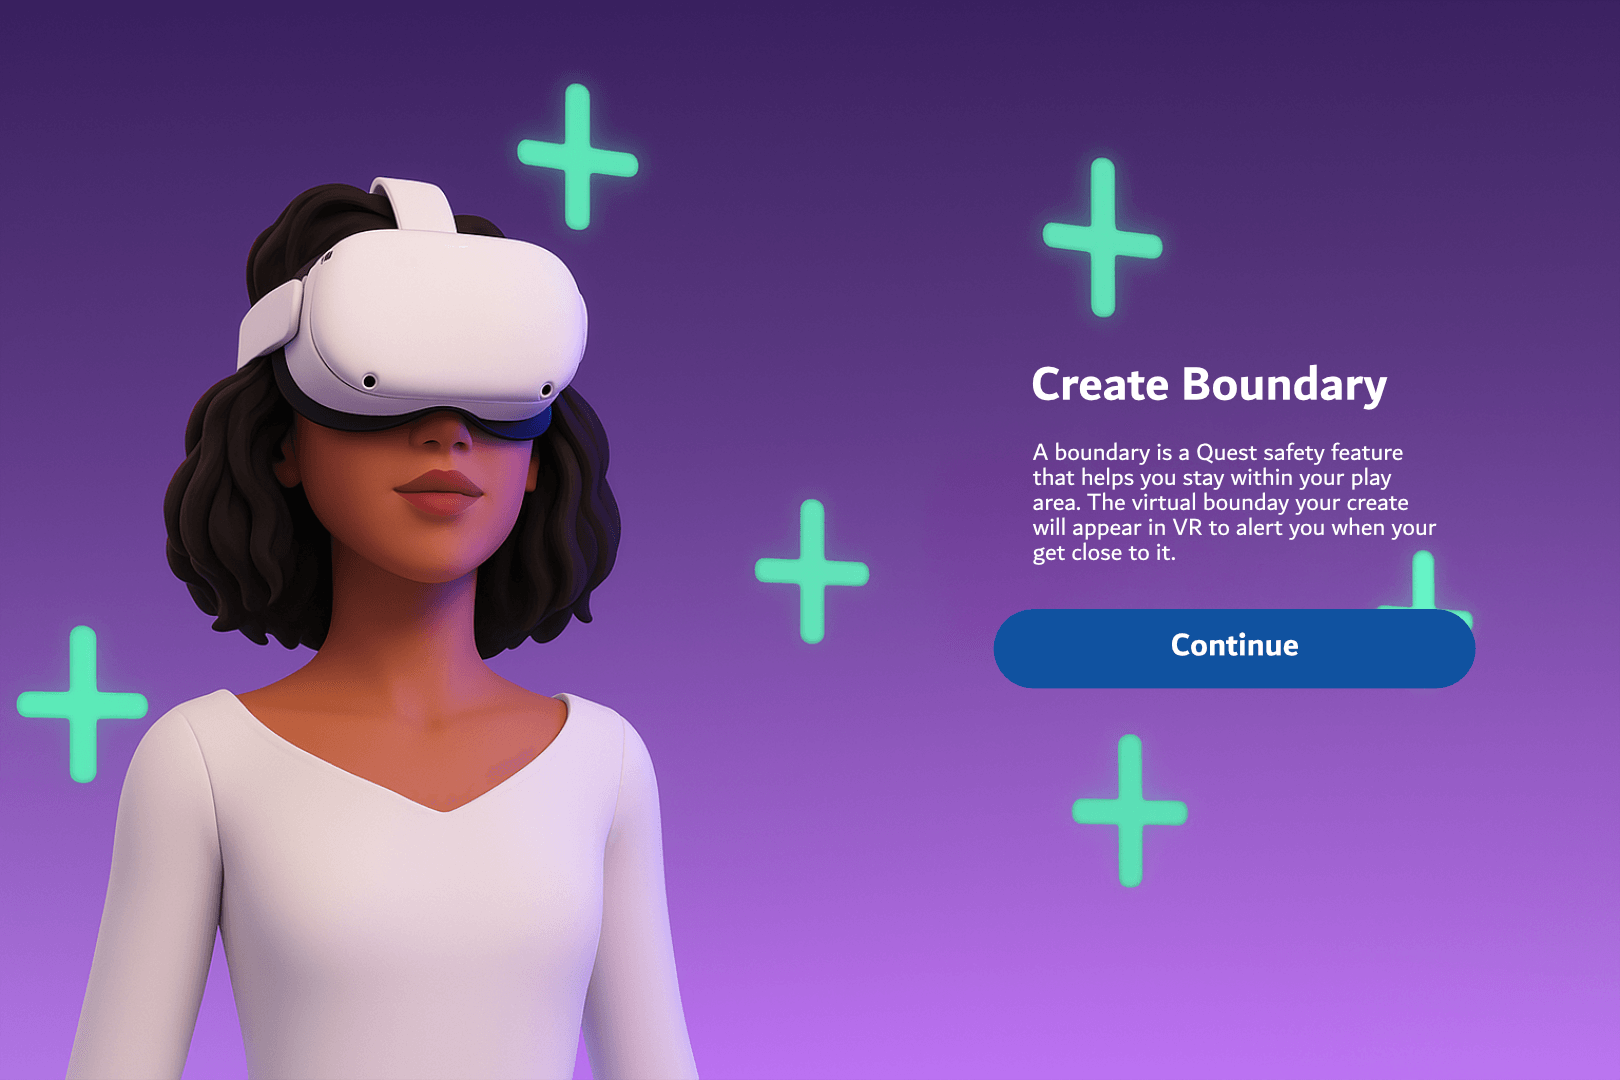
26. **Create a Guardian Boundary:**
- Follow on-screen instructions to map your play space.
- Choose Stationary Boundary if seated, or Roomscale for standing/walking setups.
[](https://docs.nwxr.app/uploads/images/gallery/2025-04/step14.png)
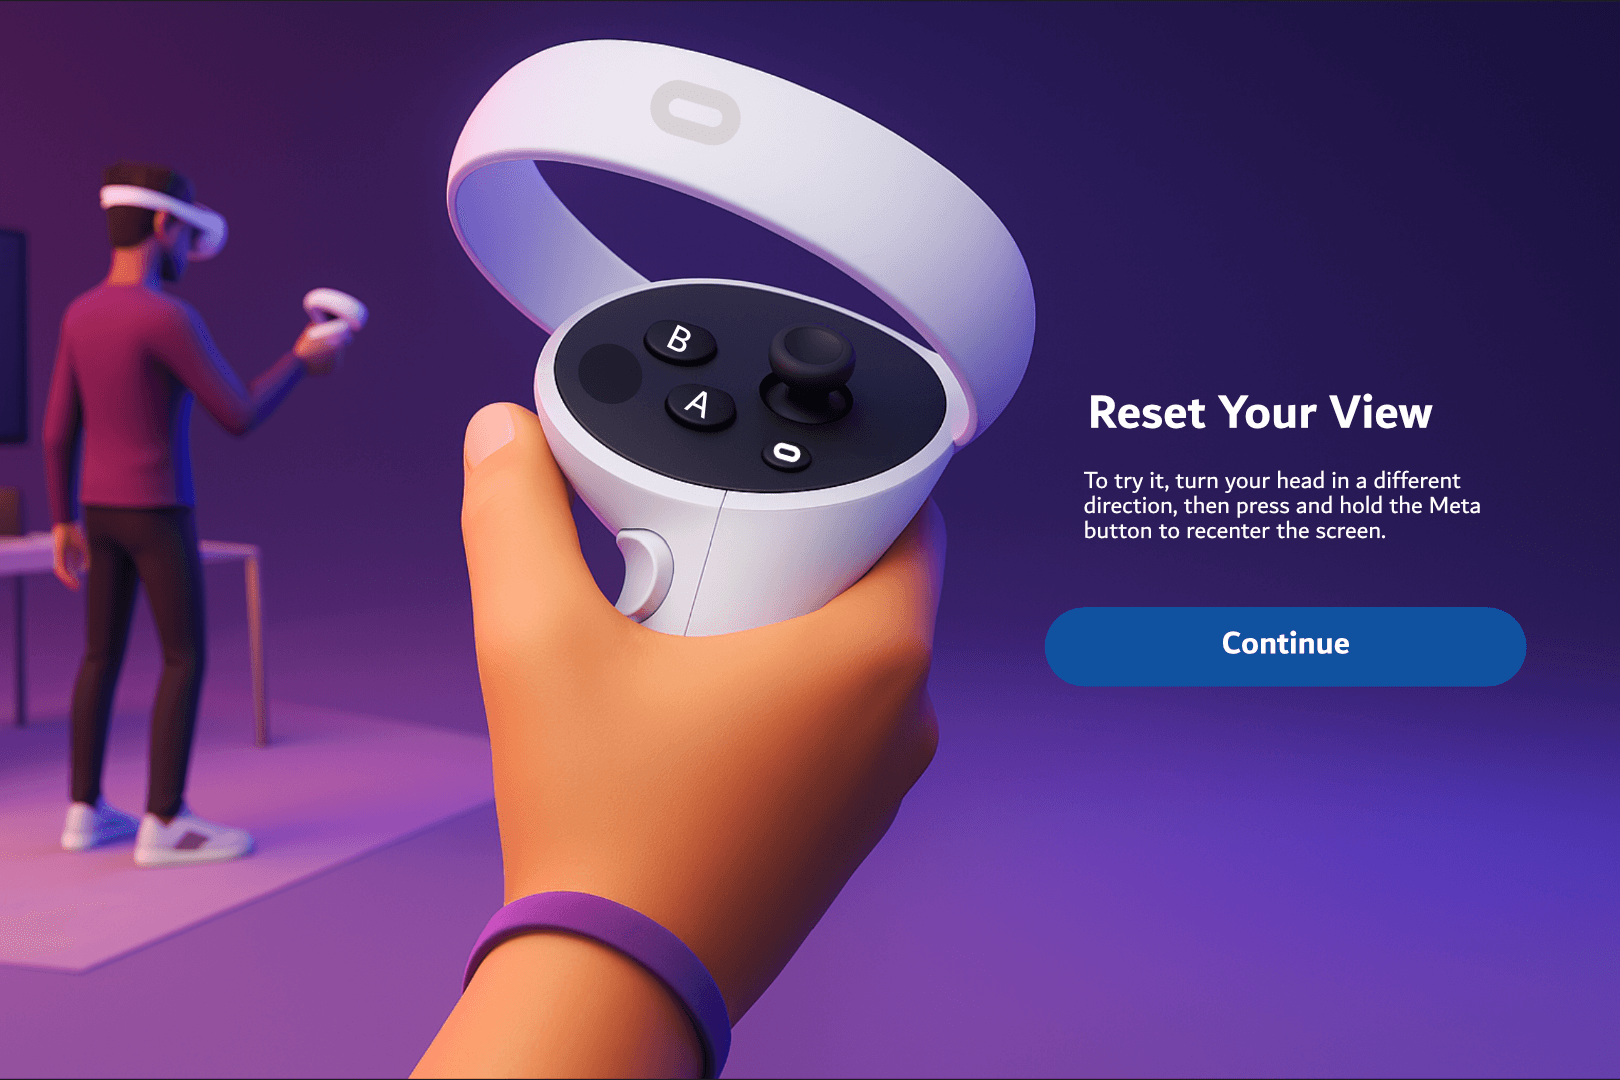
27. **Learn to Reset View:**
- You’ll be shown how to **recenter your view** by holding the **Meta button** on the right controller. Press **Continue**.
[](https://docs.nwxr.app/uploads/images/gallery/2025-04/step15.png)
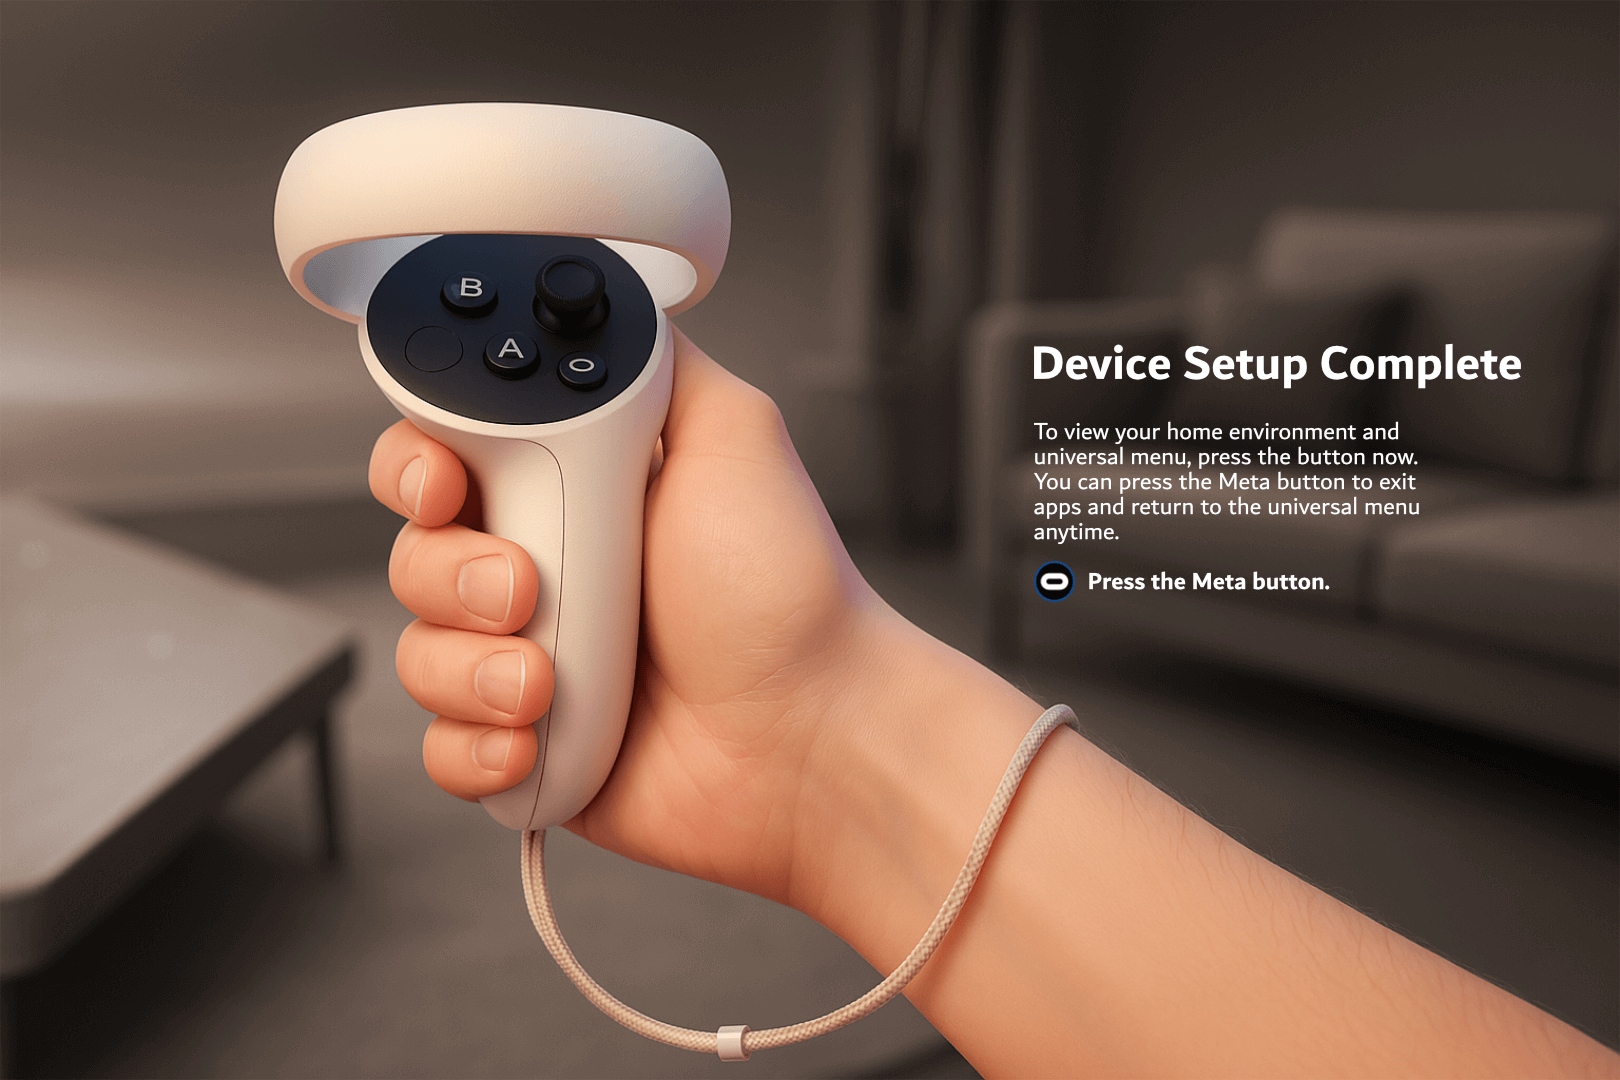
28. **Complete Setup:**
- The final screen will show **“Device Setup Complete.”**
- Press the **Meta button** to enter the Home environment.
[](https://docs.nwxr.app/uploads/images/gallery/2025-04/step17.png)
---
## **Section 4: Accessing Next World Software on Your HMS Headset**
29. From the **Home screen**, open the **Library**.
30. Navigate to the **“For Work”** tab to find the **Next World** app.
31. The app will launch in **Demo Mode** by default.
32. **Enroll Device in Next World Platform:**
- Log in to the **Next World Platform.**
- Register the device using the displayed Device ID under your organization's account.
- This will unlock access to all assigned content and features associated with your subscription.
# Whitelisting Domains Required By Next World Services
For networks that have strict policies which may prevent access to certain websites or domains that are required for Next World's services to function, you may need to contact your IT team to whitelist the following URLs and hostnames depending on your network's configuration and restrictions. The below are required for our services to function, including to download necessary apps and components, and to sync events to our LMS:
#### **Primary URL Pattern for Next World-specific Downloads**
Our services run through AWS (Amazon Web Services), and downloads occur via AWS S3. The primary pattern that should be whitelisted is: [https://app.nextworldenterprises.com/\*](https://app.nextworldenterprises.com/*)
**Examples of specific download locations that are handled by the above whitelisted URL pattern**
• Next World's "Agent" Android application: https://app.nextworldenterprises.com/nwagent/nwagent.apk
• Experience download example: https://app.nextworldenterprises.com/packs/com-nextworld-manualhandling.2.7.1.intl.nwpz
**Alternative S3 URLs**
Since these files are hosted in S3 buckets, the actual Amazon AWS S3 links would replace "app.nextworldenterprises.com" with "app.nextworldenterprises.com.s3.amazonaws.com". However, allowing traffic from "app.nextworldenterprises.com/\*" should work fine for your needs.
#### **Bodyswaps Soft-Skills Library**
If your deployment includes Bodyswaps modules delivered through our Home library, please also whitelist the domains listed in Bodyswaps’ networking guide: [https://support.bodyswaps.co/knowledge/minimum-hardware-requirements](https://support.bodyswaps.co/knowledge/minimum-hardware-requirements)
Add those domains (and any ports they specify) alongside the Next World entries above.
#### **Device Firmware Updates**
For **Pico** devices (Such as "Pico Neo 3 Pro" and "Pico 4 Enterprise"), the firmware is downloaded from the [static.us-pui.picovr.com/\*](https://static.us-pui.picovr.com/* "https://static.us-pui.picovr.com/*") domain.For **Meta** devices (Such as "Meta Quest 2" or "Meta Quest 3"), the firmware is downloaded from the [scontent.oculuscdn.com/\*](https://scontent.oculuscdn.com/*) domain.